A Sunday of Pizzas to please my loves - Step by step recipe || Domingo de Pizzas para complacer a mis amores - Receta paso a paso
Welcome Dear Food Lovers
Bienvenidos Queridos Amantes de la buena comida
Disfrutar de una rica comida en familia es lo máximo, y aunque mis niñas, mi esposo y yo siempre comemos justos, de lunes a viernes, no tenemos mucho tiempo, ni para realizar comidas muy elaboradas y mucho menos para disfrutar de ella con calmadamente. Siempre andamos en un corre, corre, entre las actividades escolares y extra académicas de las niñas y nuestros trabajos, el tiempo libre es poco.
Enjoying a nice meal as a family is the ultimate, and although my girls, my husband and I always eat just right, Monday through Friday, we don't have much time to make elaborate meals, much less to enjoy it calmly. We are always on the go, between the girls' school and extracurricular activities and our jobs, free time is scarce.


Ahora los fines de semanas es otra cosa, siempre tratamos de preparar comidas especiales, probar nuevas recetas o simplemente complacer a las niñas con sus comidas favoritas. Normalmente, yo soy una especie de sub-chef en todas esas aventuras culinarias, mi esposo es el chef por excelencia en casa, excepto que se trate de una sopa, en esos casos, yo llevo la batuta en la cocina.
Now on the weekends it's a different story, we always try to prepare special meals, try new recipes or just please the girls with their favorite foods. Normally, I am sort of the sous chef in all these culinary adventures, my husband is the chef par excellence at home, except when it comes to soup, in those cases, I take the lead in the kitchen.
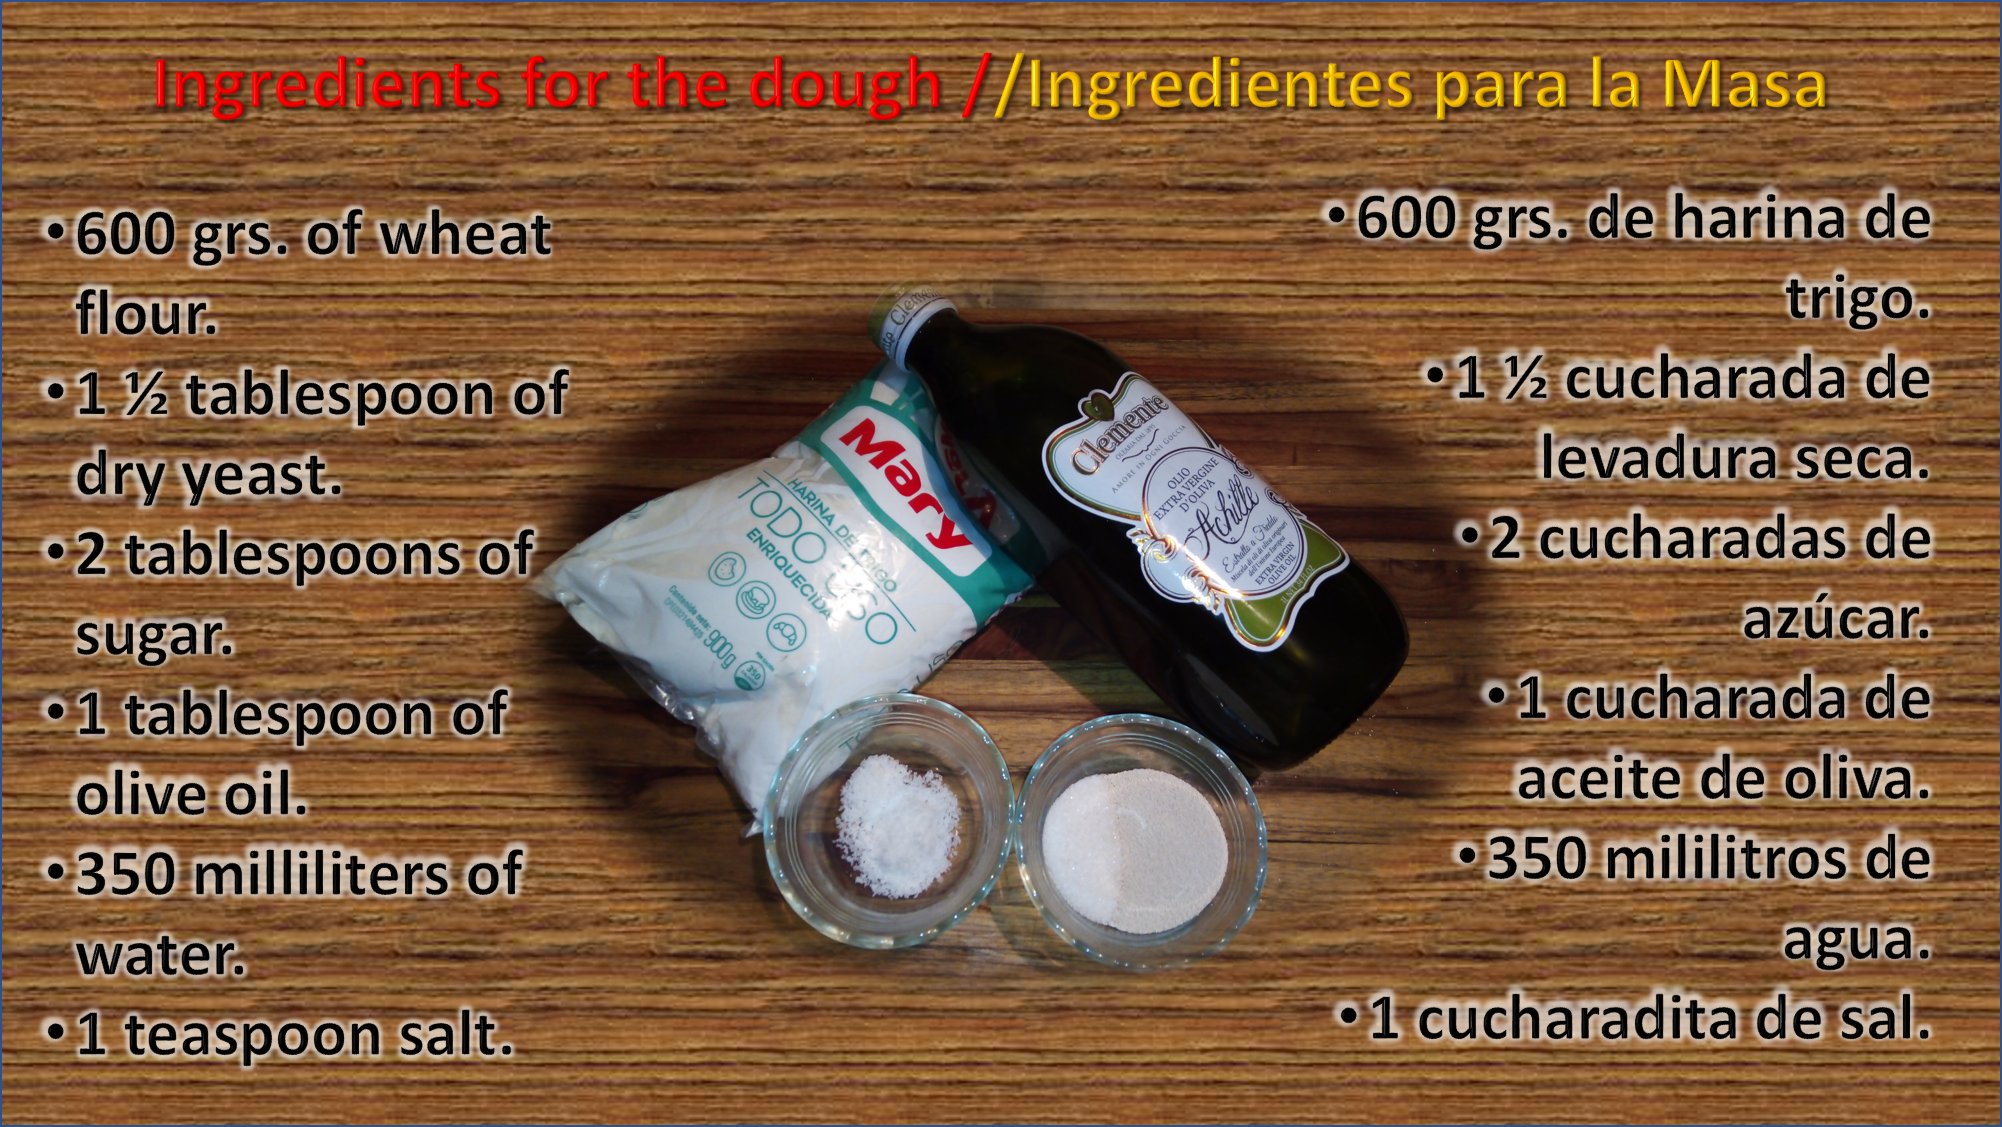
Sin embargo, este domingo pasado las niñas querían de almuerzo pizza y bueno, mi esposo es el experto en pizzas, pero, él no podía hacerlas, porque tuvo que salir durante la mañana a un compromiso. Así que, me toco a mi prepararlas, claro, mi esposito me oriento, pero a distancia, jajaja, porque regreso casi a la hora de almorzar. Fue una pizza muy sencilla, de pepperoni y maíz nada complicado, en la imagen de arriba, pueden ver los ingredientes que utilicé para preparar la masa, que es lo que primero les mostraré.
However, this past Sunday the girls wanted pizza for lunch and well, my husband is the pizza expert, but he couldn't make it, because he had to go out in the morning for an engagement. So, it was my turn to prepare them, of course, my husband guided me, but from a distance, hahaha, because he came back almost at lunch time. It was a very simple pizza, pepperoni and corn, nothing complicated, in the image above, you can see the ingredients I used to prepare the dough, which is what I will show you first.
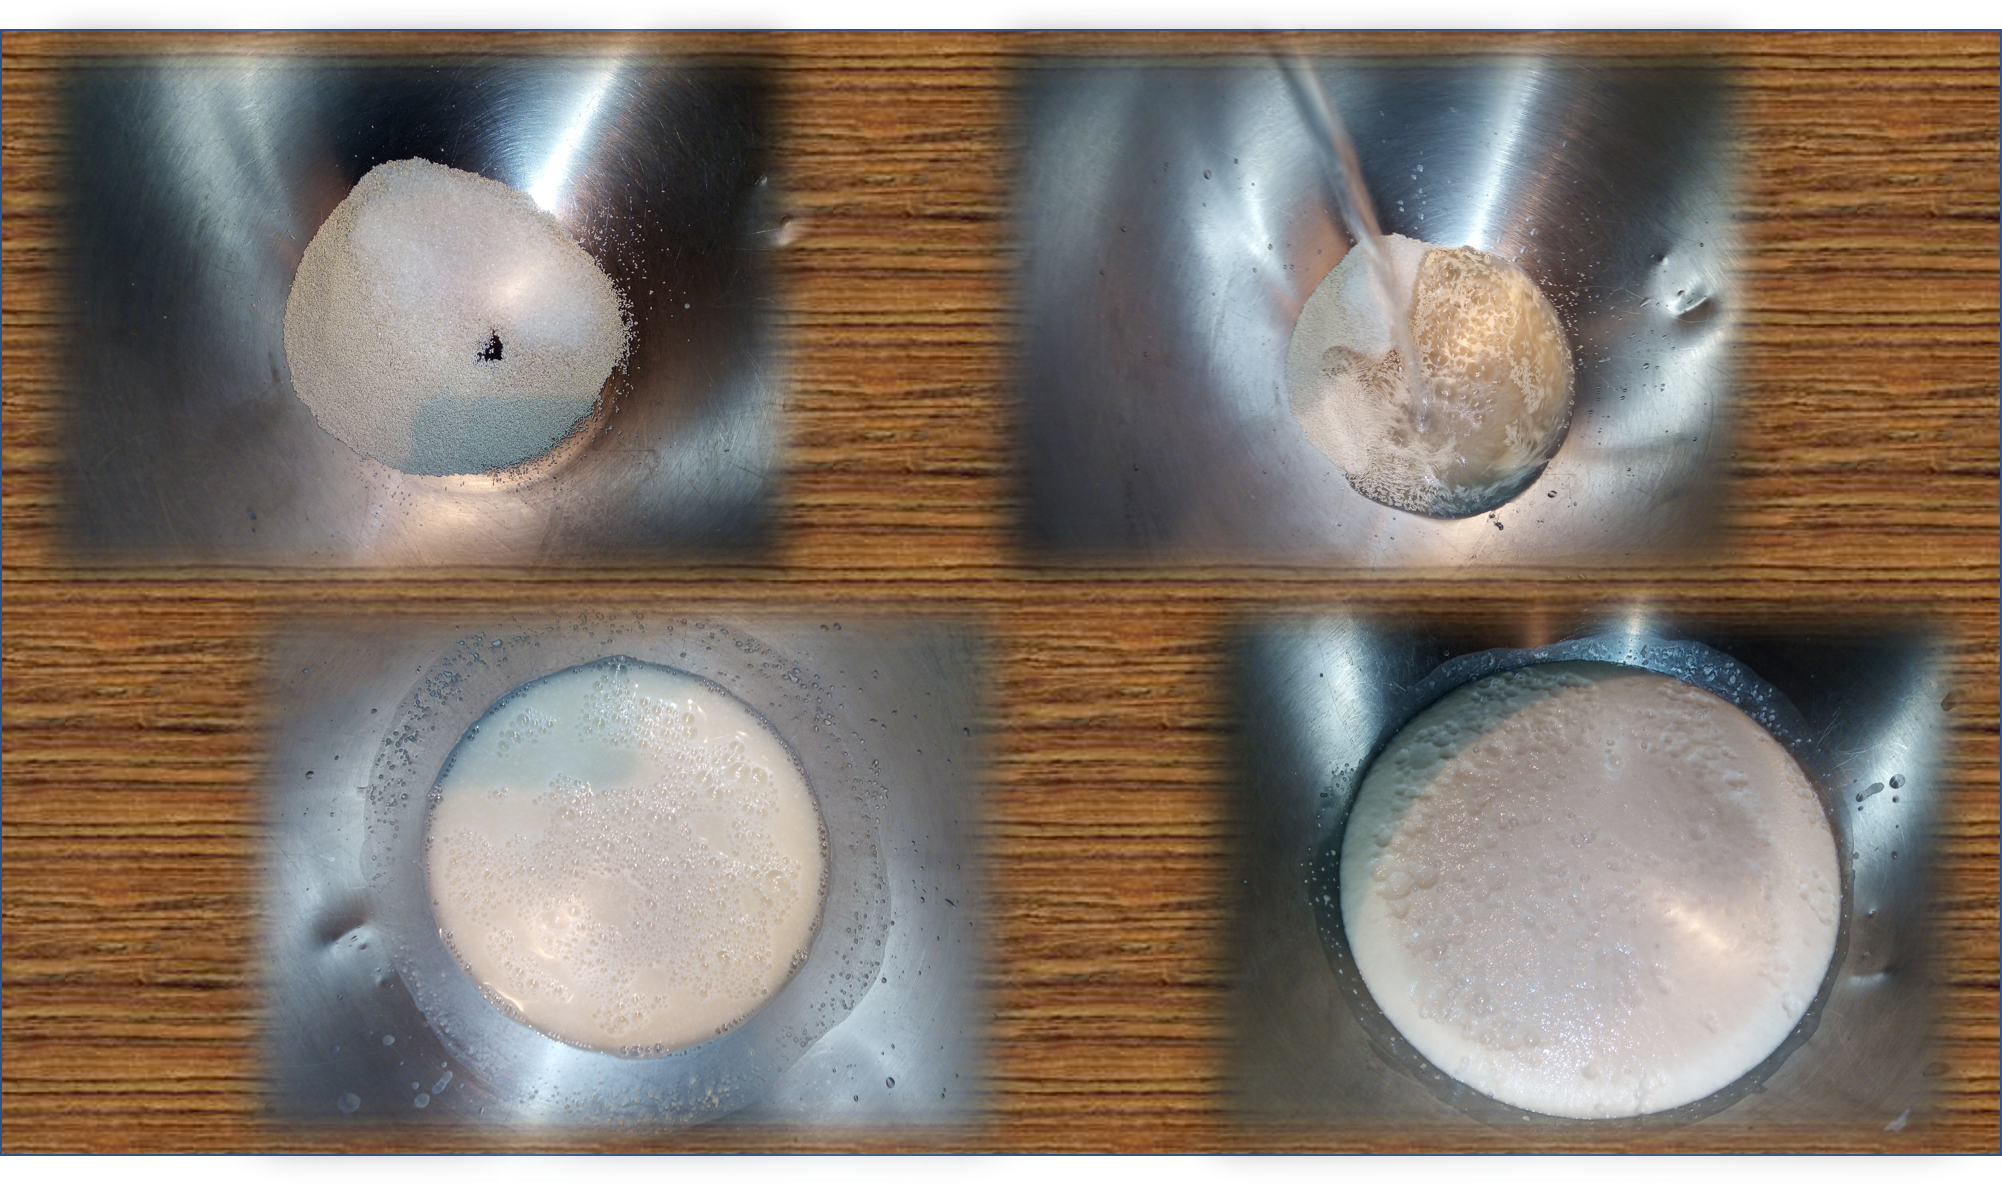
Ok. comencemos entonces, lo primero es activar la levadura, para ello coloque en el bol de la batidora, la levadura y el azúcar. Previo a esto puse a entibiar un poco de agua, como media taza, recuerden que no deben calentarla mucho, porque dañaran la levadura. Le agregue el agua a los otros ingredientes y deje, que la levadura hiciera su trabajo por unos 15 min, la mezcla debería más o menos duplicar su volumen.
Ok, let's start then, the first thing is to activate the yeast, for this I put in the bowl of the mixer, the yeast and the sugar. Previously I put to warm a little water, about half a cup, remember not to heat it too much, because it will damage the yeast. Add the water to the other ingredients and let the yeast do its work for about 15 minutes, the mixture should more or less double its volume.
Pasado los 15 minutos, como ya les dije, la levadura ya debería más o menos haber duplicado su volumen, así que es el momento de añadir la harina de trigo y el aceite de oliva. Una vez añadido todos los ingredientes, simplemente llevamos a la batidora, para empezar el proceso de amasado.
After 15 minutes, as I told you, the yeast should have more or less doubled its volume, so it is time to add the wheat flour and the olive oil. Once all the ingredients have been added, we simply take it to the mixer, to start the kneading process.

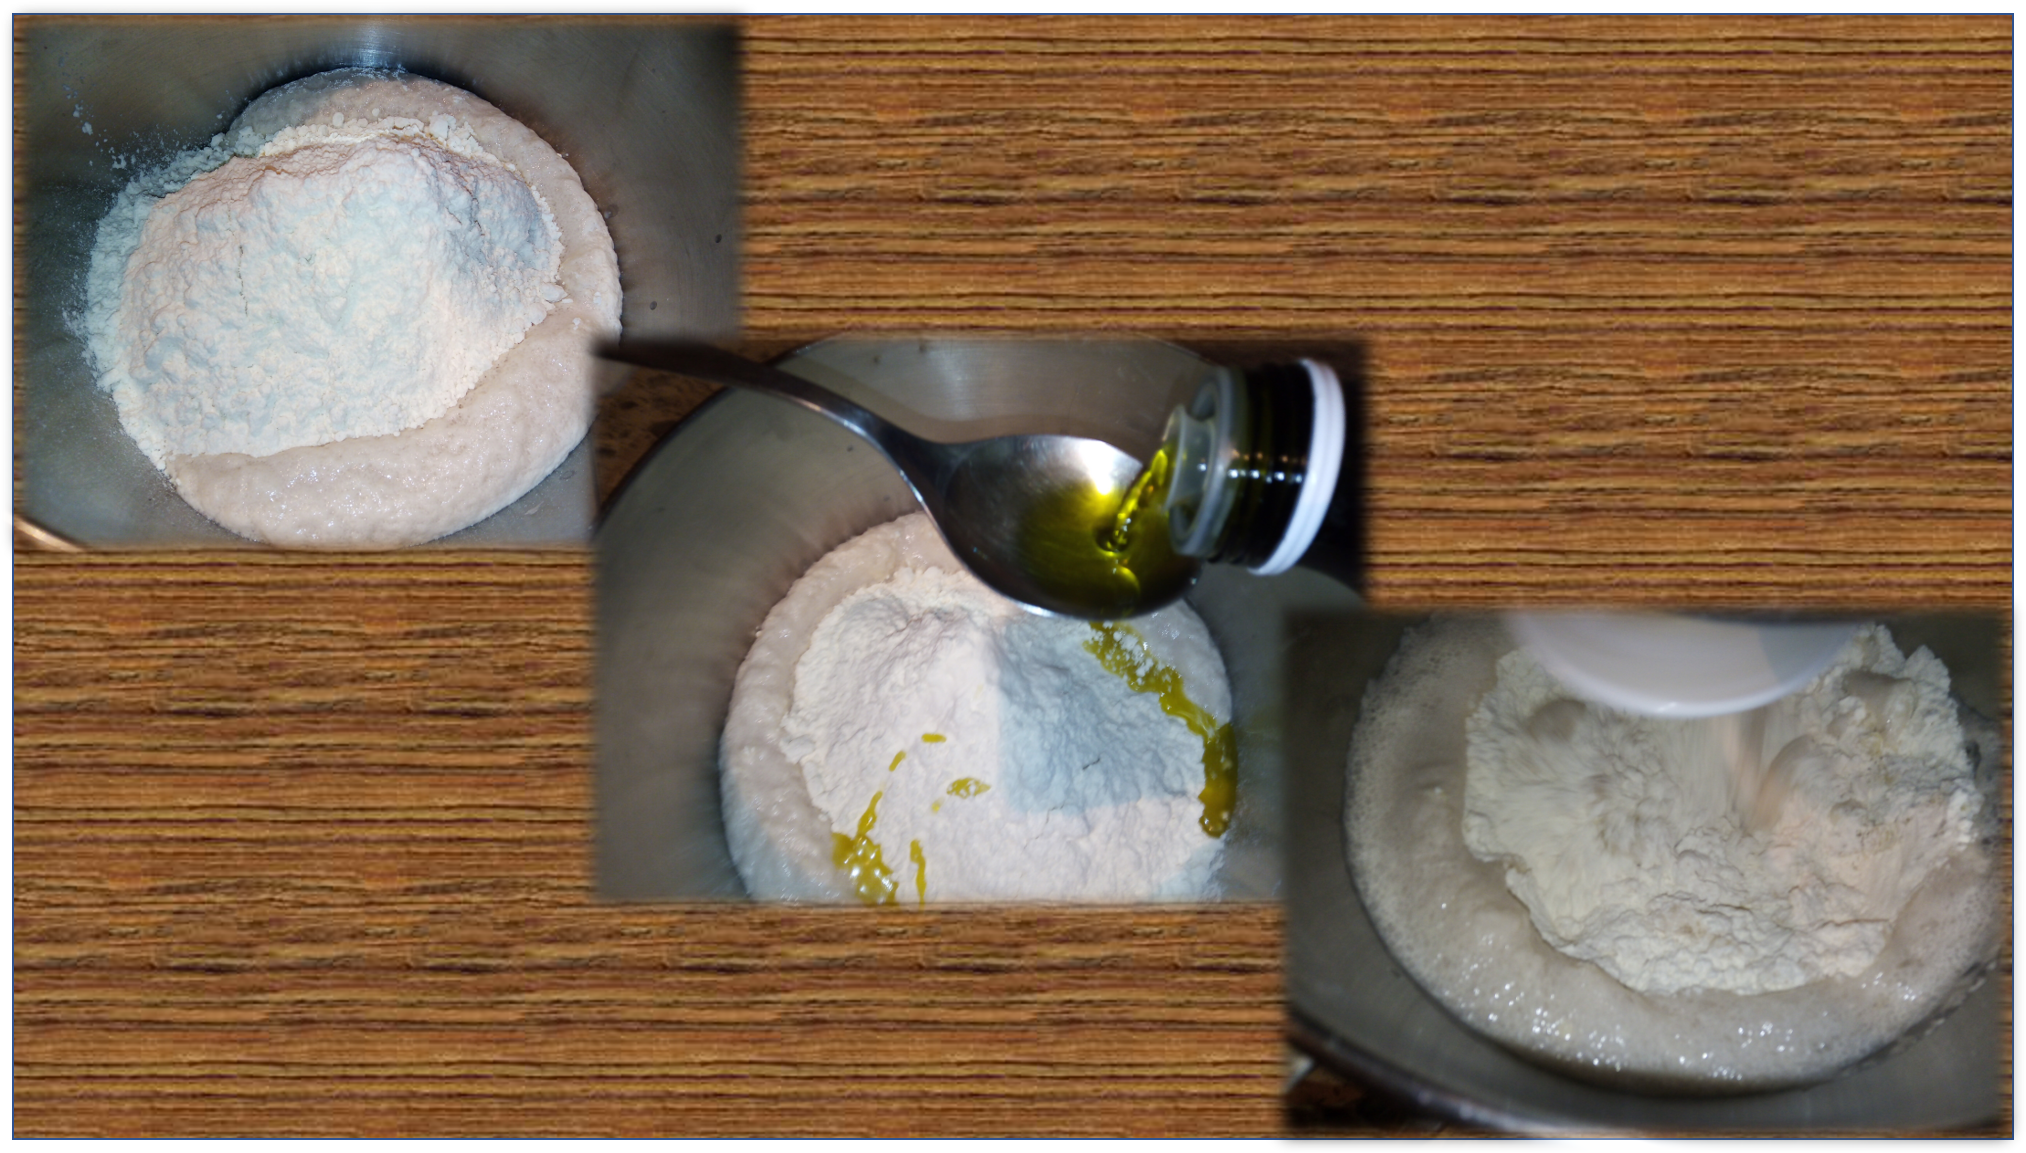
Cuando ya los ingredientes han empezado a integrarse en la batidora, añadimos la sal y dejamos que siga el amasado, hasta que todos los ingredientes se integren perfectamente. La masa adsorberá toda la humedad y tomará un aspecto similar al de la plastilina, como pueden ver en las imágenes.
When the ingredients have begun to integrate in the mixer, add the salt and let the kneading continue until all the ingredients are perfectly integrated. The dough will absorb all the moisture and will take on a plasticine-like appearance, as you can see in the pictures.
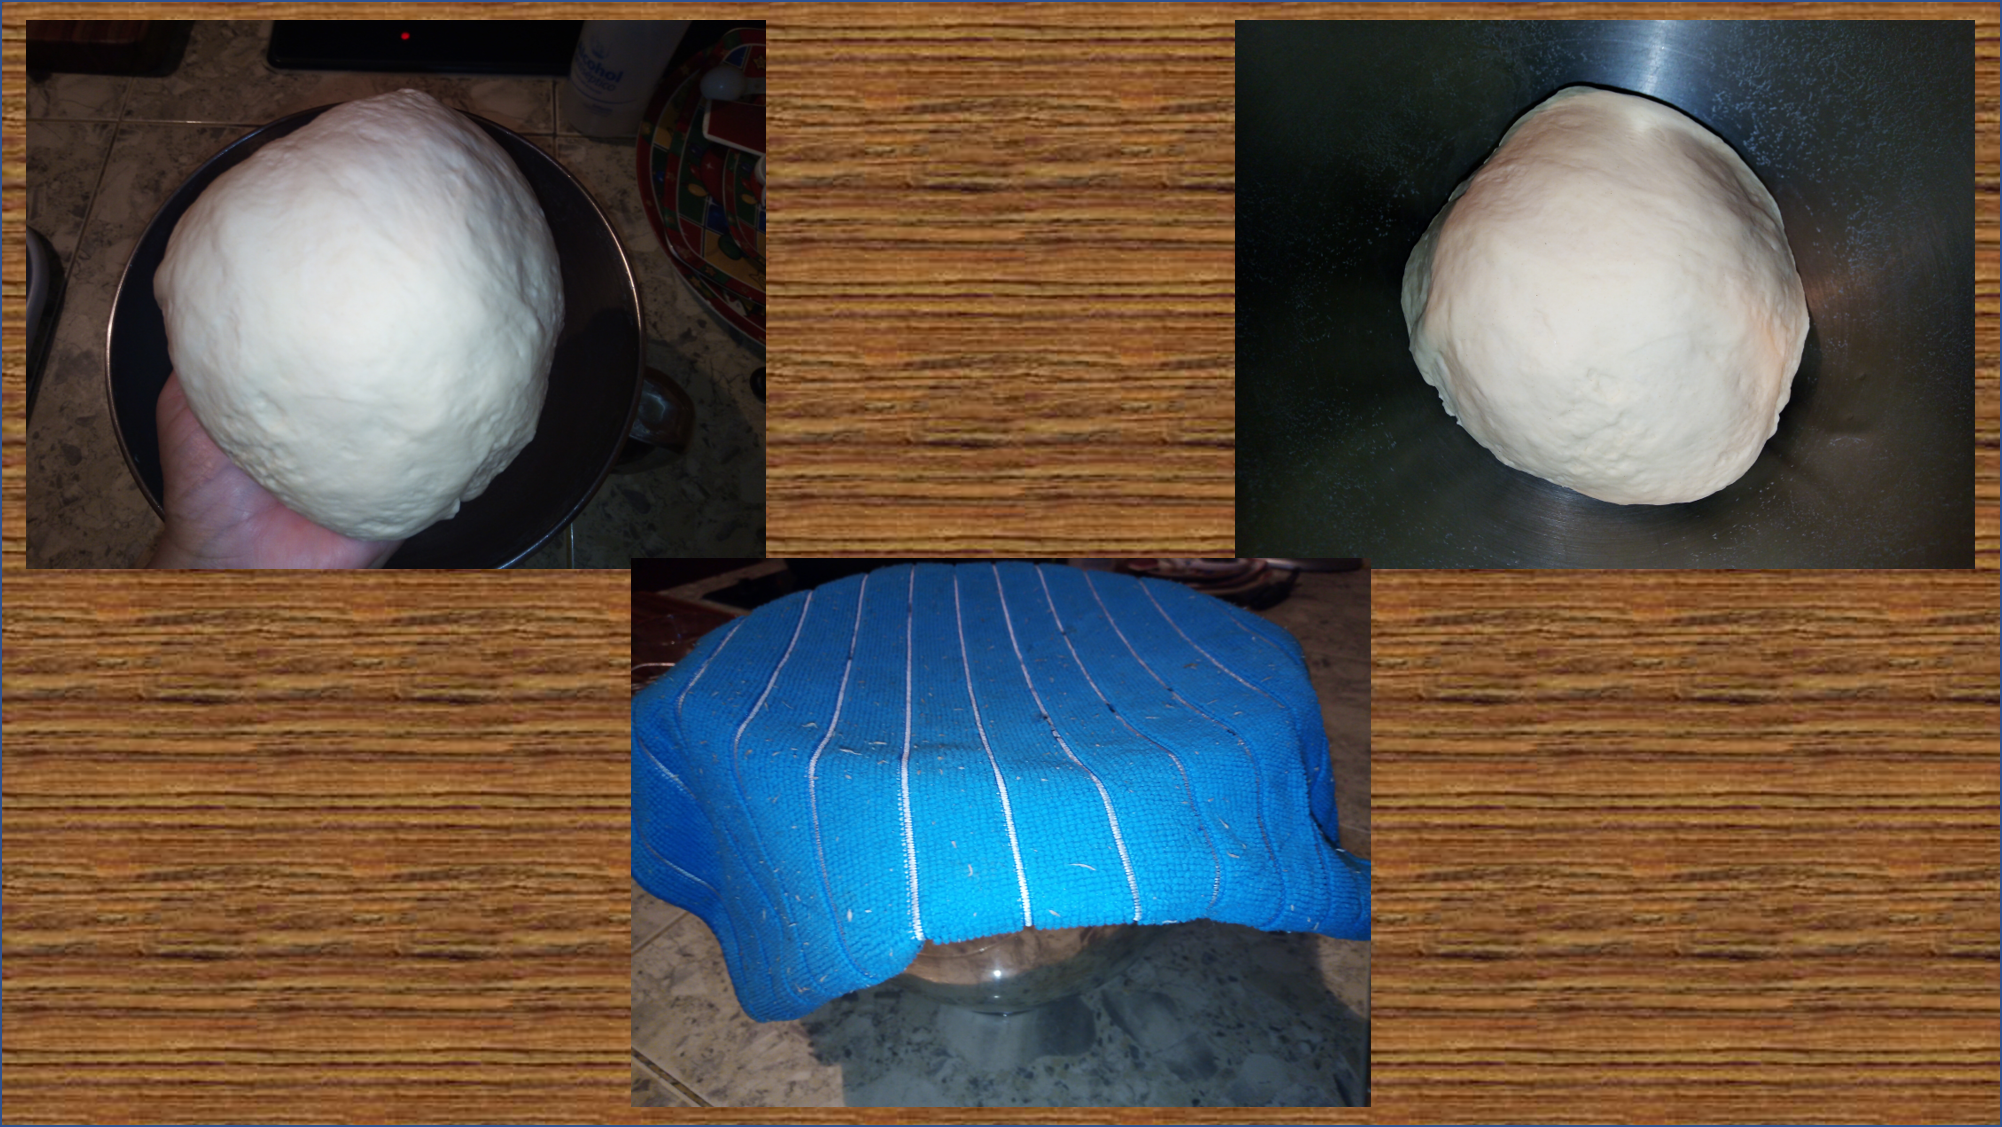
Cuando ya está lista la masa, la sacamos toda del bol, hacemos un bollo con ella, espolvoreamos un poco de harina en el fondo del bol y colocamos el bollo encima. Seguidamente, tapamos el bol con un pañito de cocina y dejamos que la masa leve por aproximadamente 1 ½ hora o hasta que duplique su tamaño.
When the dough is ready, take it all out of the bowl, make a roll with it, sprinkle a little flour on the bottom of the bowl and place the roll-on top. Then cover the bowl with a kitchen towel and let the dough rise for approximately 1 ½ hours or until it doubles in size.

Mientras que esperamos que la levadura hace su trabajo, fermentando o descomponiendo los carbohidratos presentes en la harina, produciendo en el proceso gases los cuales son los responsables de que la masa crezca hasta duplicar su volumen. Vamos a ir alistando los ingredientes que usaremos para rellenar las 2 pizzas que prepararemos, arriba pueden ver los ingredientes que usé.
While we wait for the yeast to do its work, fermenting or decomposing the carbohydrates present in the flour, producing gases in the process which are responsible for the dough to grow to double its volume. Let's get ready the ingredients we will use to fill the 2 pizzas we will prepare, above you can see the ingredients I used.
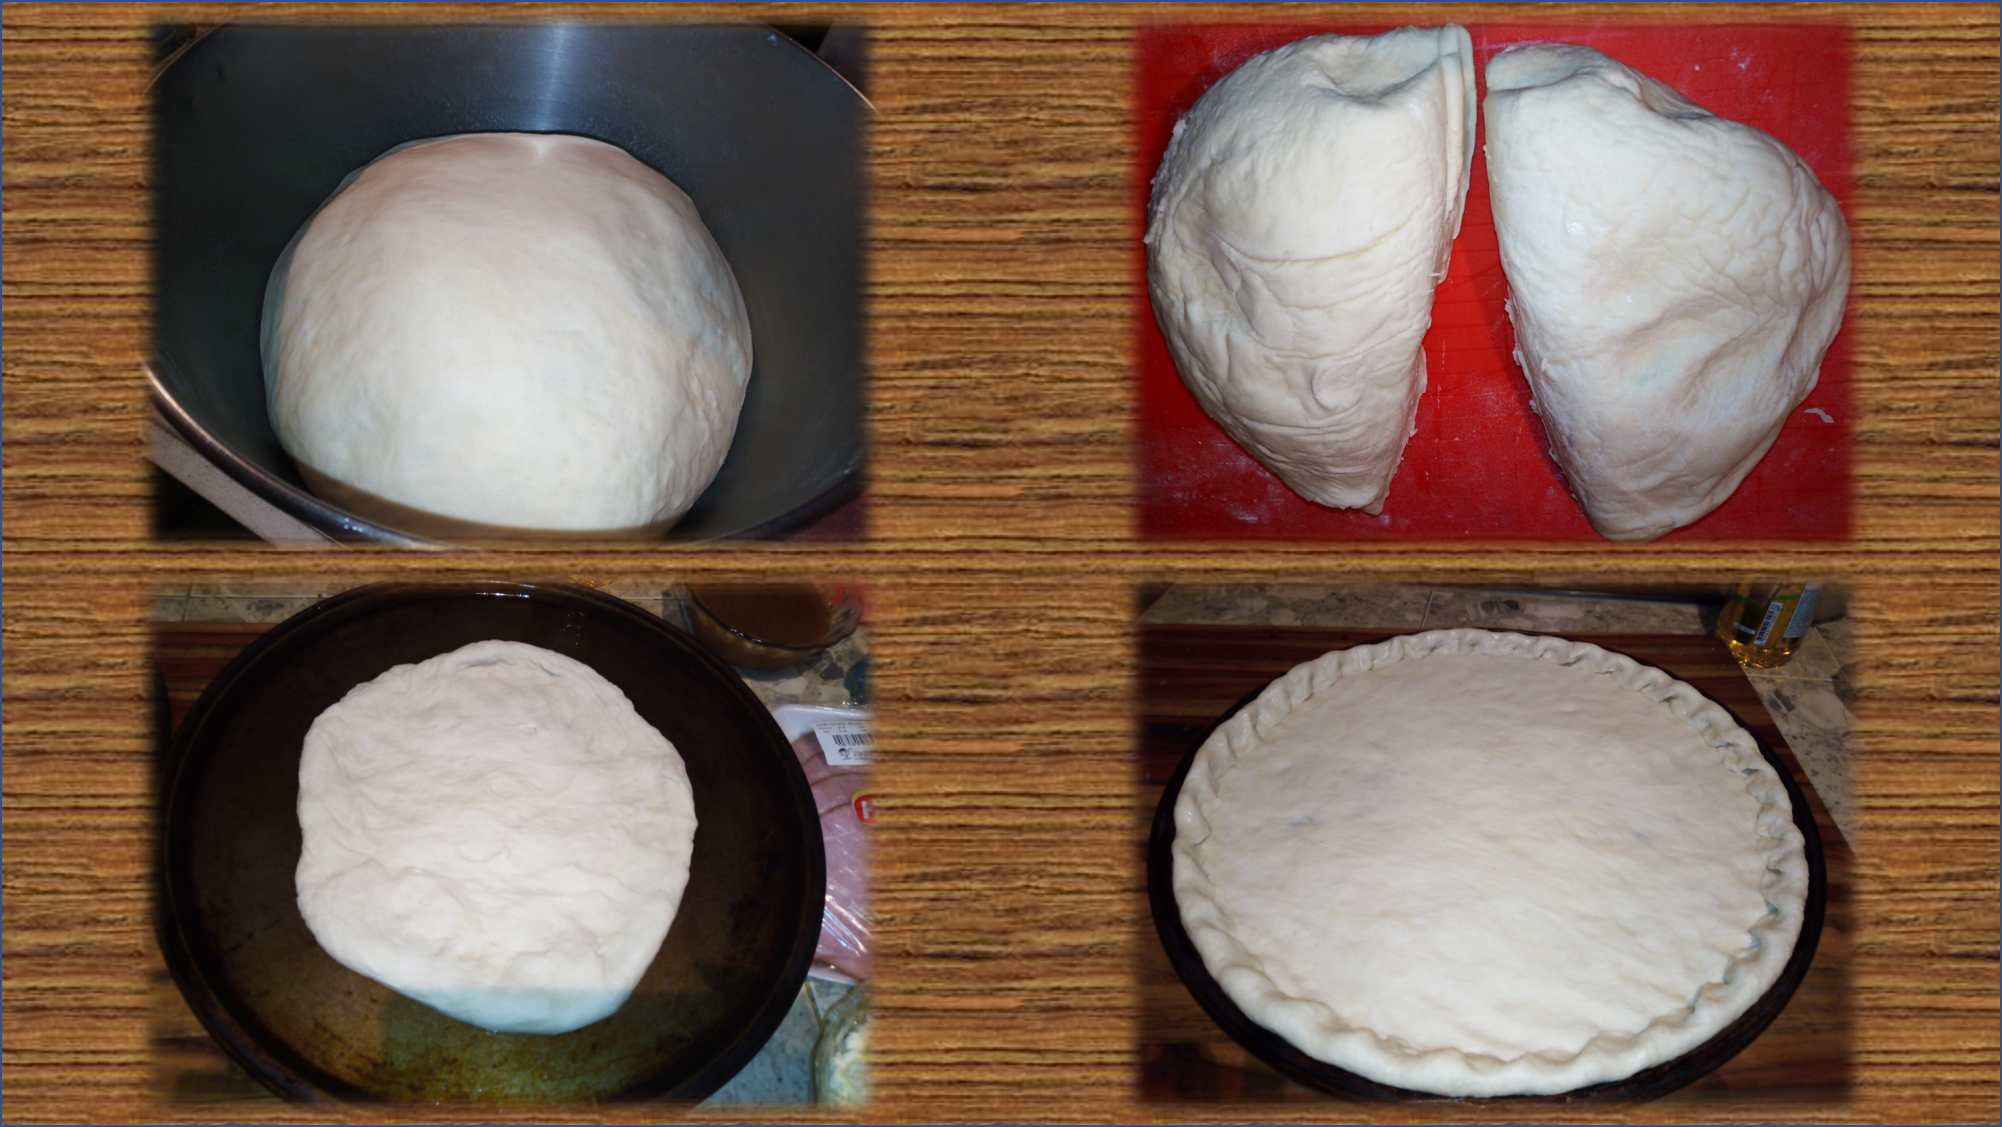
Pasado el tiempo de levado, como ya les comenté, la masa ha logrado duplicar su volumen, ahora la sacamos del bol y dividimos en dos porciones. Cada porción la estiraremos en una bandeja y en este momento el siguiente paso dependerá de nuestra preferencia. Les explico, si les gusta la masa de la pizza gruesa, debemos dejar levar por unos 15 min más, antes de colocarle el relleno, si no, procedemos a armar la pizza.
After the rising time, as I already mentioned, the dough has doubled its volume, now we take it out of the bowl and divide it into two portions. We will stretch each portion on a tray and at this point the next step will depend on our preference. Let me explain, if you like the pizza dough thick, we must let it rise for about 15 minutes more, before putting the filling, if not, we proceed to assemble the pizza.

En casa, nos gusta las pizzas de masa gruesa, así que, después de esperar que reposara la masa por unos 15 min, comenzamos con el armado. Lo primero es esparcir en la base la salsa de tomate, en esta oportunidad utilizamos una que preparamos en casa, pero, ustedes pueden usar la que vende de forma comercial, también queda muy bien. Luego, colocamos el jamón y encima distribuimos el queso mozzarella.
At home, we like thick dough pizzas, so, after waiting for the dough to rest for about 15 minutes, we started with the assembly. The first thing is to spread the tomato sauce on the base, in this opportunity we used one that we prepared at home, but you can use the one sold commercially, it is also very good. Then, place the ham and distribute the mozzarella cheese on top.
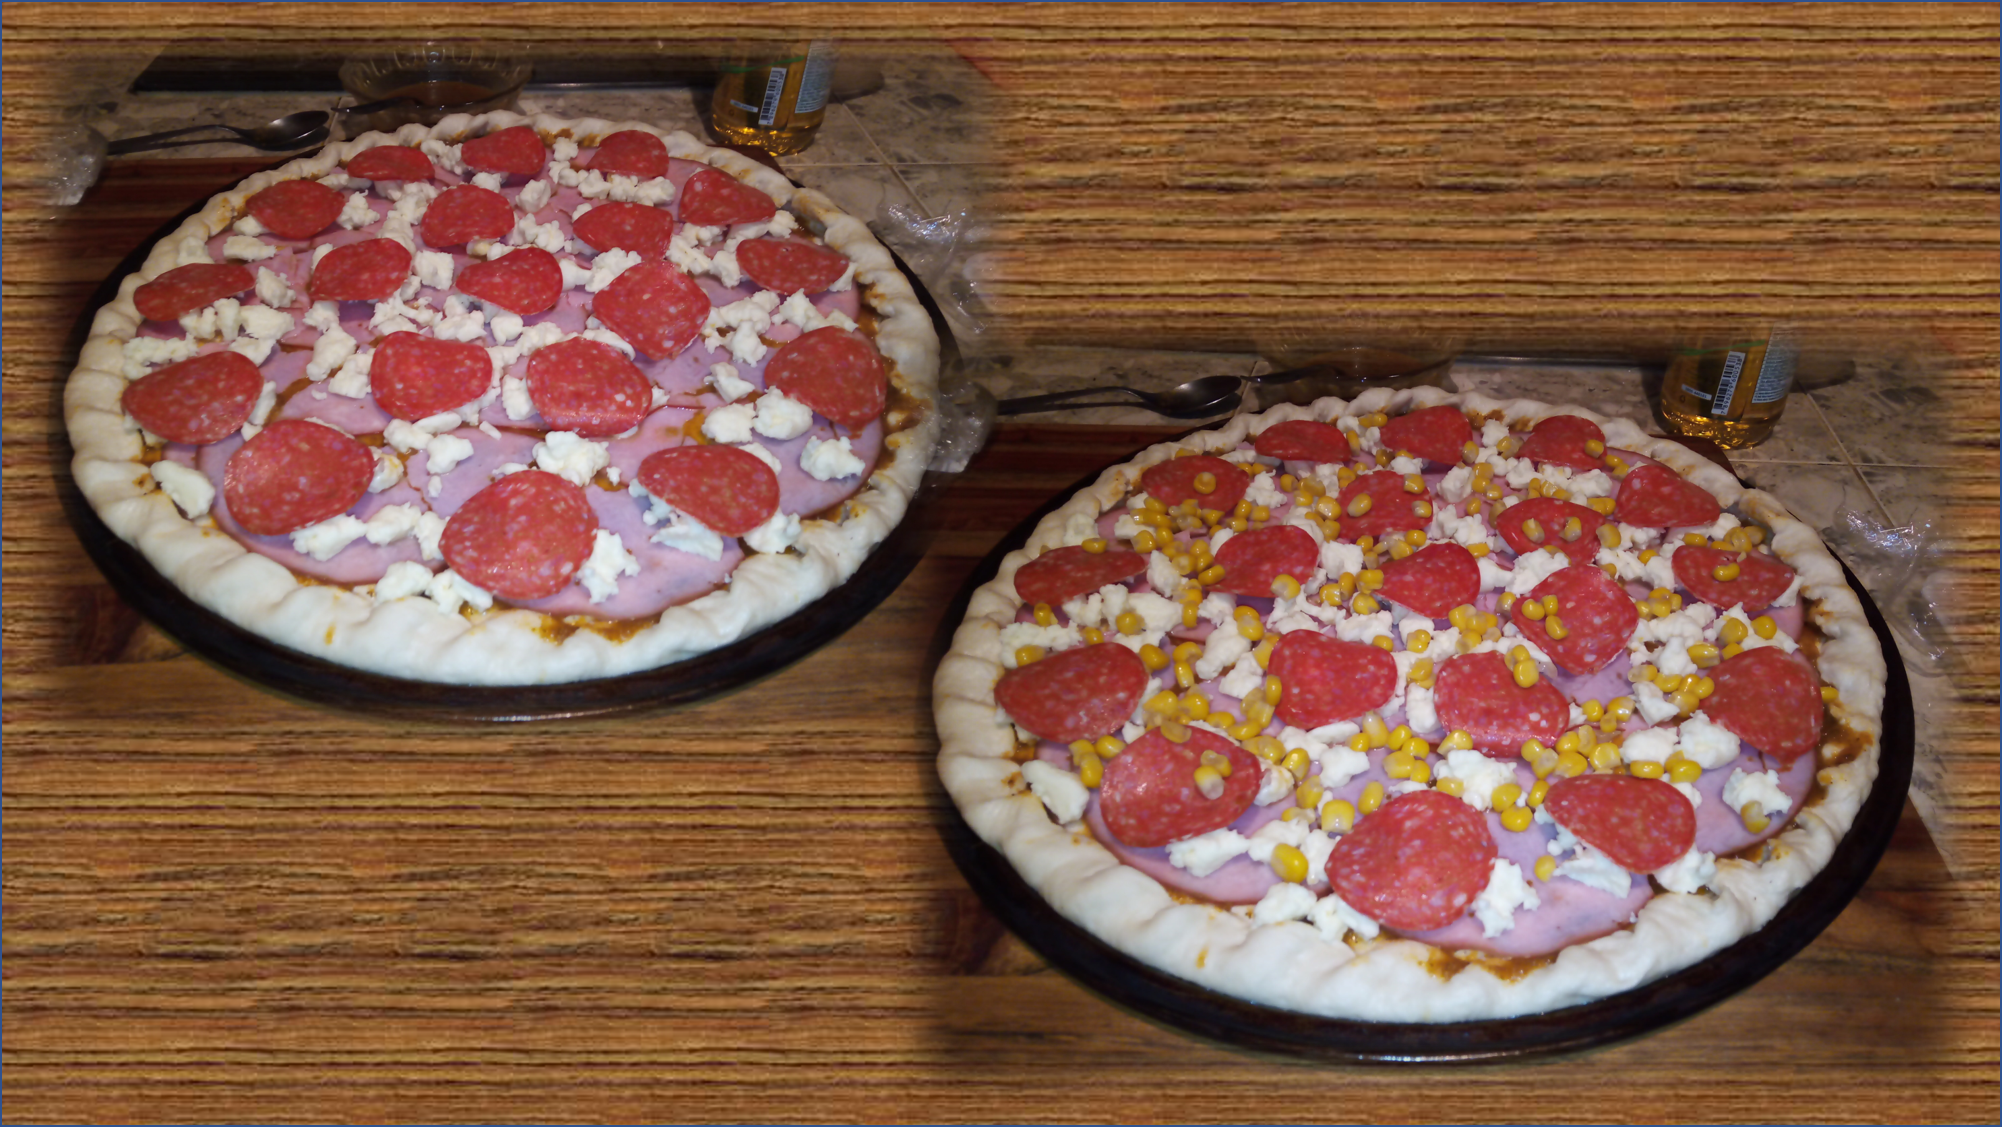
A continuación, agregamos los últimos 2 ingredientes a nuestras pizzas, primero colocamos el pepperoni y por último esparcimos los granos de maíz. Con esto la pizza esta lista para llevar al horno.
Next, we add the last 2 ingredients to our pizzas, first we place the pepperoni and finally we sprinkle the corn kernels. With this the pizza is ready to take to the oven.

Ahora sí, toca hornear las pizzas, el horno debe estar precalentado a una temperatura de 180 °C. Una vez que metemos las pizzas en el horno, las dejamos cocinar por unos 15 min y después de ese tiempo, ya estarán listas para degustarlas.
Now it is time to bake the pizzas, the oven must be preheated to a temperature of 180 °C. Once we put the pizzas in the oven, we let them cook for about 15 minutes and after that time, they will be ready to be tasted.

Como pueden ver en las imágenes mi pizza se ve genial y realmente estaba deliciosas, modestia aparte, jajaja. Por supuesto, las niñas quedaron encantadas con la pizza y mi a esposito también le encanto como quedaron, así que, prueba superada. No me queda mas que despedirme, esperando que les gustara el paso a paso de elaboración de esta rica pizza con pepperoni. Les envío bendiciones y mis mejores deseos para cada uno de ustedes.
As you can see in the pictures my pizza looks great and it was really delicious, modesty aside, hahaha. Of course, the girls were delighted with the pizza and my husband also loved how they turned out, so, test passed. I just have to say goodbye, hoping you liked the step by step preparation of this delicious pepperoni pizza. I send my blessings and best wishes to each of you.
Contenido y fotografías de mi propiedad intelectual
Información Técnica
| Cámara | Pentax * istDL |
|---|---|
| Lente | * Pentax 18-55 |
| Iluminación | Luz Natural |
| Locación | Barcelona, Estado Anzoátegui, Venezuela |
Content and photographs of my intellectual property
Technical information
| Camera | Pentax * istDL |
|---|---|
| Lens | * Pentax 18-55 |
| Lighting | Natural Light |
| Location | Barcelona, Anzoátegui State, Venezuela |


0
0
0.000
https://twitter.com/268913702/status/1618215703240380418
The rewards earned on this comment will go directly to the people( @francyrios75 ) sharing the post on Twitter as long as they are registered with @poshtoken. Sign up at https://hiveposh.com.
Congratulations, your post has been upvoted by @dsc-r2cornell, which is the curating account for @R2cornell's Discord Community.
Gracias @jasonmunapasee por tu visita y apoyo, salud y bendiciones para ti el Sr. @r2cornell y todo el equipo de trabajo de @dsc-r2cornell.
I really enjoyed reading your step-by-step pizza recipe, it will be very easy to follow and the pictures will be helpful. I loved the personal touch you added by sharing your family's tradition of making special meals on the weekends. Thank you for sharing your recipe with us.
!discovery 38
Thank you for your visit and support, it is very nice to know that you liked it and that you found it easy to follow, I hope you will be encouraged to do it one day. Health and blessings to you and yours.
This post was shared and voted inside the discord by the curators team of discovery-it
Join our community! hive-193212
Discovery-it is also a Witness, vote for us here
Delegate to us for passive income. Check our 80% fee-back Program
Muy agradecida de recibir su visita y apoyo. Salud y bendiciones para usted y todo el equipo de trabajo.
Wow! that pizza just made me want to buy some right away. If I am not mistaken it has been two months since I last ate a pizza.