Con Perlas y Cintas podemos hacer pulseras. // With pearls and ribbons we can make bracelets. Esp-Eng
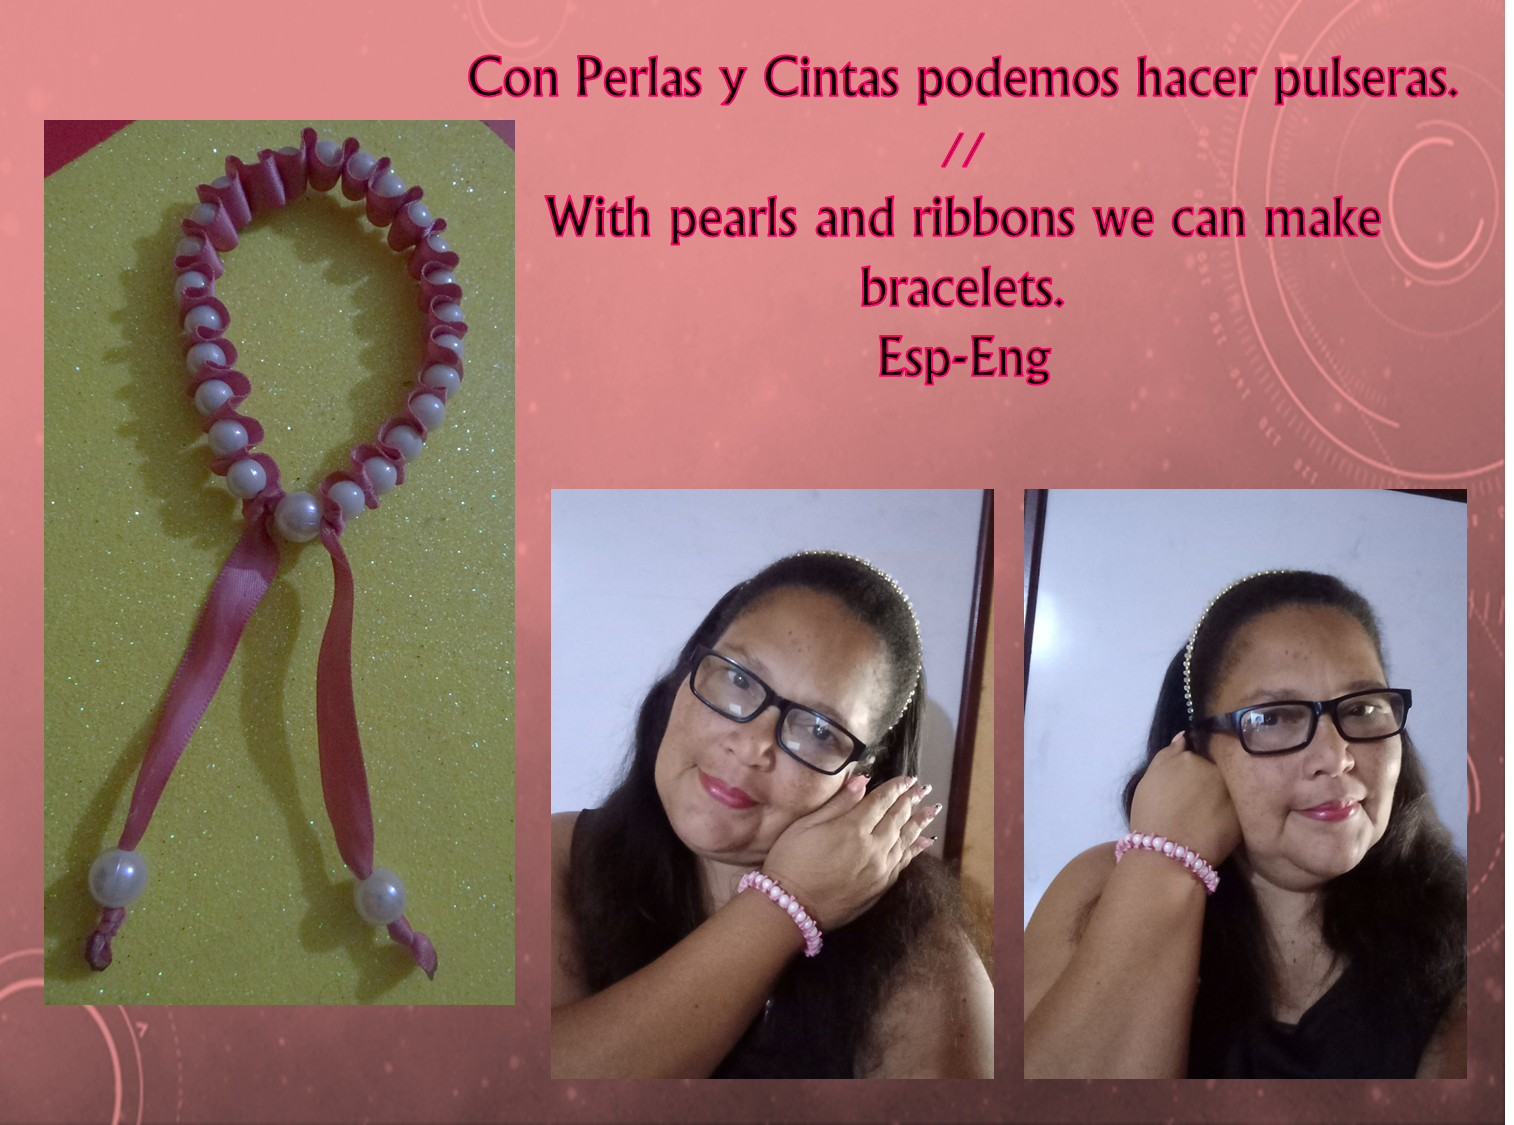
💘 Una de las cosas que me gusta de aquí en Hive, es que se me parece a una escuela, porque aprendemos y lo mejor que lo ponemos en practica, de lo que nos enseñan otros hives, por aquí se enseña de todo: comidas, dulces, manualidades, joyería y muchísimo mas.
💘 Hace días vi que una hive que hizo una pulsera con perlas y cintas,aquí de la cual quede encantada, porque me gusta usar este tipo de accesorios.
💘 Ahora haré la mía y así demostrar que aprendí y que si se puede.
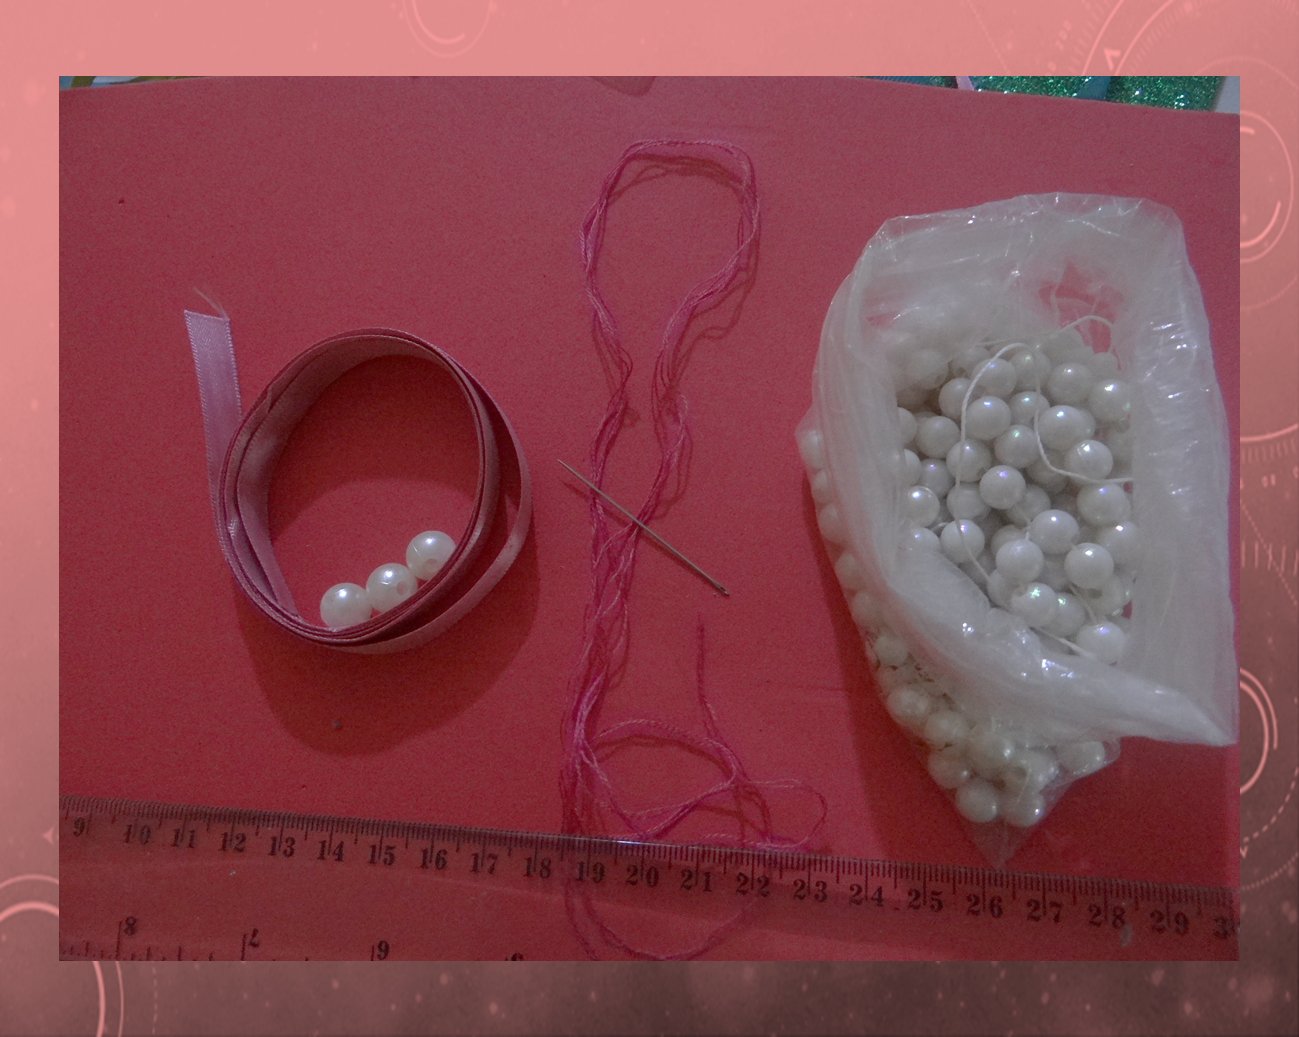
💘Materiales:
💘Cinta de raso color rosa vieja de 1 cms de ancho.
💘Perlas blancas nacaradas o tornasol nº 7.
💘Perlas blancas nacaradas o tornasol nº 8 o 9
💘Hilo de bordar del mismo color de la cinta rosado.
💘Aguja.
💘Regla, tijera, vela.
💘Todo lo hice con material reciclado, o sea tenia en casa, porque los que hacemos manualidades siempre nos queda algún material en casa, por eso el que guarda siempre tiene.
💘Ahora si manos a la pulsera.
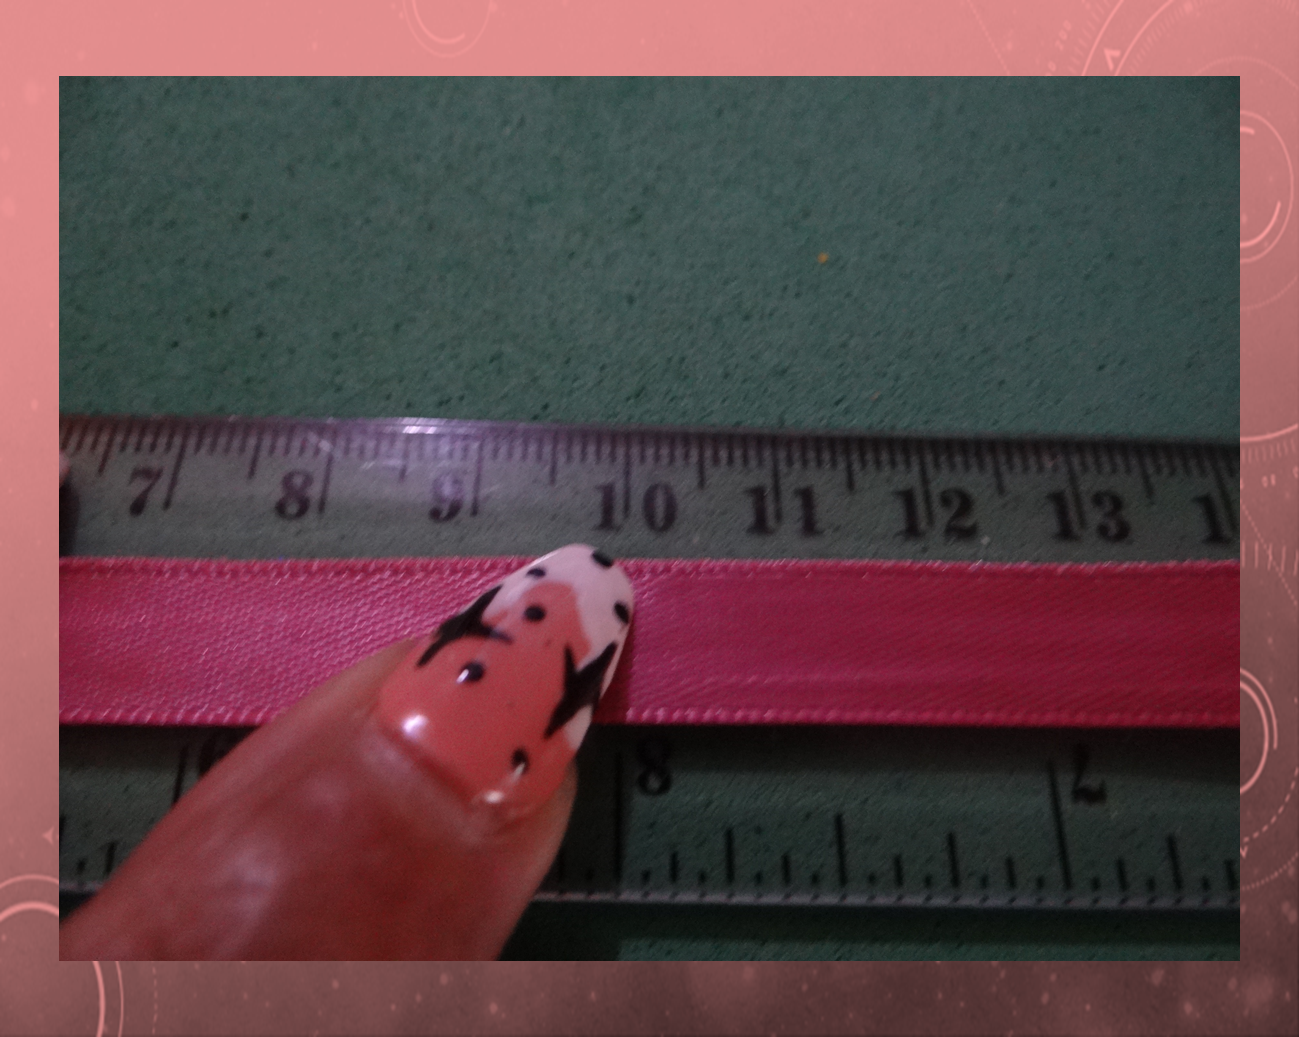
1.- Use una cinta rosa vieja que media 1.25 cms la deje así porque no sabemos cuanto iba a necesitar, lo que sobre ya saben se guarda para otra cosa mas adelante.
2.- Antes de empezar buscar una aguja que sea fácil de enhebrar y que pase por los huequitos de las perlas, porque hay agujas que son gruesas o los huequitos de las perlas son muy pequeñitos.

3.- Medir con una regla o cinta métrica de costura, 10 u 12 cms que a partir de ahí, empezamos con la pulsera, hacemos un pequeño dobles y tratamos de meter la aguja en el medio y regresamos de nuevo para hacer el nudito de seguridad.
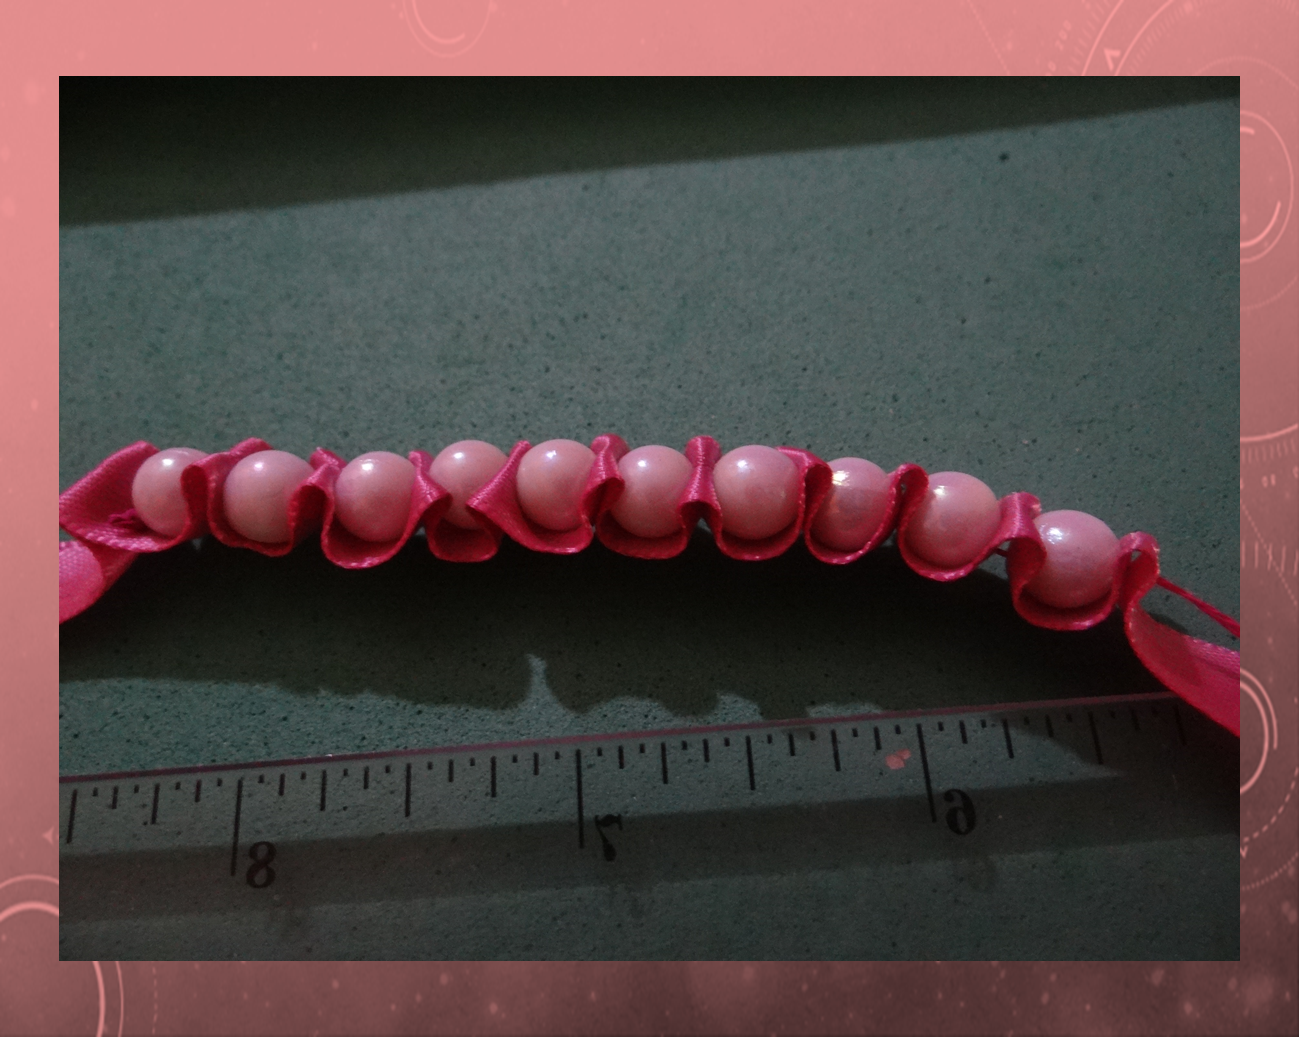
4.- Ahora si vamos metiendo perlas, doblamos la cinta que no sobresalga a la perla, de 4 en 4 o en 5 en 5 perlas que llevamos hacemos un nudito para asegurar y vaya quedando apretadito.
 )
)

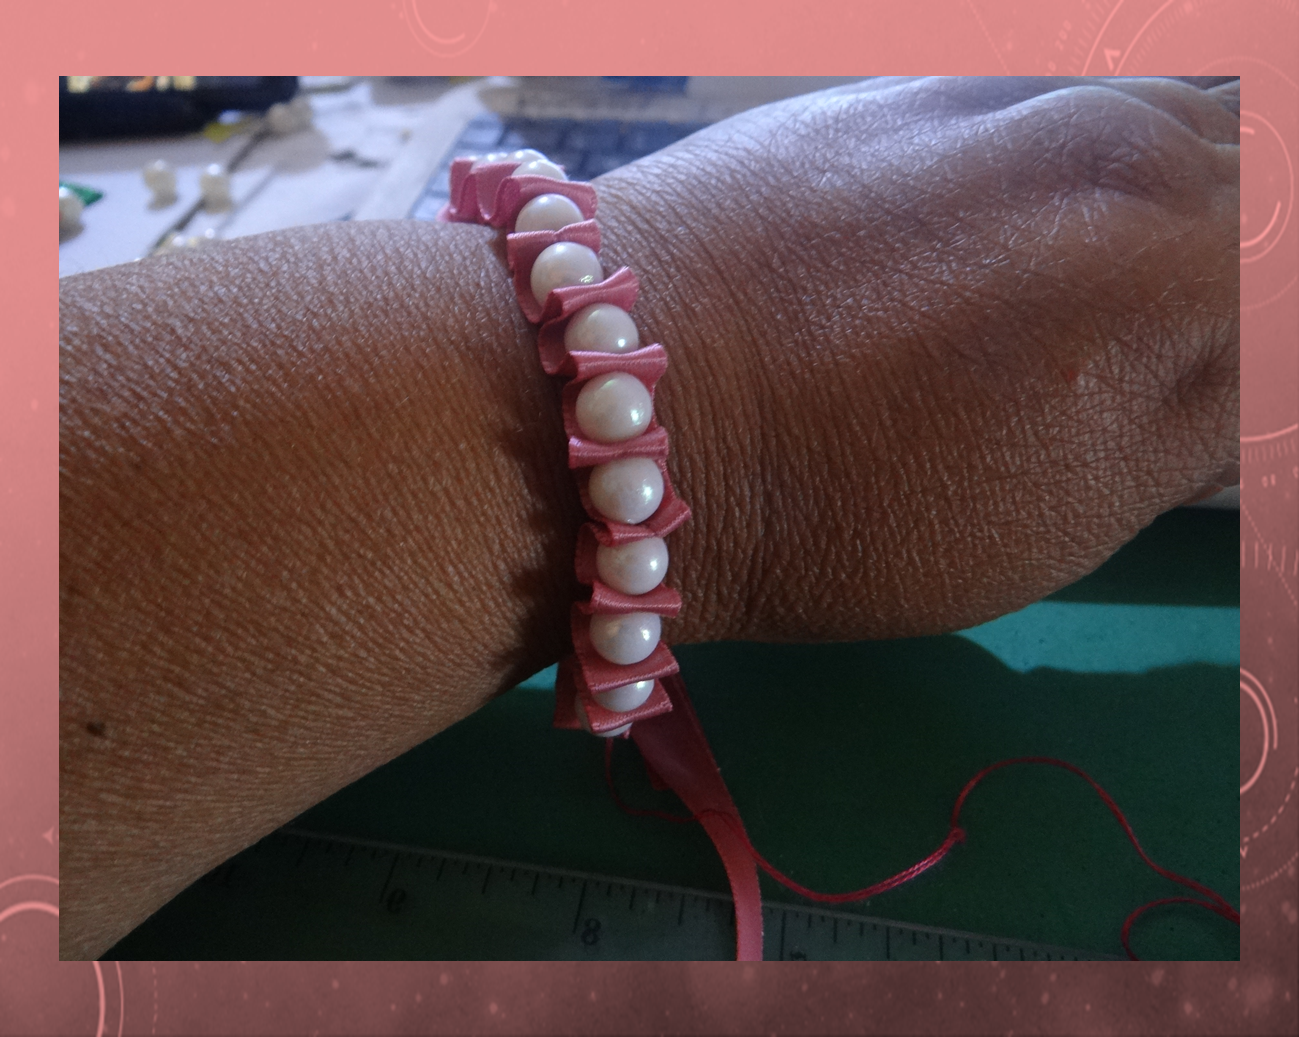
5.- De vez en cuando nos debemos ir probando en la muñeca, la pulsera para ir midiendo como va, si falta mas perlas seguimos, sino la dejamos hasta ahí, pero como es para mi, me faltaba.
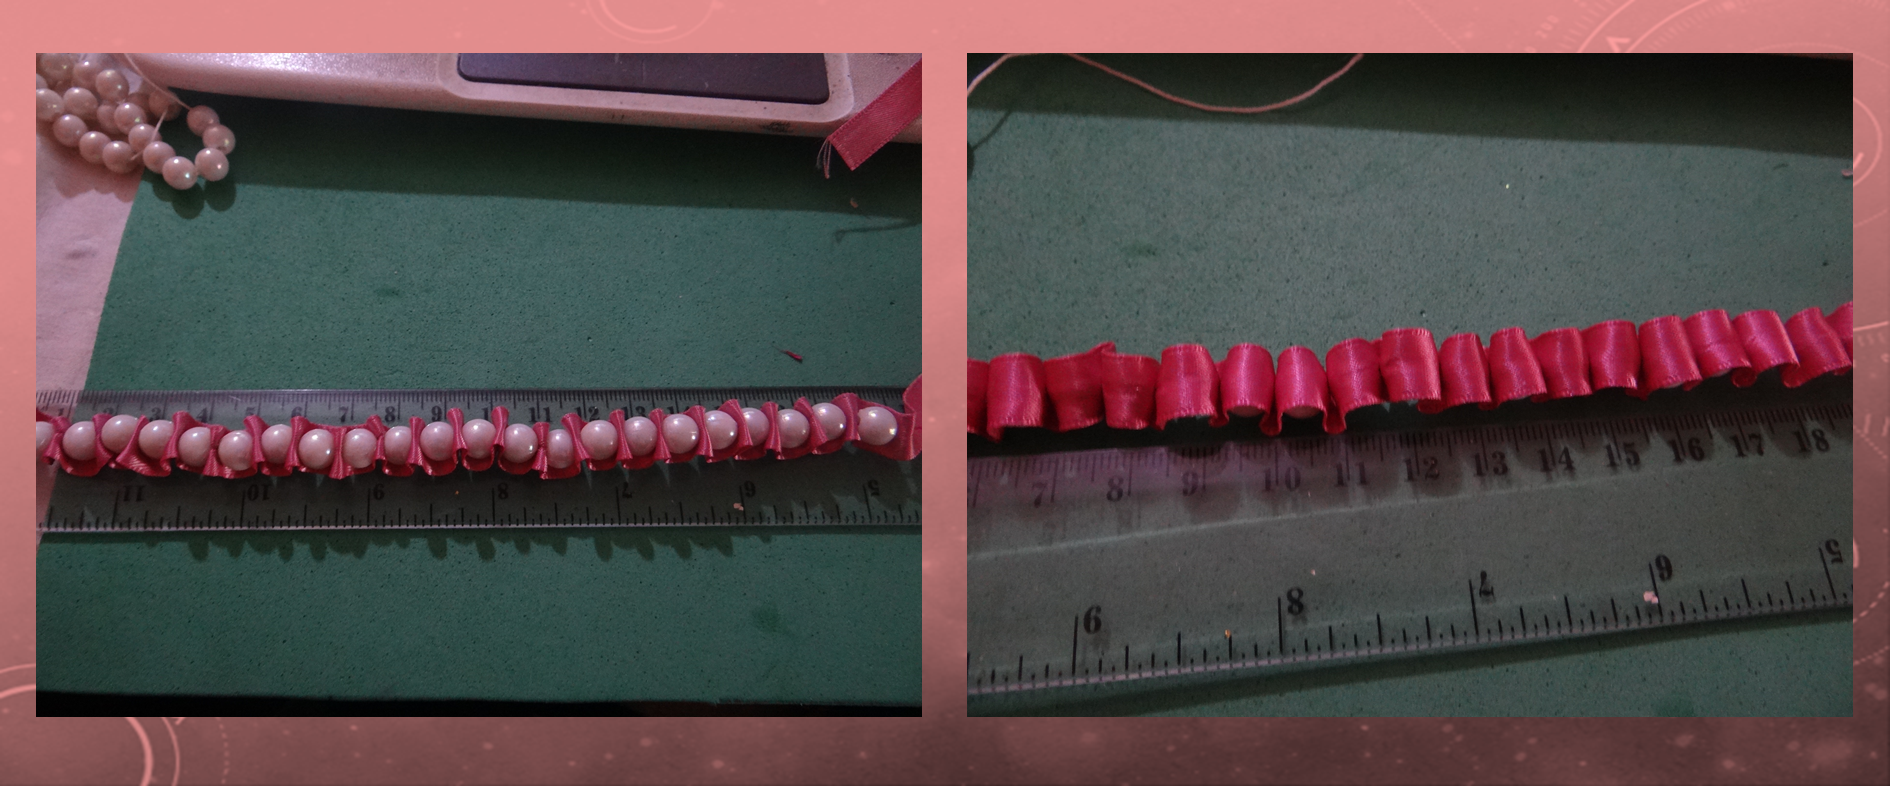
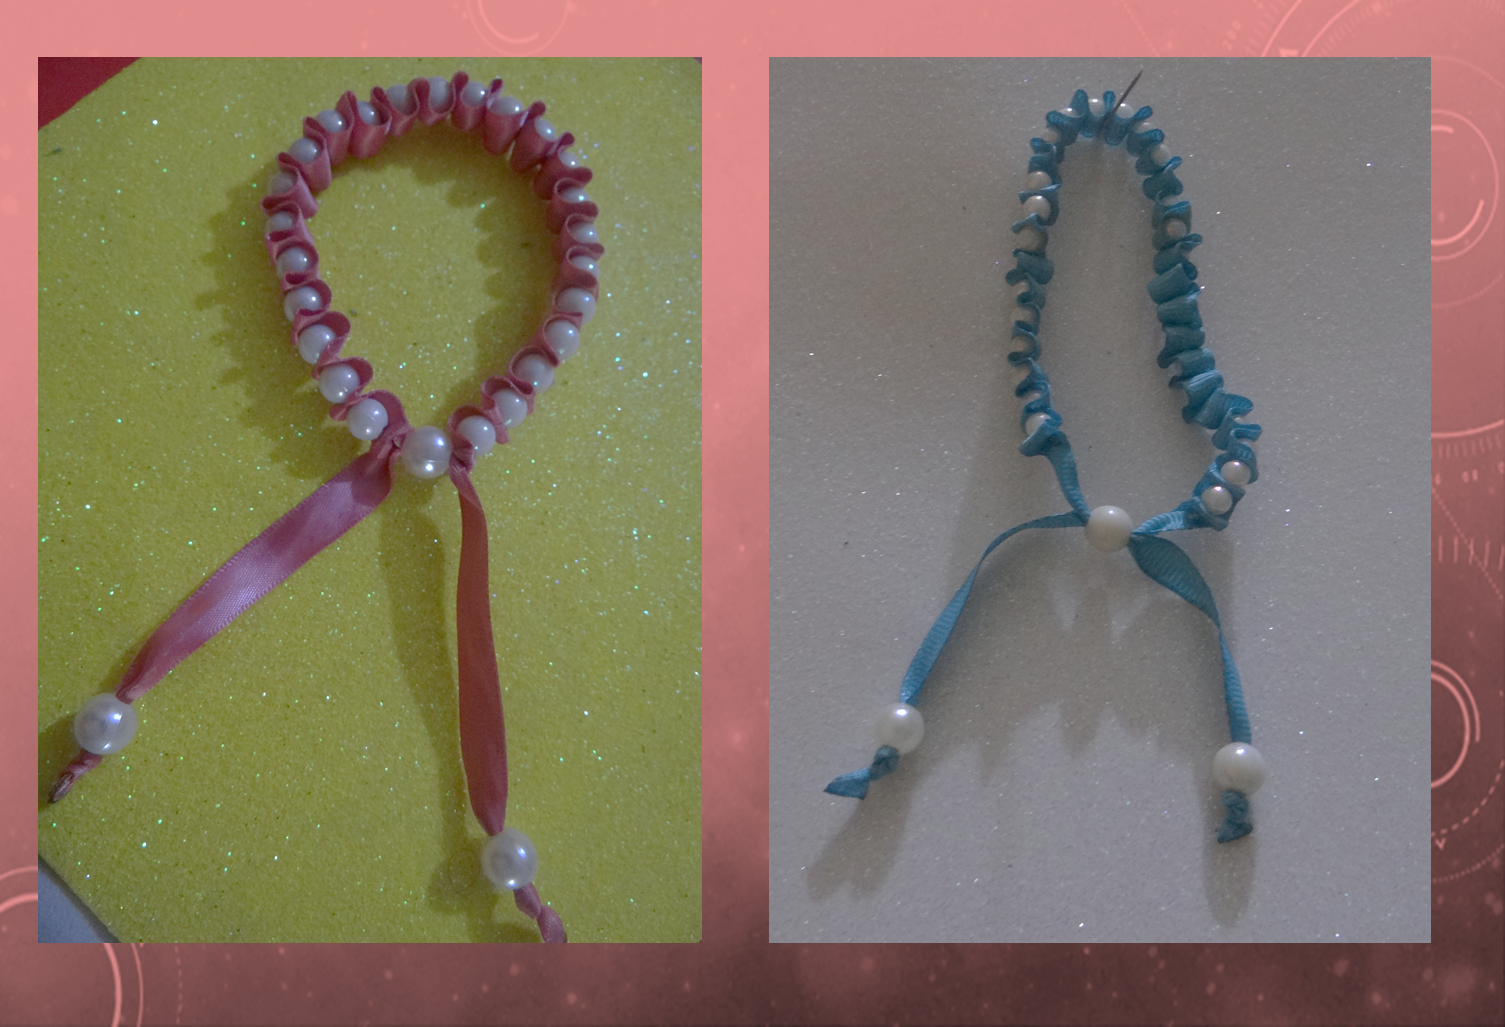
6.- Ya lista la pulsera a mi medida, use 24 perlas, hice mi nudito de seguridad.
7.- Medí de nuevo los 10 o 12 cms y corte con la tijera, en total use 0.45 cms de la cinta, lo demás lo guarde.
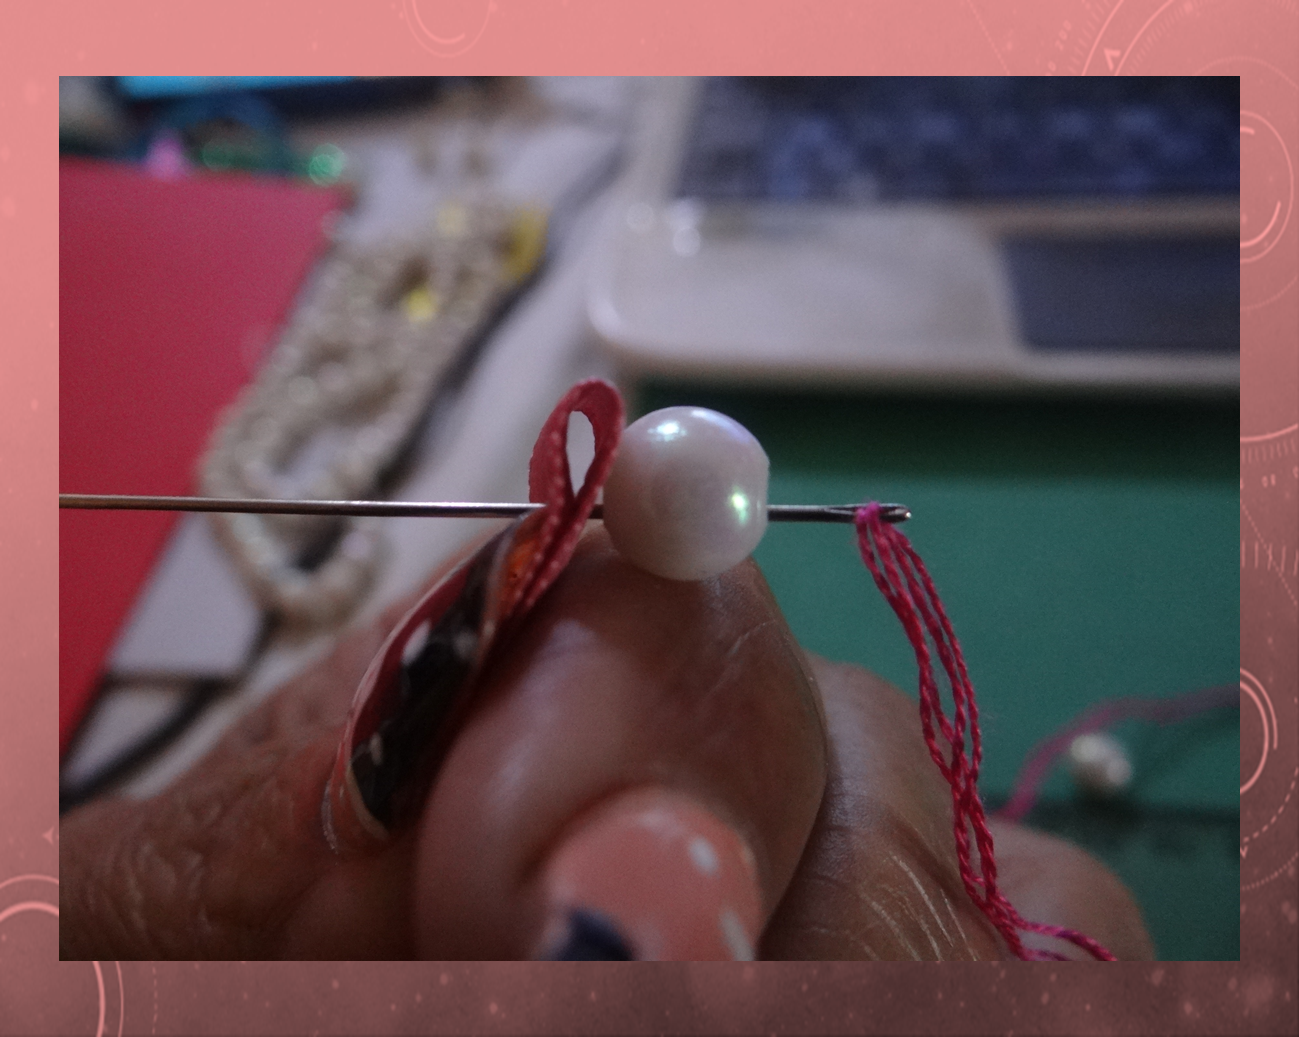
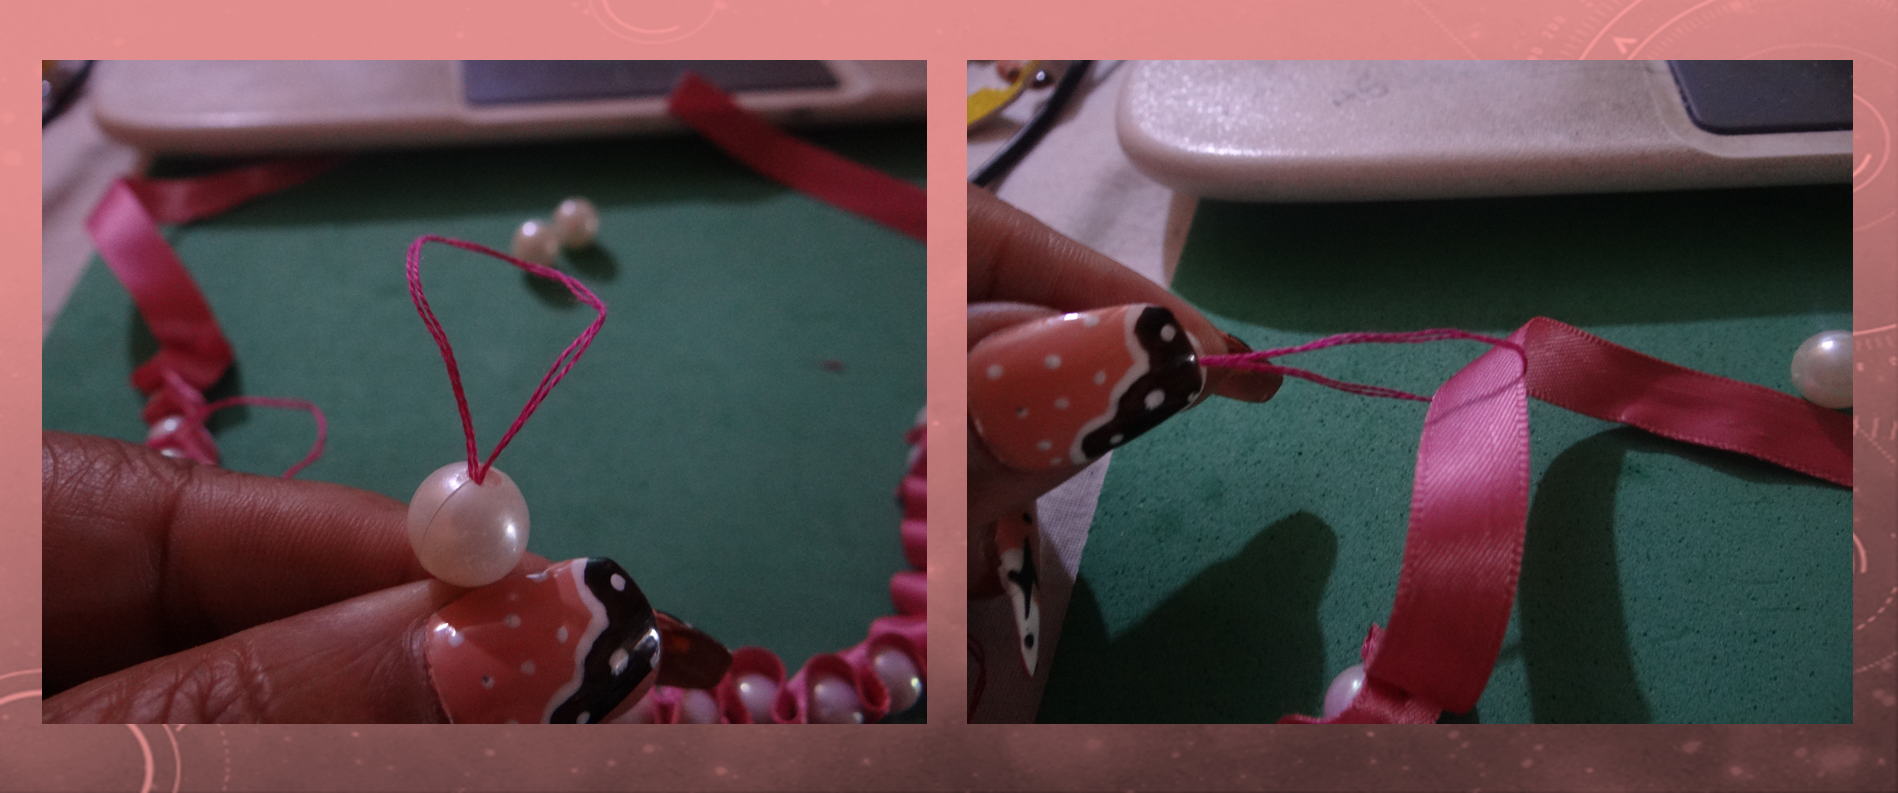
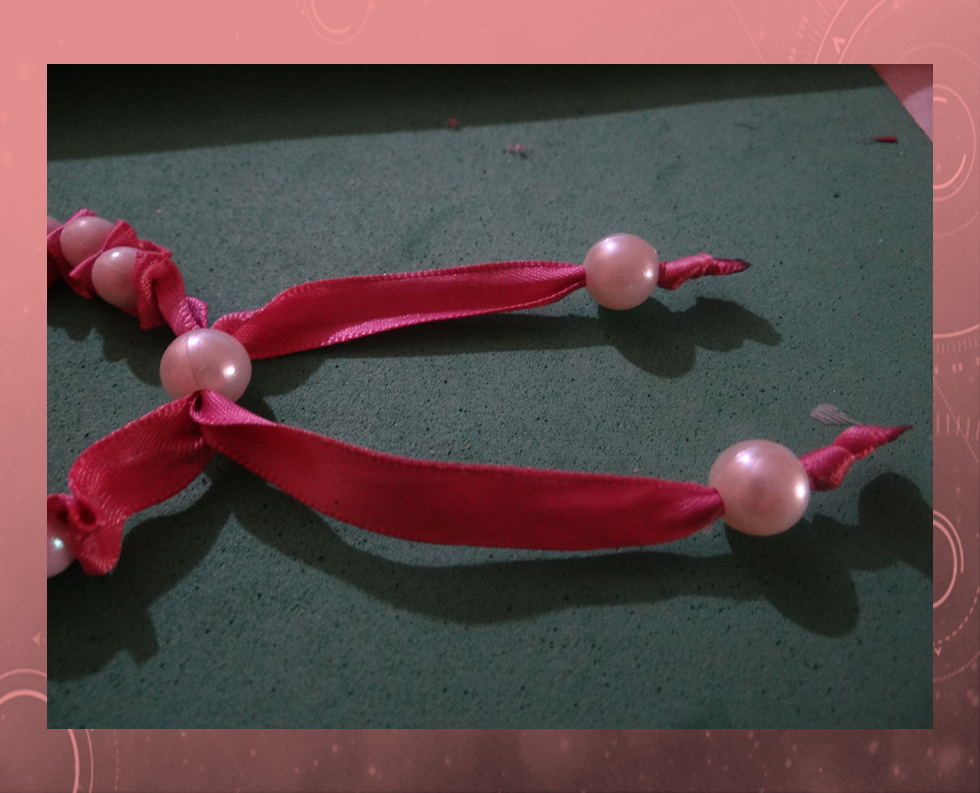
8.- Viene el trancadero de la pulsera que es como los que se hacen para las pulseras de macramé o nudo franciscano, pero aquí es con perlas.
9.- Para este trancadero usare las perlas mas grandes, pero aquí se no presenta la dificultad de que la cinta es muy gruesa para pasar por la cinta, pero es ahí donde debemos ingeniarnos como.
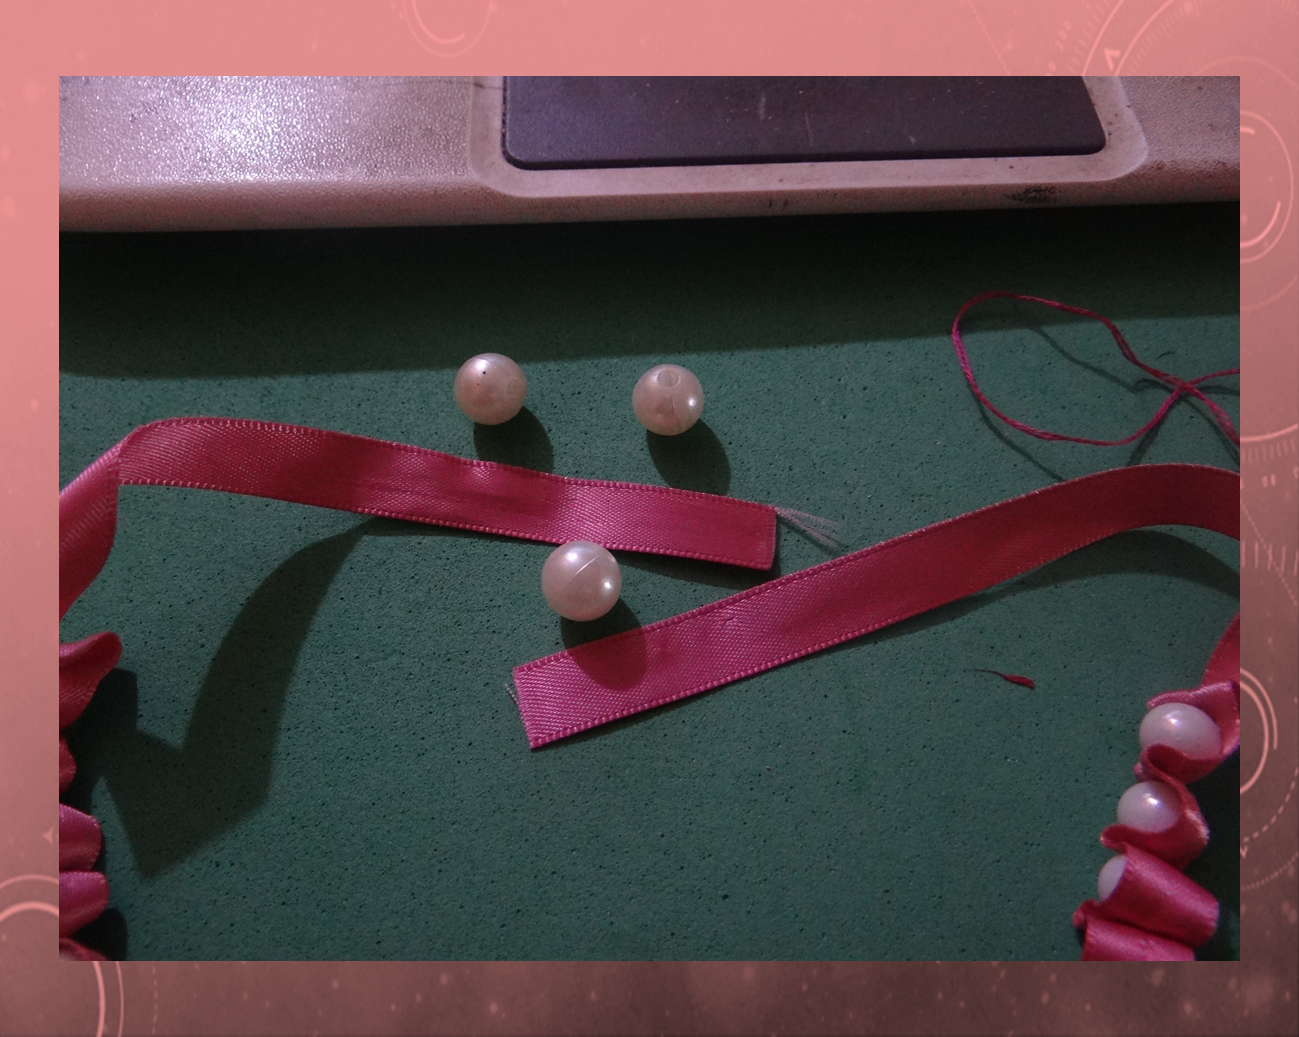
10.- Pase la aguja por la perla y me regrese igual dejando del otro lado como un espacio que por ahí meto uno de los extremos de la cinta y del otro lado de la perla donde están los hilos los halo con cuidado y así pasamos la cinta. Lo mismo debemos hacer para el otro lado de la cinta pero de sentido contrario, aquí si se pone mas difícil porque como ya pasamos una cinta queda menos espacio, pero con cuidado y paciencia se logra, cuando del otro lado ya vemos algo de la cinta la podemos halar con una pinza y ya salio la cinta.
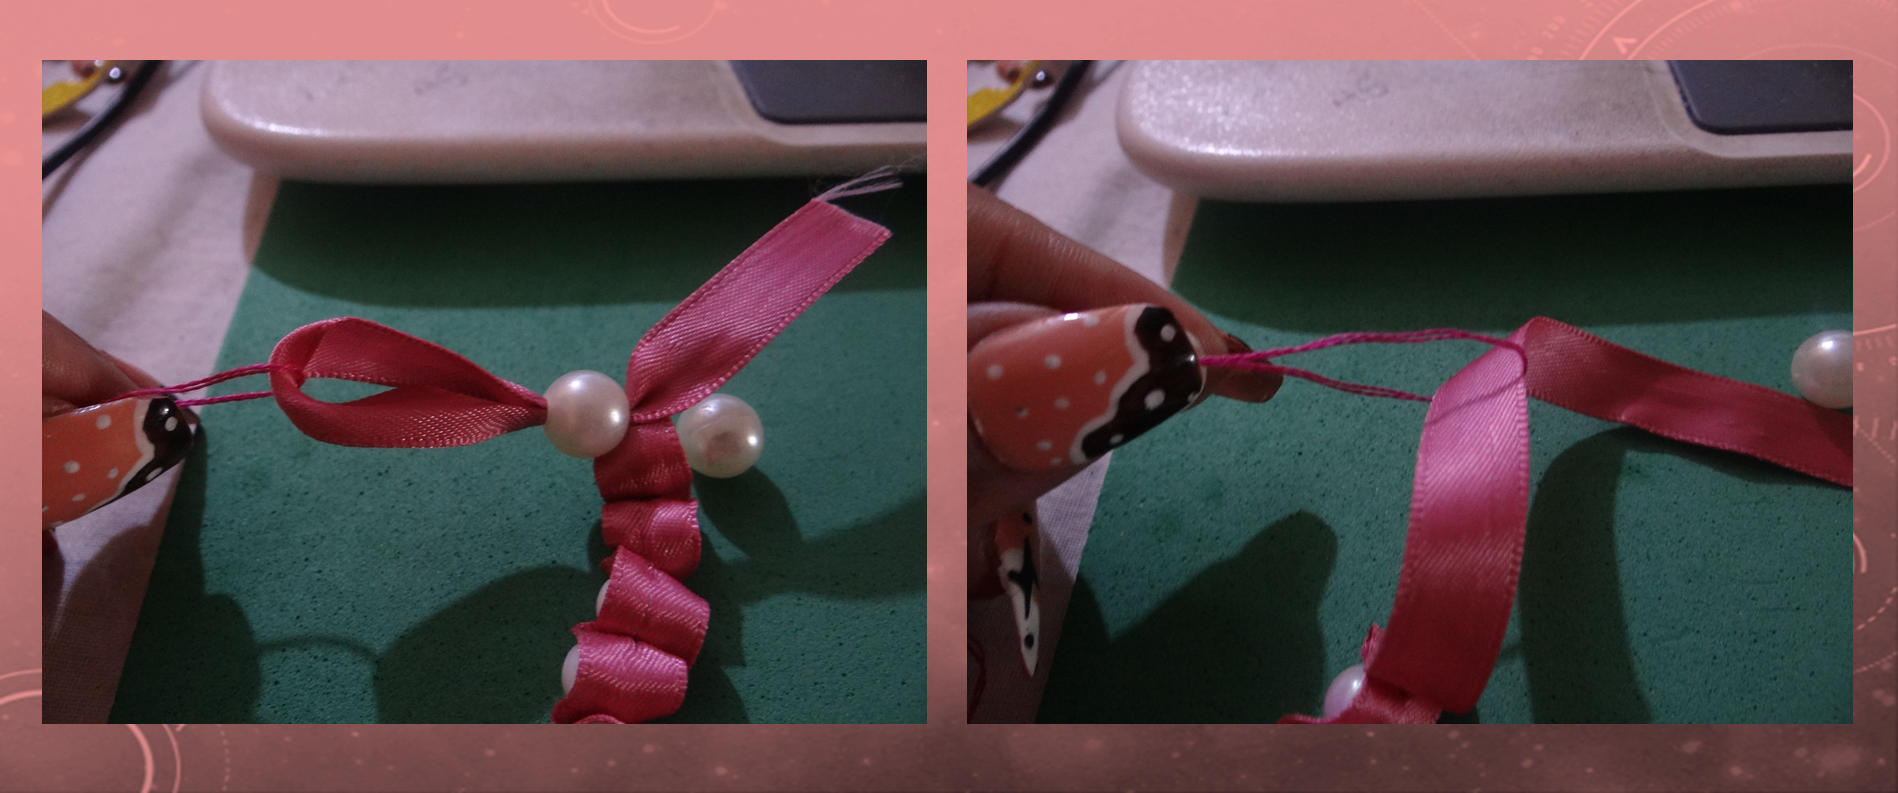
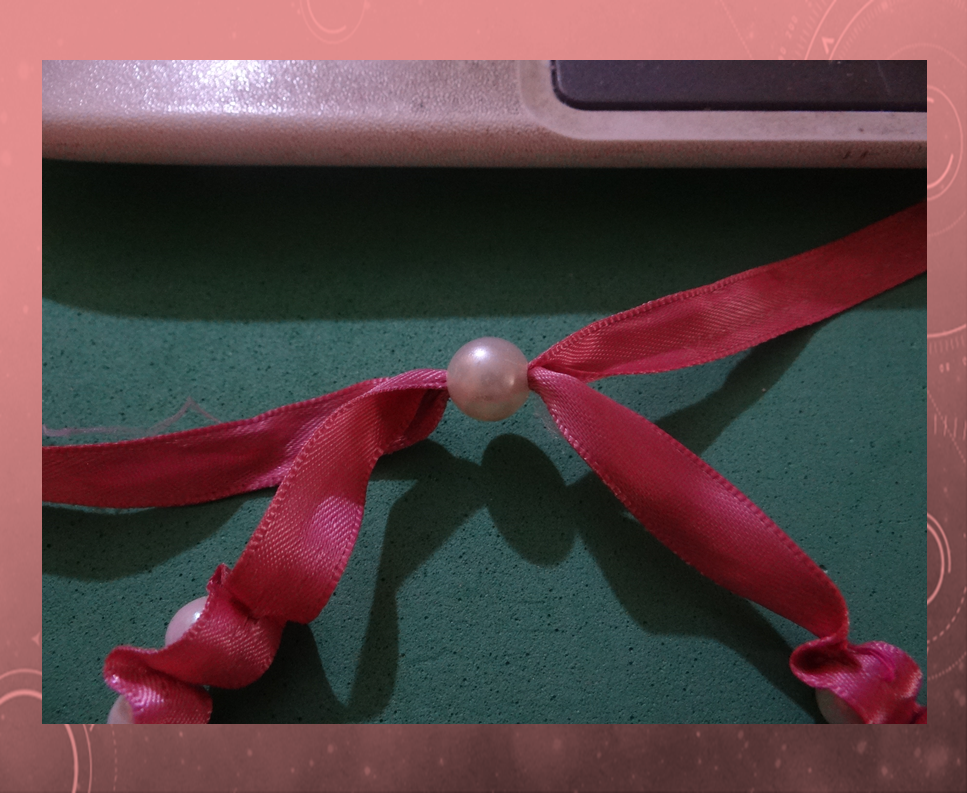
11.- Este tipo de trancadero son ajustables, podemos apretar o aflojar como nos guste usar la pulsera a mi me gustan que me quede sueltecita.
12.- En los extremos de las cintas, hacemos lo mismo, luego con la vela quemamos para que no se deshilache la cinta, hacemos un nudito para que no se salga la perla que no se va salir porque es gruesa la cinta pero para que se vea mas bonita, delicada la pulsera y ya la terminamos.
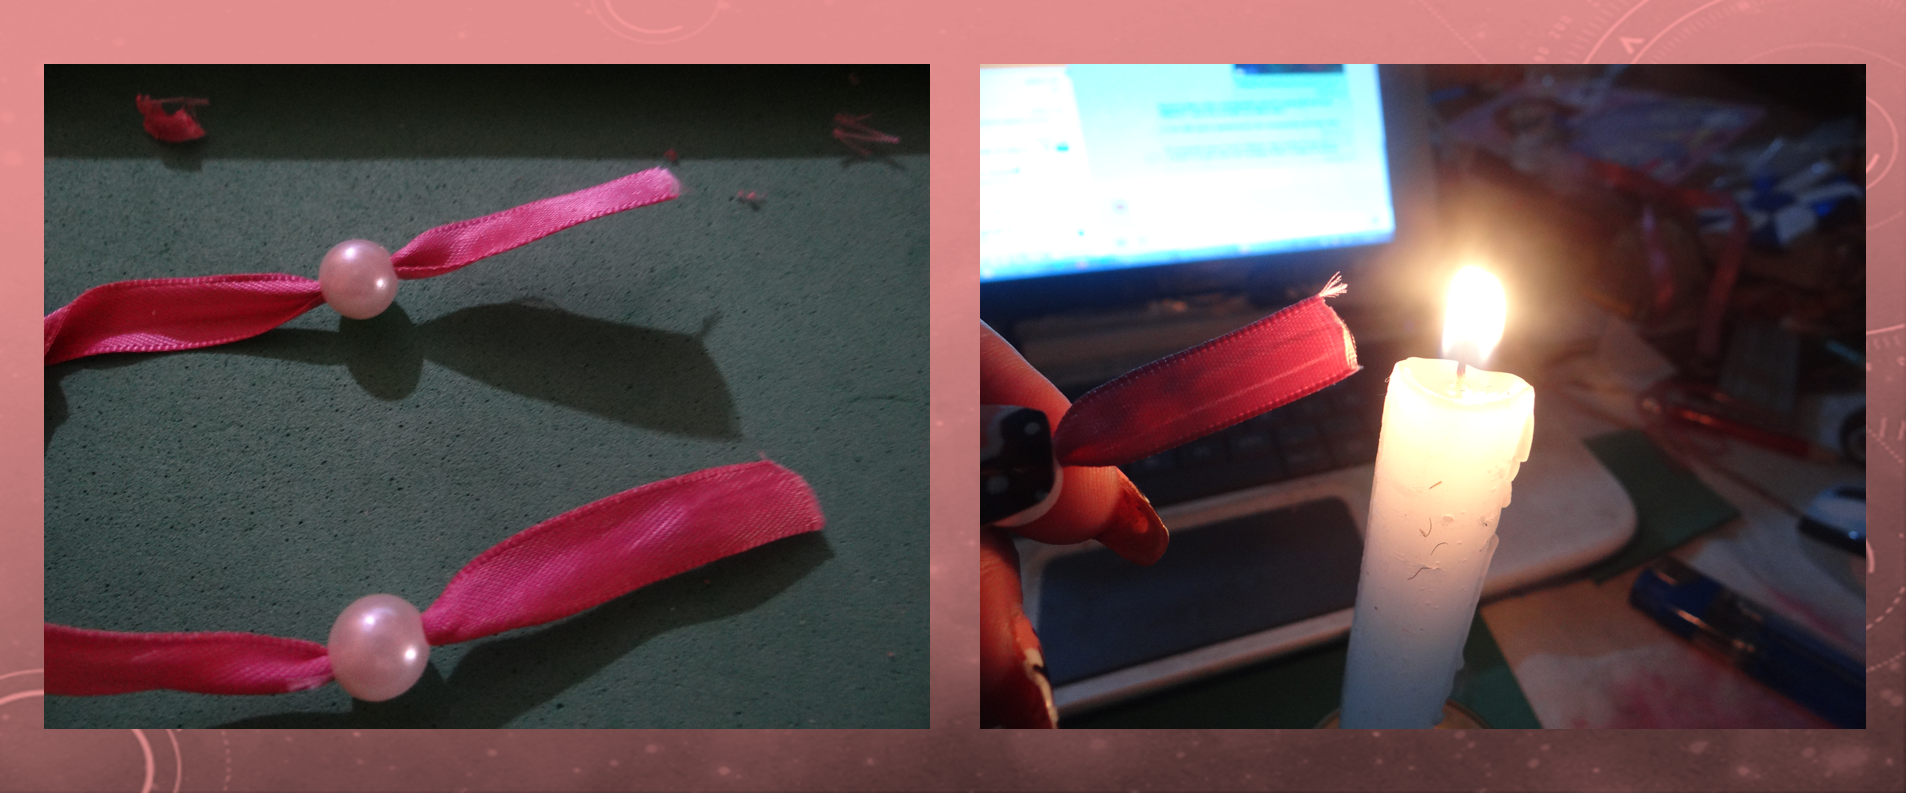
13.-También con los extremos de las cintas se pueden hacer lazos pero prefiero como la hice es como mas segura que no se me salga de mi mano.

💘Todas las fotos del paso a paso tomadas con mi cámara Sony y las selfies con mi celular Samsung A12.
💘Contenido propio traducido con la app DeepL.
Nunca se rindan antes de hacer las cosas, no podemos
decir no se, sino lo intentamos.
💘 Hasta otra publicación mis queridos orfebres, de cosas bellas, para todos y para uno.

💘 One of the things that I like here in Hive, is that it is like a school, because we learn and the best thing is that we put it into practice, from what other hives teach us, here they teach us everything: food, sweets, crafts, jewelry and much more.
💘 A few days ago I saw a hive that made a bracelet with pearls and ribbons, here which I was delighted with, because I like to use this kind of accessories.
💘 Now I will make my own and thus prove that I learned and that yes it can be done.
💘 Materials:
💘 Old pink satin ribbon 1 cm wide.
💘 Pearly white pearls or litmus nº 7.
💘 Pearly or iridescent white beads nº 8 or 9.
💘 Embroidery thread of the same color as the pink ribbon.
💘 Needle.
💘 Ruler, scissors, candle.
💘Everything I did with recycled material, I had at home, because those of us who do crafts always have some material at home, so the one who saves always has.
💘 Now let's get to the bracelet.
1 .- Use an old pink ribbon that is 1.25 cms. I left it like that because we do not know how much I was going to need, what's left over you know is saved for something else later.
2.- Before starting look for a needle that is easy to thread and that goes through the holes of the pearls, because there are needles that are thick or the holes of the pearls are very small.
3.- Measure with a ruler or sewing tape measure, 10 or 12 cms and from there, we start with the bracelet, we make a small double and try to put the needle in the middle and return again to make the safety knot.
4.- Now if we are putting pearls, we fold the ribbon that does not protrude to the pearl, from 4 in 4 or 5 in 5 pearls we make a little knot to secure it and it will be tight.
5 .- From time to time we must be trying on the wrist, the bracelet to go measuring how it goes, if you need more beads we continue, but if not we leave it there, but as it is for me, I was missing.
6.- The bracelet is ready to my size, I used 24 beads, I made my security knot.
7.- I measured again the 10 or 12 cms and cut with the scissors, in total I used 0.45 cms of the ribbon, the rest I kept.
8.- Here comes the trancadero of the bracelet that is like those that are made for the macramé bracelets or Franciscan knot, but here it is with pearls.
9.- For this trancadero I will use the biggest pearls, but here the difficulty is that the ribbon is too thick to pass through the ribbon, but that's where we have to figure out how to do it.
10.- Pass the needle through the bead and I return the same leaving on the other side as a space that I put one of the ends of the ribbon and on the other side of the bead where the threads are, I pull them carefully and so we pass the ribbon. The same we must do for the other side of the tape but in the opposite direction, here if it gets more difficult because as we passed a tape is less space, but with care and patience is achieved, when the other side and we see some of the tape we can pull it with tweezers and the tape is out.
11 .- This type of trancadero are adjustable, we can tighten or loosen as we like to use the bracelet to my I like that I stay loose.
12 .- At the ends of the ribbons, we do the same, then burn with the candle so that the tape is not frayed, we make a knot so that the pearl does not come out because the tape is thick but to make it look more beautiful, delicate bracelet and we finished it.
13.-Also with the ends of the ribbons you can make loops but I prefer the way I did it, it's more secure and it won't come out of my hand.
💘 All the step by step photos taken with my Sony camera and the selfies with my Samsung A12 cell phone.
💘 Own content translated with the app DeepL.
Never give up before doing things, we can't say I don't know, if we don't
say I don't know, if we don't try.
Until another pulbication my dear goldsmiths, of beautiful things, for all and for one.
Congratulations @zhanavic69! You have completed the following achievement on the Hive blockchain And have been rewarded with New badge(s)
Your next target is to reach 22000 upvotes.
You can view your badges on your board and compare yourself to others in the Ranking
If you no longer want to receive notifications, reply to this comment with the word
STOPTo support your work, I also upvoted your post!
Check out our last posts:
Hive is such a great place to teach and learn by putting it into practice. I'm not aware ribbon and beads could be this good in making a bracelet.
Hermosa pulsera, me encanto, voy a hacerla porque tengo todo, gracias por compartir y un paso a paso tan bien explicado
Excelente te quedó hermosa felicitaciones.
Con el apoyo de la familia.
También nos puedes apoyar en nuestro Trail de TopFiveFamily
Si desea delegar HP al proyecto de la Familia del Top Family puedes hacerlo desde aquí: Delegue 5 HP - Delegue 10 HP - Delegue 20 HP - Delegue 30 HP - Delegue 50 HP - Delegue 100 HP.
Hermosas; y te envío muchas bendiciones por tus manos y tus esfuerzos @zhanavic69