🎨 {06/07/24} ✦ DIY - "Sailor Moon themed decorated choker" 🪡 🎀 [step-by-step tutorial] ✦ 🇪🇸 │ 🇺🇸
✦ Let's get inspired by gothic and romantic aesthetics, lots of lace and silk ribbons! - Collage and Edition made with FotoJet, photos and creative process by @Tesmoforia ✦

🇪🇸 ~ ¡Actualmente casi todo esta de moda! Tanto el maximalismo como el minimalismo en todas sus variantes. Casi todo es válido y personalmente encuentro entrañable la manera en que las personas más jóvenes combinan su ropa, es como si no hubiera reglas ya al vestir pero aun así encuentran un agradable equilibrio donde la única pauta es sentirte bien con lo que usas (pero si me equivoco, bienvenidas sean las correcciones por favor, la moda actual me intriga mucho).
🇺🇸 ~ Nowadays almost everything is in fashion! Both maximalism and minimalism in all its variants. Almost everything is valid and I personally find it endearing the way younger people combine their clothes, it's as if there are no rules anymore when dressing but still find a nice balance where the only guideline is feel good with what you wear (but if I'm wrong, welcome corrections please, current fashion intrigues me a lot).

 |  |
|---|---|
 |  |
 |  |
Reflexionar sobre la moda actual y esta sensación de libertad me hizo recordar los accesorios que estuvieron de moda cuando fuí niña-adolescente, especialmente la moda gótica y la moda otaku de finales de los 90s y principios del 2000s. Me hizo preguntarme por ejemplo si podría recrear algo de lo que recuerdo, pero agregando un "extra" tematizándolo con la serie anime más popular entre el publico femenino de ayer y hoy ヽ (> ∀ <☆) ノ
Reflecting on current fashion and this sense of freedom made me remember the accessories that were in fashion when I was a child-teenager, especially the gothic fashion and otaku fashion of the late 90s and early 2000s. It made me wonder for example if I could recreate some of what I remember, but adding an "extra" by theming it with the most popular anime series among the female audience of yesterday and today ヽ (> ∀ <☆) ノ
✦ STEP BY STEP TUTORIAL ✦

 |  |
|---|---|
 |  |
| 📝 Los materiales y herramientas que necesitaras para elaborar este proyecto son: Cinta de seda, cinta de raso, encaje de tela no elástico, hilo, aguja, pegamento, alfileres, pinzas de costura, tela, plancha para ropa, regla o cinta métrica, lápiz y tijeras. ✦ Opcional: Cuero sintético , máquina para ojales, media perla sintética de 1cm, perla sintética de 0.5cm, dijes de luna o masa flexible, pintura acrílica color dorado y pinceles. |
|---|
| 📝 The materials and tools you will need to make this project are: Silk ribbon, satin ribbon, non-elastic fabric lace, thread, needle, glue, pins, sewing clothespins, fabric, clothes iron, ruler or tape measure, pencil and scissors. ✦ Optional: Synthetic leather , eyelet machine, 1cm synthetic half pearl, 0.5cm synthetic pearl, moon charms or flexible dough, gold color acrylic paint and brushes. |

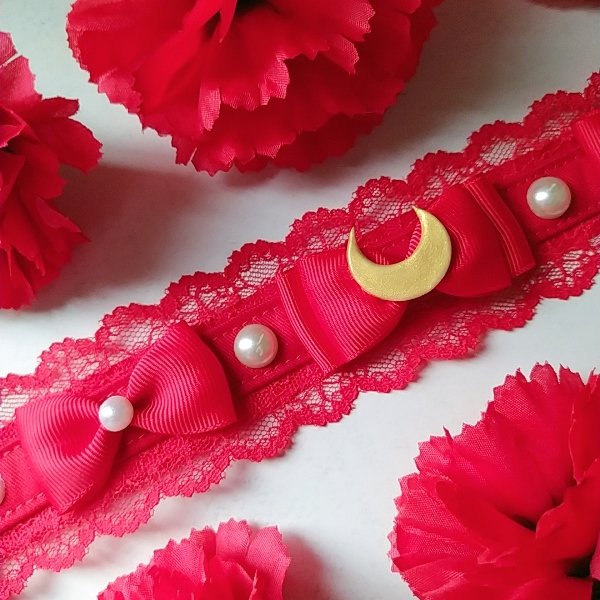
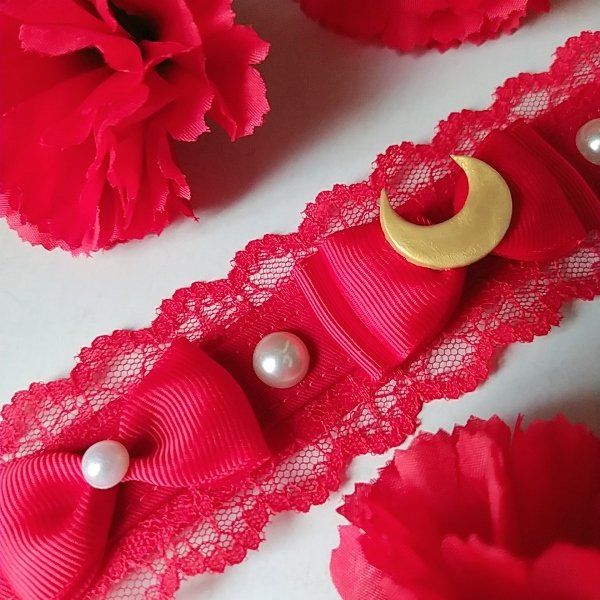
✦ I chose an assorted selection of red ribbons in different textures and tones. The measurement I used for all of them was: 28 cm ✦
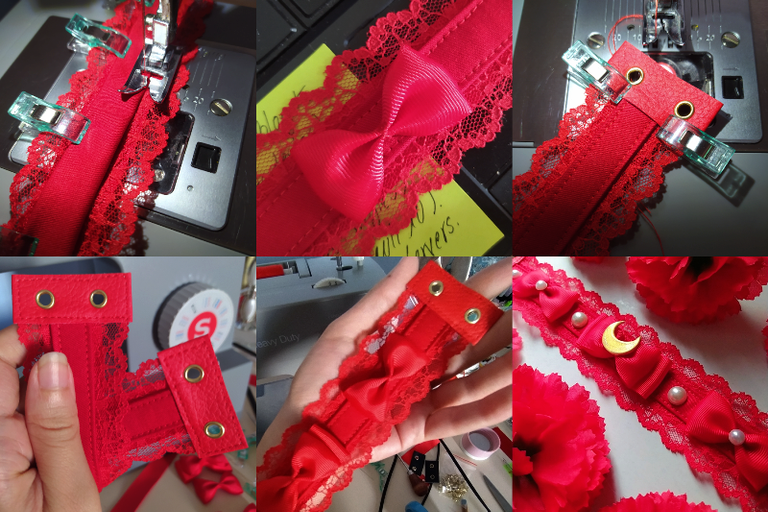
📌 PASO 1 ✦ Aunque la selección del tipo de cinta y color es a elección personal, antes de escogerlo recomiendo medir el contorno de tu cuello y asegurarte que el encaje que has escogido se vea como aspiras. La medida de los cuellos varía mucho y este accesorio si es muy ancho, se arrugará al superar la curva del cuello y la curva de los hombros. Es decir, mide antes de cortar. Y resta a la medida total contorno de tu cuello, minimo 3cm.
❤ STEP 1 ✦ Although the selection of ribbon type and color is up to personal choice, before choosing it I recommend measuring the contour of your neckline and making sure the lace you have chosen looks as you aspire. Neck sizes vary greatly and this accessory if it is too wide, it will wrinkle as it goes over the curve of the neck and the curve of the shoulders. That is, measure before cutting. Subtract at least 3cm from the total measurement of your neckline.
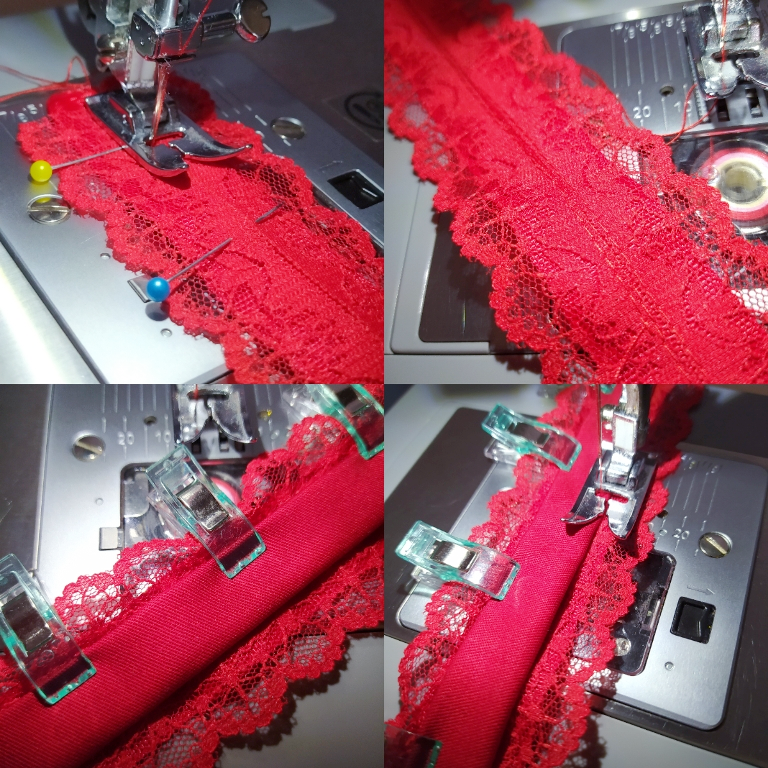
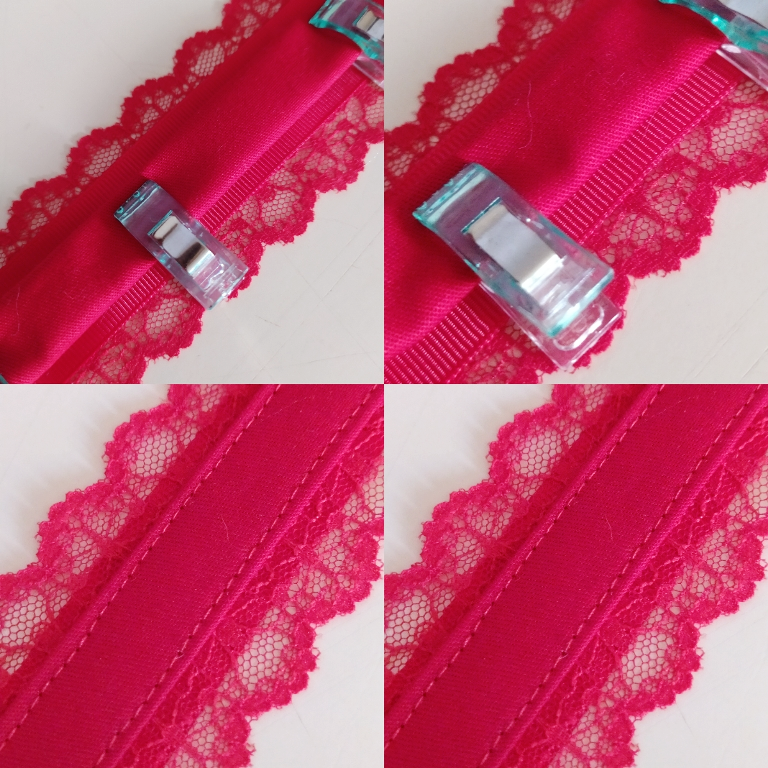
✦ In this step I prefer sewing pliers rather than pins, because this type of work is very delicate and a wrong movement of the pins can cause an irreparable defect in the piece ✦
📌 PASO 2 ✦ Decide la configuración que quieres para tu gargantilla. Es decir el orden del material: Yo recomiendo primero utilizar una base de cinta gruesa, luego 2 capas de encaje dejando el lado decorado hacia el exterior, y finalmente una capa o cinta de tela gruesa. Puedes utilizar pegamento o coserlo a mano, pero para un acabado mas profesional, recomiendo para este proyecto en específico utilizar una máquina de coser.
❤ STEP 2 ✦ Decide the configuration you want for your choker. That is the order of the material: I recommend first using a thick ribbon base, then 2 layers of lace leaving the decorated side to the outside, and finally a layer or thick fabric ribbon. You can use glue or sew it by hand, but for a more professional finish, I recommend for this specific project using a sewing machine.
✦ When everything is ready, iron at low-medium temperature with great care ✦
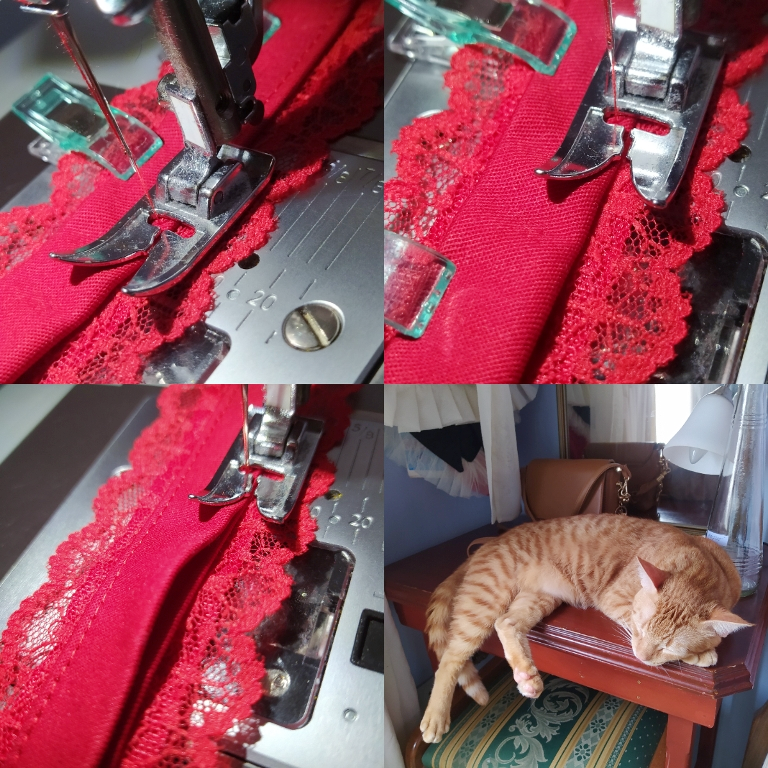
📌 PASO 3 ✦ Si tienes la oportunidad o elijes coser con la máquina, la puntada debe ser pequeña, recomiendo utilizar del N° 2.5 o máximo N° 3, lo más cerca del borde posible.
❤ STEP 3 ✦ If you have the opportunity or choose to sew with the machine, the stitch should be small, I recommend using No. 2.5 or maximum N° 3, as close to the edge as possible.
✦ You can make this accessory with different colored material. I chose red as the only color because it is currently in my TOP 3 best colors for crafts ✦
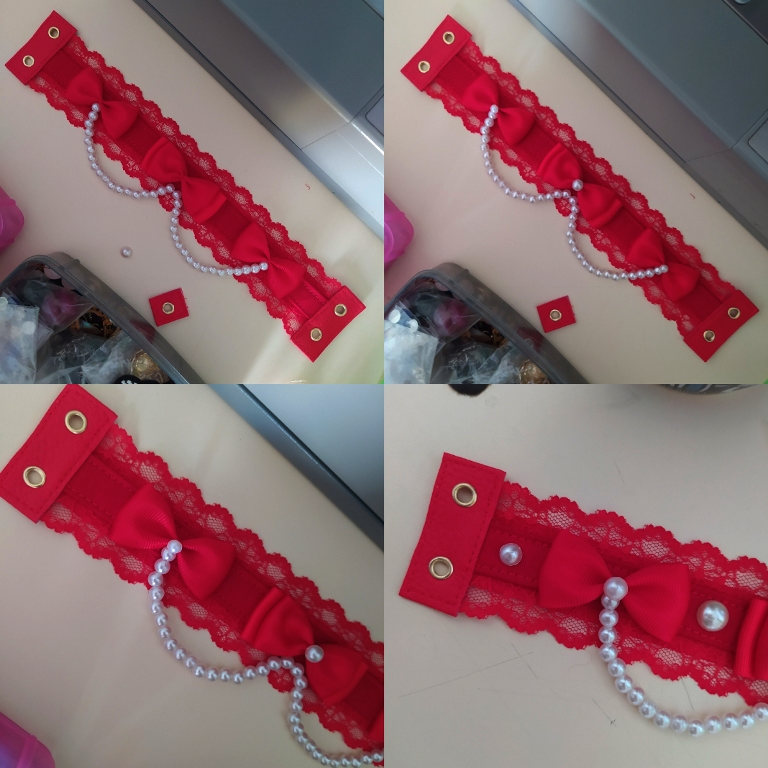
📌 PASO 4 ✦ ¡Admira el antes y el después!, ubicar el material previamente en la posición que quieres te aproxima más a un resultado que luzca armonioso. En mi caso notaras por qué cambie la posición de la cinta base o principal.
❤ STEP 4 ✦ Look at the before and after, placing the material previously in the position you want to get closer to a harmonious looking result. In my case you will notice why I changed the position of the base or main tape.

✦ Decorations are optional, if you want this accessory to be solid that's fine, and you can skip this step ✦
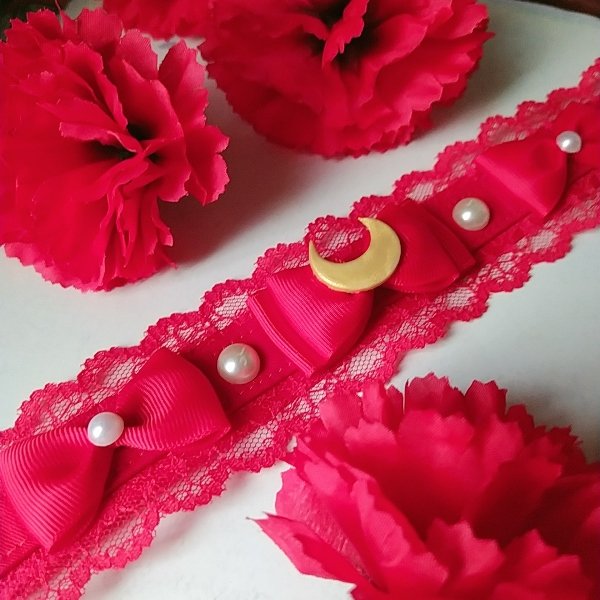
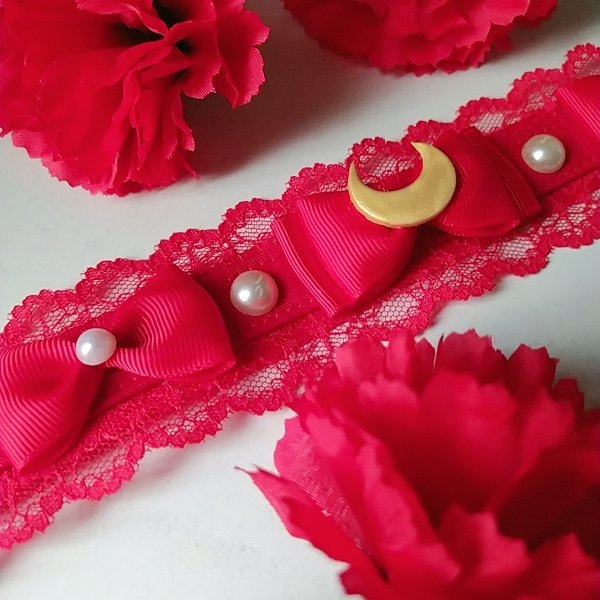
📌 PASO 5 ✦ Escoge el tipo de decoración que quieres agregar y en qué número. Según el número de piezas decorativas, debes medir el espacio que ocuparán y debes asegurarte de que sea simétrico. Yo escogí hacer lazos con cinta de raso, 2 simples y 1 de doble capa. Para hacerlos, la medida de cada pieza de cinta es 9cm de largo, que doblarás a la mitad y coseras a mano. Para la segunda capa del lazo del centro o principal, necesitaras una extra de 11cm.
❤ STEP 5 ✦ Choose the type of decoration you want to add and in what number. Depending on the number of decorative pieces, you must measure the space they will occupy and you must make sure it is symmetrical. I chose to make bows with satin ribbon, 2 single and 1 double layer. To make them, the measurement for each piece of ribbon is 9cm long, which you will fold in half and sew by hand. For the second layer of the center or main bow, you will need an extra 11cm.
✦ An alternative, too, is to use an inexpensive metal chain and clasp system, but I prefer this one, because it will make the piece more durable ✦
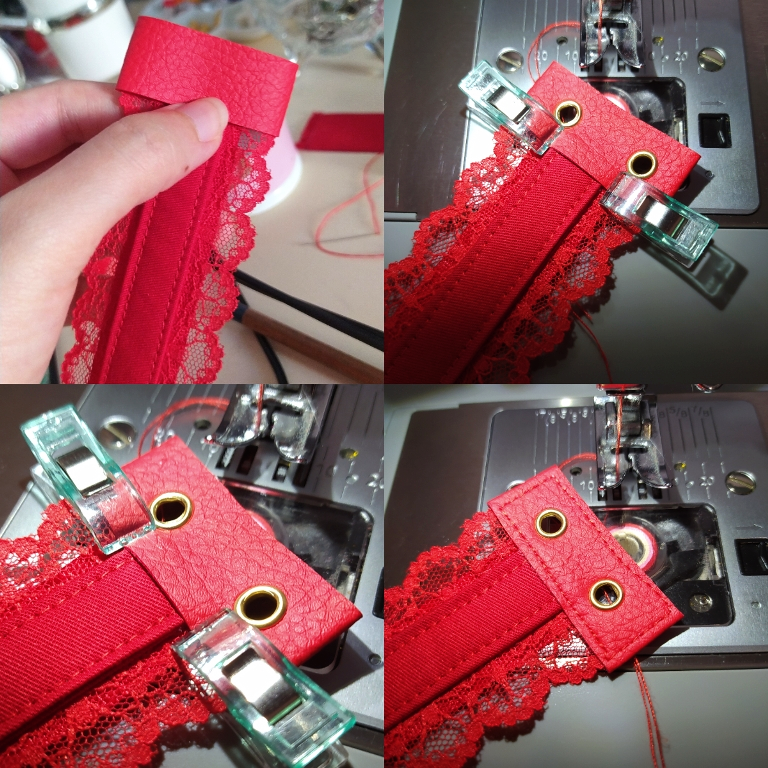
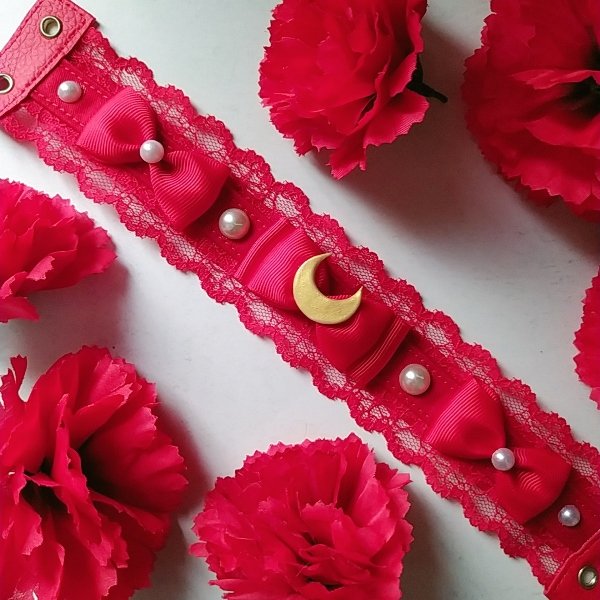
📌 PASO 6 ✦ Para los extremos, cortaras 2 piezas de cuero sintético al que previamente le instalarás 2 ojales metálicos a cada uno con la máquina manual para ojales. Luego, introducirás estas pestañas de forma centrada en los extremos del accesorio y coseras con la maquina de coser.
❤ STEP 6 ✦ For the ends, you will cut 2 pieces of synthetic leather to which you will previously install 2 metal eyelets on each one with the hand machine for eyelets. Then, you will insert these tabs centered on the ends of the accessory and sew with the sewing machine.
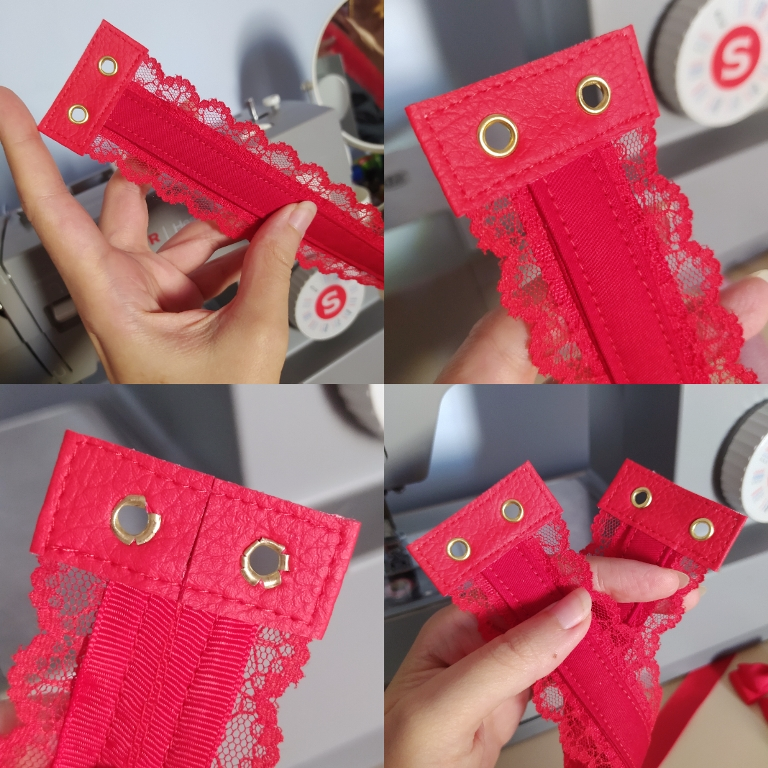
✦ The eyelet is not perfect but it is functional and secure. If you notice that the metal backing is not fully engaged with the synthetic leather, bring the piece to a clean, smooth surface and tap the eyelets gently with a rubber hammer. This will solve the problem ✦
📌 PASO 7 ✦ En esta etapa revisa la pieza. Corta todos los hilos sobrantes tanto del frente como el reverso. En caso no quieras agregar decoraciones, tu gargantilla esta lista.
❤ STEP 7 ✦ At this stage check the piece. Cut all the excess threads from both the front and the back. In case you do not want to add decorations, your choker is ready.
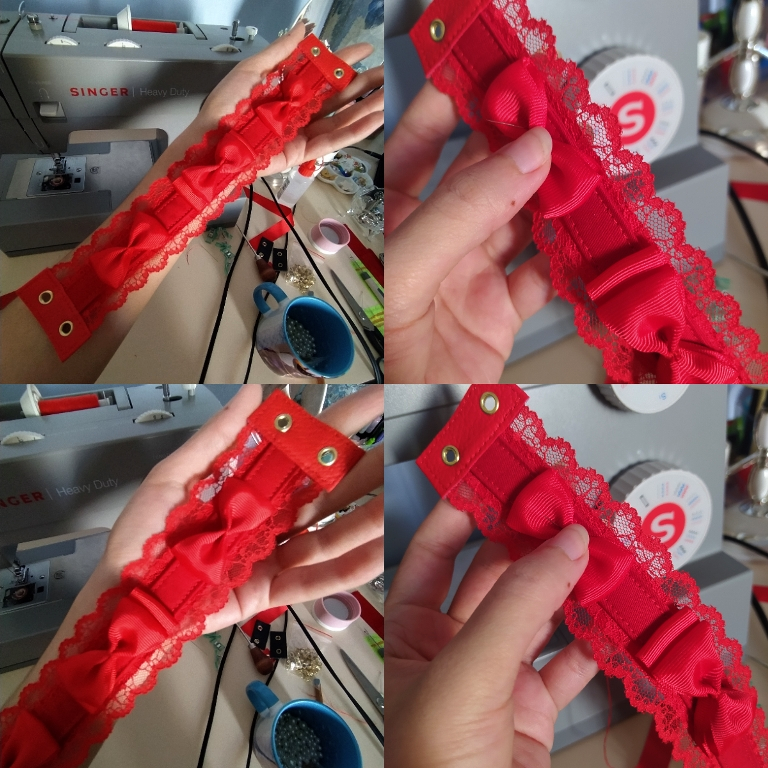
✦ A good alternative to these ribbons could be small fabric roses ✦
📌 PASO 8 ✦ ¡Hora de instalar las decoraciones!, puedes hacerlo con un poco de pegamento o a mano con hilo y aguja, y asegúrate de medir previamente y marcar su posición con ayuda del lápiz.
❤ STEP 8 ✦ Time to install the decorations, you can do it with some glue or by hand with thread and needle, and make sure to measure beforehand and mark their position with the help of the pencil.
✦ This is the final moment to add everything permanently in place. You must be very sure because once you install things it will be very difficult to take them off ✦
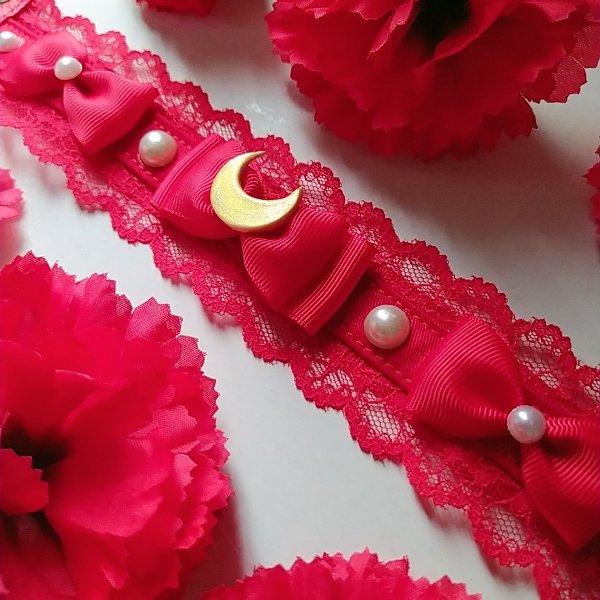
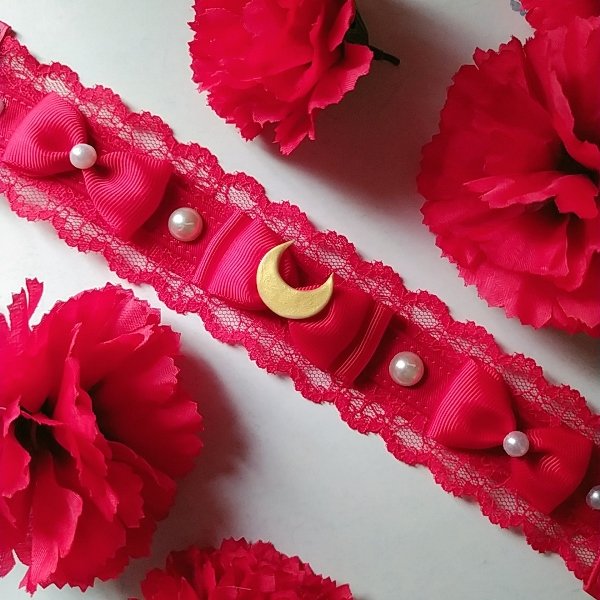
📌 PASO 9 [FINAL] ✦ Yo quería hacer una propuesta un poco más elevada y agregué una cadena de perlas entre cada lazo. Necesitas aproximadamente de 50 a 60 perlas dependiendo la medida que escojas para hacer esta secuencia.
❤ STEP 9 [FINAL] ✦ I wanted to make a slightly more elevated approach and added a string of pearls between each loop. You need approximately 50 to 60 pearls depending on the size you choose to make this sequence.
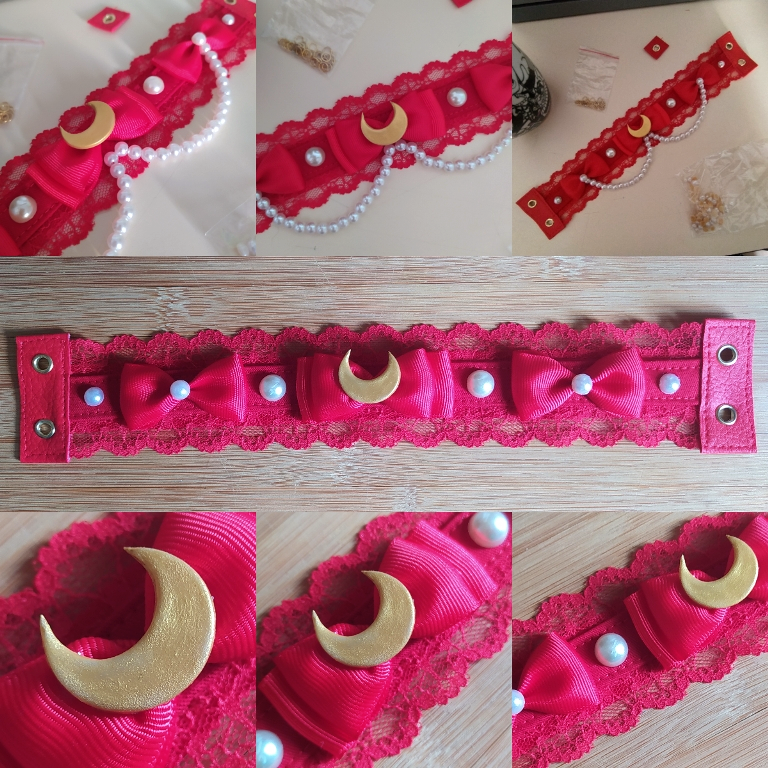
✦ My friends told me that to make this piece more affordable I should remove the pearl chain, as it was a very specific detail that maybe not everyone would like, so I listened to them and removed it at the end. I hope to produce several models of these for my store ✦
| 🇻🇪 Instrucciones Resumidas en Español 🇻🇪 | 🇺🇸 Summary Instructions in English 🇺🇸 |
|---|---|
| 1. Selecciona el Material. | 1. Select the Material. |
| 2. Corta el material de acuerdo a la medida de tu cuello. | 2. Cut the material according to the size of your neck. |
| 3. Superpón el material de forma temporal para comprobar la posición de cada capa. | 3. Overlap the material temporarily to check the position of each layer. |
| 4. Une cada capa con pegamento o costura. | 4. Join each layer with glue or stitching. |
| 5. Fabrica pasadores o instala un broche tradicional. | 5. Make pins or install a traditional brooch. |
| 6. Agrega las decoraciones de tu preferencia. | 6. Add the decorations of your choice. |
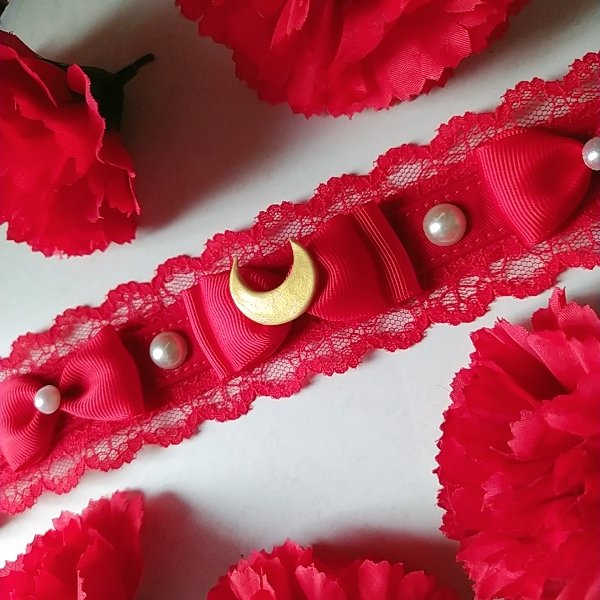
✦ Get ready for a shot of cuteness! ✦
 |  |
|---|---|
 |  |
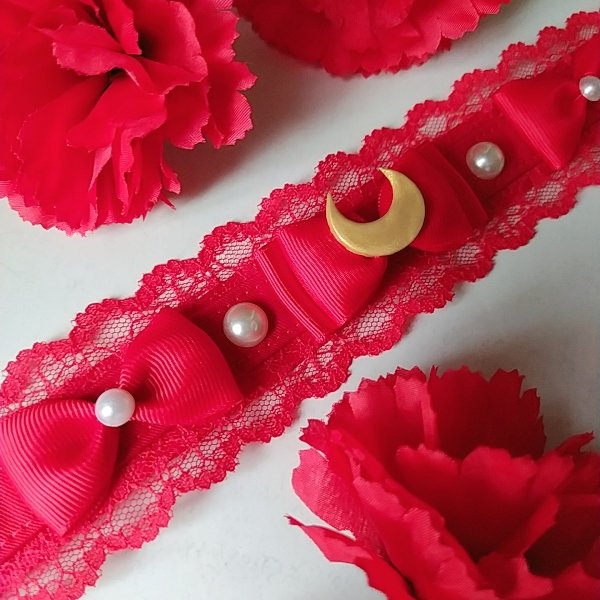 |  |
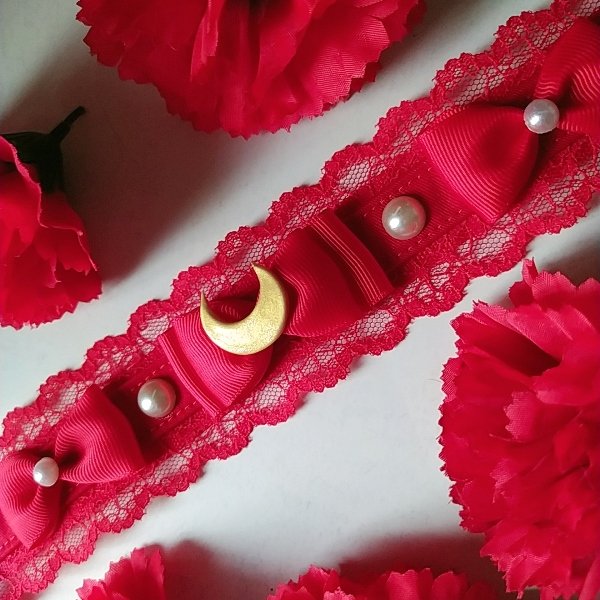
"¡HEY!, ¿Y que ha pasado con las instrucciones de las lunas?" ~ No lo he olvidado mi estimado amigo uwu)/ puedes conseguir el tutorial completo de cómo elaborar lunas en masa flexible en este primer tutorial más sencillo de collares inspirados en Sailor Moon. De hecho la luna que vez en esta ocasión forma parte de ese primer lote que elabore hace algunas semanas, y como puedes ver el aspecto es bastante bonito y no se dañan ni pierden brillo con el paso de los días
"HEY!, And what happened to the instructions for the moons? " ~ I haven't forgotten my dear friend uwu)/ you can get the full tutorial on how to craft flexible mass moons in this first, simpler tutorial of Sailor Moon inspired necklaces. In fact the moon you see this time is part of that first batch I made a few weeks ago, and as you can see the look is quite nice and they don't get damaged or lose their shine as the days go by.
 |  |
|---|---|
 |  |
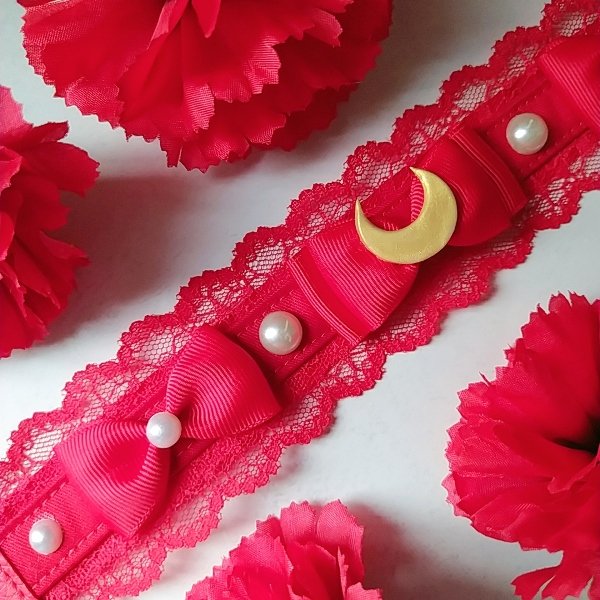
El recurso "hazlo tu mismo" es mas importante ahora que nunca, en un mundo donde el fast-fashion nos ahoga con productos prefabricados de dudoso origen y calidad, los recursos gratuitos que nos enseñan a cómo elaborar las prendas con las que soñamos son un tesoro.
Así, este es el tesoro que yo te regalo hoy, esperando te sea útil no solo para crear complementos de estética alternativa para tu closet, sino tambien para que hagas regalos para tus amigos, o incluso empieces un emprendimiento. Si tienes alguna pregunta estare encantada de responderte en los comentarios ⌒ (o ^ ▽ ^ o) ノ 🌸 ✨
The resource "do it yourself" is more important now than ever, in a world where the fast-fashion drowns us with prefabricated products of dubious origin and quality, the free resources that teach us how to make the garments we dream of are a treasure.
So, this is the treasure that I give you today, hoping it will be useful not only to create alternative aesthetic complements for your closet, but also for you to make gifts for your friends, or even start a business. If you have any questions I'll be happy to answer them in the comments ('. • ω •.`) 🌹 ✨

 |  |  |  |  |  |  |  |  |
|---|
✨ 🍓 All texts and images by @Tesmoforia 🍓 ✨
📸 Tools: Xiaomi Redmi Note 8 📲 Snow 🎬 Remini 🌓 FotoJet 📐
🚨 ¡Please do not take, edit or republish my material without my permission! 🚨
💌 ¿Do you wish to contact me? Discord #tesmoforia 💌
🌙 Banner, signature and separators by Keili Lares
Posted Using InLeo Alpha
If anyone knows please how to change the X account link with Hive let me know! This is my current active X account for Hive, the other one I use just to share art of my favorite ancestral Chinese hahahaha (* ノ ∀` *)
Si alguien sabe por favor cómo cambiar el enlace de cuenta de X con Hive avíseme! Esta es mi cuenta actual de X activa para Hive, la otra la utilizo solo para compartir arte de mis chinos ancestrales favoritos jajajaja (* ノ ∀` *)
https://x.com/MinoCosplay/status/1809809441644011555
What a beautiful choker, I love the red color, and that touch of pearls looks beautiful on it.
Hello Emmaris! I'm glad to know that you liked the pearls detail, although my friends recommended me to remove them from the design to make it less specific, but I think both presentations look good owo thanks for the feedback! ❤
Precioso. Estoy loca por un traje de Sailor Moon. Amo mucho ese animado, pero como no tengo muchos recursos, pues no puedo hacer un lindo traje de esos. Pero estoy segura que si haces uno, quedará genial.
Te ha quedado precioso, hasta me dieron ganas de hacer uno 😍
It was beautiful, it even made me want to make one 😍.
Deberías hacerlo! Quien dijo miedooooo ~ :3
Guao! qué preciosa colección amiga!
Aqui es donde enlazas tu cuenta de Hive con X https://hiveposh.com/
Aaaayyyy me hace muy feliz si te gusto este proyecto preciosa Isa ///)u/// 💞 Como siempre, eres un sol, ya pude actualizar X y la cuenta esta enlazada, había tenido problemas para poder compartir el contenido alli hasta ahora, muchisimas gracias 🫂 🫂 🫂
This is so creative and beautiful!!!
Good job!
Thank you so much! 🌼 💕