30 Pictures 30 Stories Challenge - Day 14 – Unashamed Selfie (Selective Colour Photography #2)
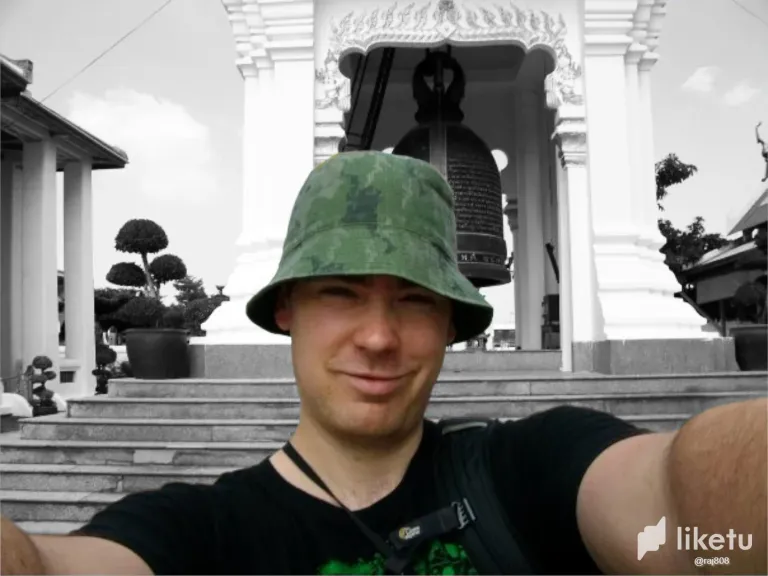
Selective Colour Photography Selfie
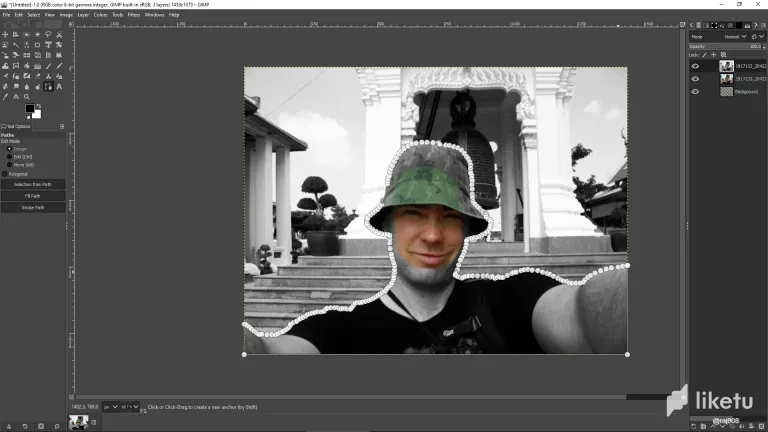
GIMP Selective Colour Photography method

I was inspired by thisismylife's recent blogging challenge on @liketu, 'The 30 Pictures 30 Stories Challenge'.
They were originally inspired by rubencress '30 day not-so ordinary ordinary items challenge' and both challenges are a great way to encourage daily posting on hive.

This challenge is pretty open-ended; please feel free to follow my formula, or thisismylife's or rubencress' challenge structures listed in their posts linked above 🔼
The only stipulations are that you post one picture daily with a personal story for 30 days.
Write your story/anecdote to the best of your ability, and use the tag #30stories and/or the #notsoordinary & it's also advised to use the #challenge tag.
As I am a professional writer outside of hive blockchain and only dabble as an amateur photographer, I thought I would loosely follow thisismylife's challenge format to tell some stories and anecdotes about my strange life.

This is my second attempt at Selective Colour Photography and this time I decided to stick more closely to what I have read about using a clear subject to focus on to create contrast, rather than isolating lots of different parts of the photo to add colour.
But, this has all come from Google research... and we all know how precarious 'Daddy Google' can be in imparting his knowledge.
I always think of Google research much like asking a know-it-all father of your partner to explain the world to you. What you’ll get is half fact, half opinion and plenty of hard-won wisdom.
So you better be listening!
All my gentle piss-taking aside though, the truth is you can mitigate against misinformation, or just badly thought out methodologies by asking 'Daddy Google' (a phrase of my invention which I shall trademark if I ever become famous 😉) numerous times. Then you get a few perspectives on how to best go about doing what you're setting out to achieve.
There is also a certain amount of drawing upon past experience and knowledge, so this time around I decided to use the 'paths tool' to create a selection on the black and white layer (at the top of the layer tree) and then after pressing the 'selection from path' option all I needed to do was hit the delete key.
And boom... the area I'd selected was deleted to alpha in the colour image in the layer tree below.
I'm so happy I thought to do it this way, as when you look at the second picture in this post that illustrates my GIMP methodology I had started using the 'Eraser tool' which I used in my last Selective Colour Photography post Day 11 – Hippie Market (Selective Colour Photography) and it took much more time to achieve the same technique due to the fine detail and pixel level feathering at the edges of each section.
I really like how this Selective Colour Photo came out. Not because I have a massive ego... and it is obviously all about me 😂
But this picture was taken during my brief stay in Bangkok when I was in Thailand in 2008. I'm not a fan of big cities, and Bangkok is an absolute megalopolis.
I'm pretty sure I would have enjoyed it more if I'd not been alone travelling the first time I ever went backpacking. If I'd had some friends with me to reassure me and encourage further afield trips to the floating market and other attractions.
I spent most of my time in Bangkok taking the public ferry from the dock nearest Khaosan Road and visiting various temples at different stops simply because the size of the city overwhelmed me.
After seeing so many temples, which I did find satisfying and enjoyable when I looked at this photo what jumped out at me was how happy and young I look. Also, I love the vibrant green of my favourite camouflage hat which I later lost somewhere in Ao Nang.
I decided to highlight how that initial adventure in Bangkok made me feel, despite finding it challenging. I put the colour and the focus on my smile, the slight tan I'd managed to build up and the vibrant Green of my long-lost and missed favourite hat.
Let me know in the comments if you agree, or if you think I'd have made a better image by focusing the colour on the temple or the sky in the photograph.
I am open to criticism, and always willing to learn and hear different viewpoints.
Thanks for reading 🌿
All photos and media design used in this post are my own.
Camera: Samsung S7 Smart Phone.


For the best experience view this post on Liketu
Hi @raj808,
Thank you for participating in the #teamuk curated tag. We have upvoted your quality content.
For more information visit our discord https://discord.gg/8CVx2Am