How to build a terrace DIY - ENG/GER
Hello dear garden friends,
just at the end of the year you often think "what project could I realize next year". Therefore, I would like to introduce you in this post, as I have built my terrace itself. Maybe I inspire one or the other to his next project.
Since I am not a craftsman, I have of course made the one or other mistake, which I had to correct later. Despite everything, I succeeded but a really good result and the project was a lot cheaper than if I had implemented it by a craft company.

The planning phase
The planning phase is for me the most important phase. You should not rush anything to avoid unnecessary mistakes as best as possible. The most important points that you should answer in the planning phase are the following:
- What is my budget?
- Where do I want to build the terrace?
- How big do I want the terrace to be?
- Do I want to put electricity on or under my terrace?
- How many hours of sunlight will I have on the terrace?
- In what period of time do I want to build the terrace?
If you have not answered these questions, you may make mistakes later, which will be expensive to correct and cost additional time.
There is nothing worse than a construction stop because you run out of money or if you have to resort to cheap materials in the end. Changing the size of the terrace afterwards is also extremely time-consuming and should therefore be well thought out beforehand.
If you want electricity on your terrace, you should also lay the power cables directly at the beginning. After all, you have already torn up the ground and can use this also for laying cables.
A good foundation
The work you put into the foundation is very important. After all, it is the basis for your new terrace. If you are sloppy in building the foundation, you may end up with an uneven or sagging patio.
It is best to rent a mini-excavator for the excavation. Remove at least 30 to 40 cm of the earth.
Personally, I was too stingy here and saved the mini-excavator and removed the entire earth with a shovel. This took not only incredibly many hours, but was also very exhausting and thus my first learning in terrace construction.
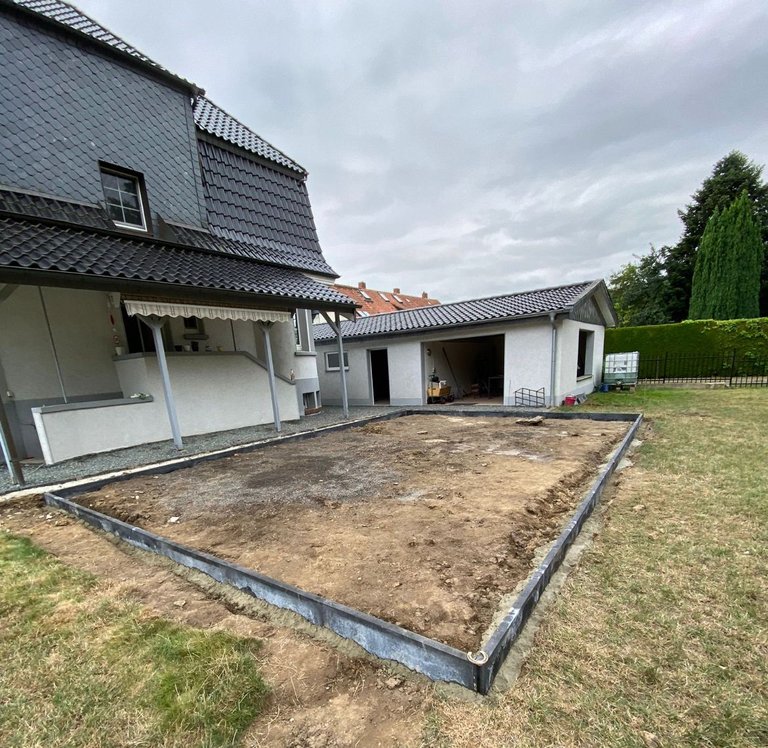
After you have removed the earth, you can set the border. This serves as a border for your terrace. In order for the border to be straight, it is important that you stretch a string and align yourself with it.
When setting the border, make sure that you install a slope of 1-2% away from the house. This way, rainwater does not remain on the surface and runs off to the garden in a relaxed manner. If you botch here, then the water runs in the worst case to the house and causes damage by moisture.
The substructure
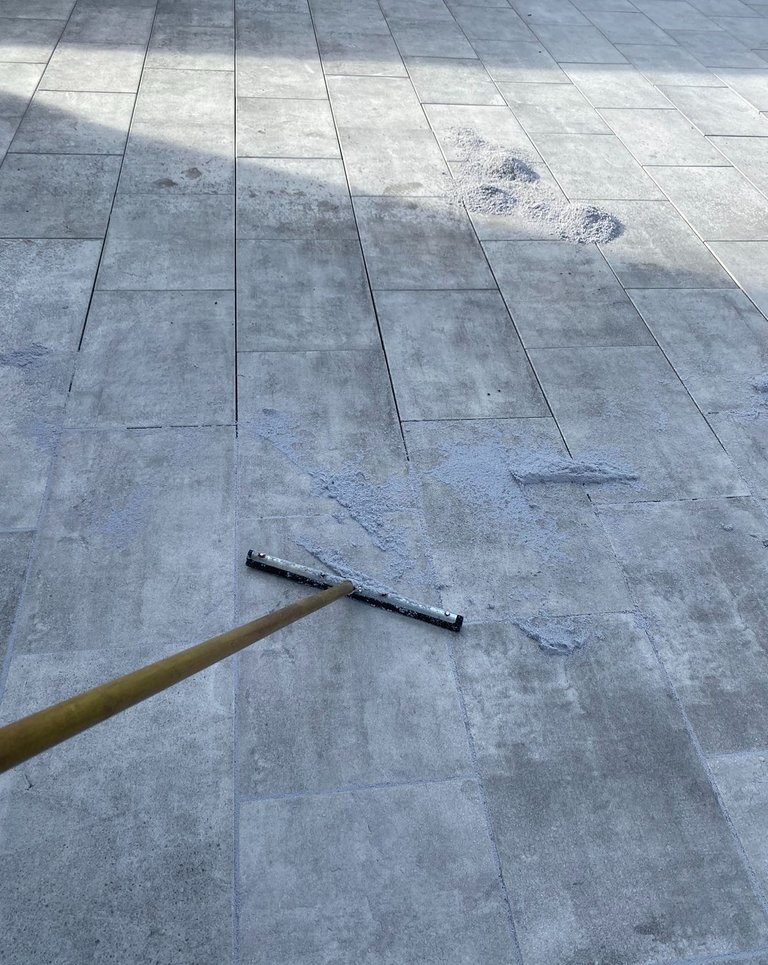
If your terrace now looks like the last picture, you should spread a 5 to 10 cm thick layer of frost protection and weed fleece. On top of this you will apply a 15 to 20 cm layer of mineral. When both layers have been applied, they must be compacted with a vibrating plate.
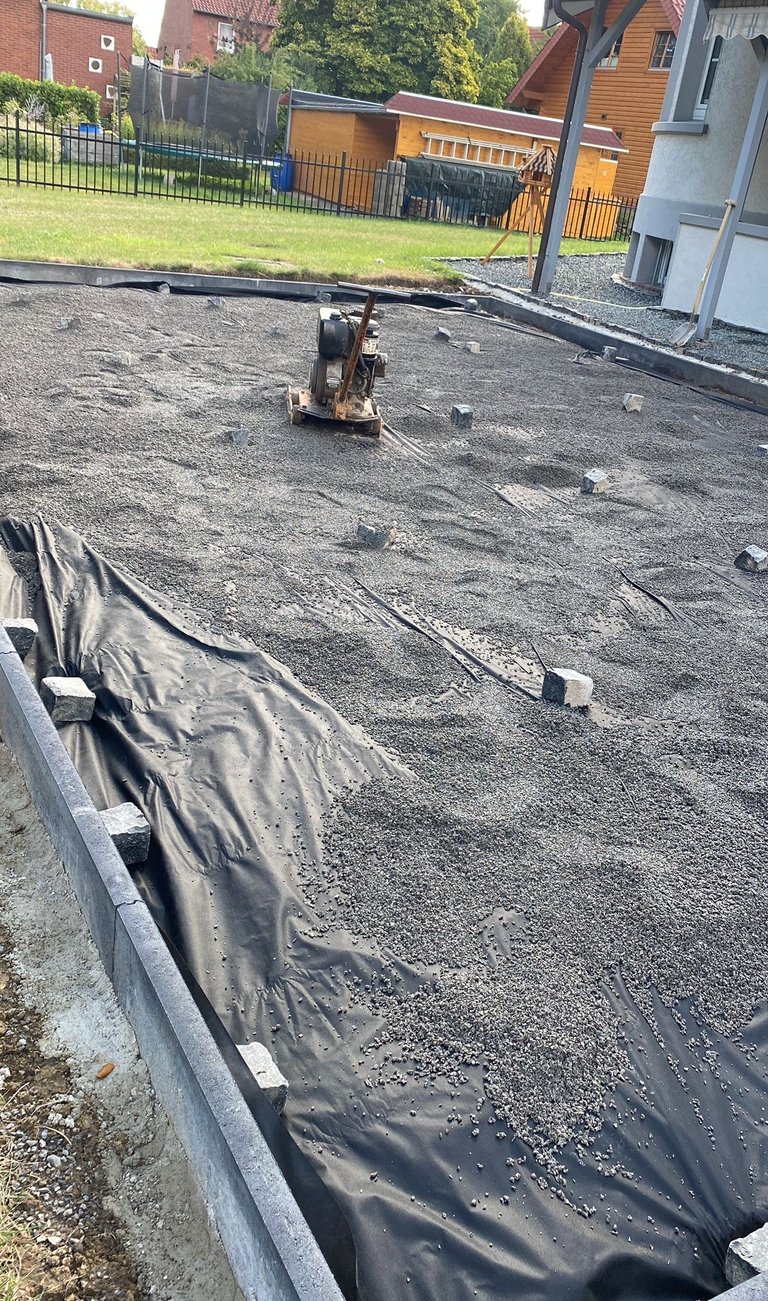
With this you have completed the substructure and foundation.
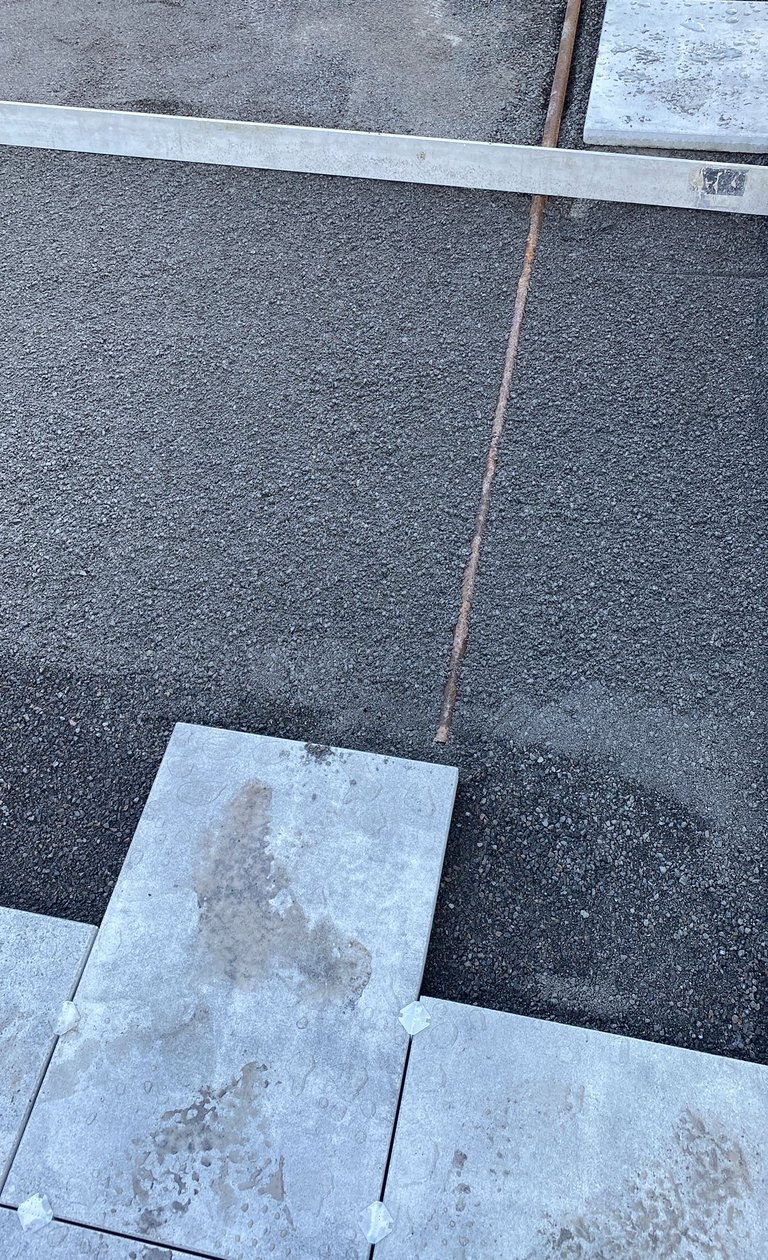
The chippings layer
When you have finished the substructure, spread fine chippings over the entire surface. This must now be removed very smoothly. This is important so that your patio slabs lie evenly next to each other. Here you should also proceed carefully.
To get this layer smooth, you need two steel rods and a straightedge. Place the two steel rods on the foundation and fill everything around them with chippings. Then you put the straightedge on the steel rods and pull it down on the rods again and again. With each repetition, you pull off any chippings that are not needed. When you have finished at one point, carefully pull the bars further down and start smoothing the chippings at the next point. In this way, you gradually remove the entire terrace.
A little tip: Make sure you watch an explanatory video beforehand. It helped me a lot to do everything right and to prepare the terrace optimally for the slabs.
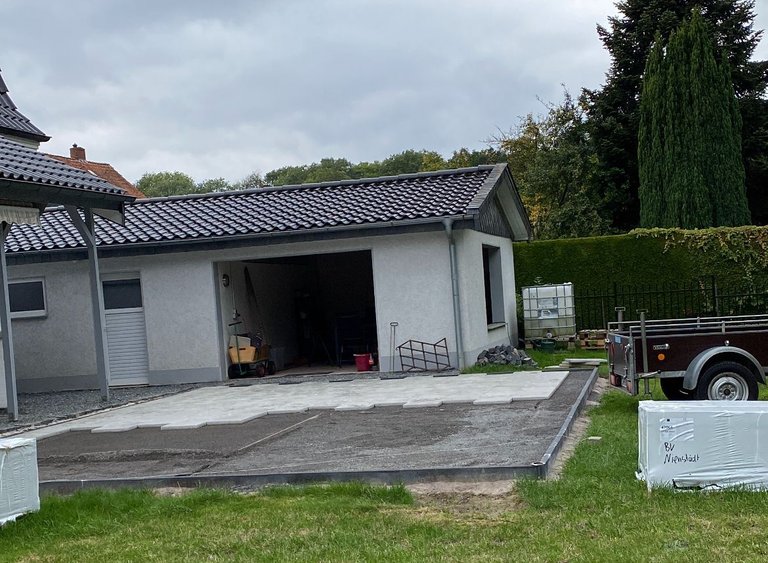
Laying patio slabs
When you get to this step, you can already be really proud of yourself. Most of the work is already behind you and the part where you see the fastest progress begins. With every tile you lay, you're getting closer to the end of the project, and the patio is really starting to take shape.
When laying the slabs, make sure you use spacers between the slabs. This will prevent the joints from becoming too narrow, too wide or uneven. Also, check regularly with a spirit level to make sure your slabs are parallel and that the slight slope to the garden is still there.
Once all the slabs have been laid, there is one last task left. Fill in the joints. You should consider whether you want to work with joint sand or with mortar. Also, find out if there are specifications for your selected slabs and if only one of the two is possible.
I have sealed my joints with grout. This is spread on the slab and wet with water. It can then be pushed into the joints with a squeegee. Keep pushing grout as you do this. This settles namely after a few minutes and a joint that already looked filled, then still offers space.
After the grout has dried, you've done it. The terrace is ready and can now be used to enjoy cozy summer days. All you have to do is to furnish it and make it comfortable. You have more than earned it after all the hard work.
I hope my contribution has given you a good insight into the construction of a terrace and perhaps encouraged one or the other to become active as a craftsman. The feeling after such a successful project and many hard hours of work to sit on the self-built terrace, has been really special for me. I'll be happy to answer any questions in the comments.
Let's see what projects in the future still waiting for me. With house and garden you always have something to do.
See you soon,
Your Ogfox
Deutsch
Hallo liebe Gartenfreunde,
gerade zum Ende des Jahres überlegt man oft "welche Projekt könnte ich nächstes Jahr realisieren". Daher möchte ich Euch in diesem Beitrag vorstellen, wie ich meine Terrasse selber gebaut habe. Vielleicht inspiriere ich damit ja den ein oder anderen zu seinem nächsten Projekt.
Da ich kein Handwerker bin, habe ich natürlich den ein oder anderen Fehler gemacht, welchen ich später korrigieren musste. Trotz allem ist mir aber ein wirklich gutes Ergebnis gelungen und das Projekt war um ein vielfaches günstiger, als wen ich es durch eine Handwerksfirma umgesetzt hätte.
Die Planungsphase
Die Planungsphase ist für mich die wichtigste Phase. Ihr solltet nichts überstürzen, um unnötige Fehler bestmöglich zu vermeiden. Die wichtigsten Punkte die Ihr euch in der Planungsphase beantworten solltet sind folgende:
- Wie hoch ist mein Budget?
- Wo will ich die Terrasse errichten?
- Wie groß soll die Terrasse werden?
- Will ich Strom an oder unter meine Terrasse legen?
- Wie viele Sonnenstunden habe ich auf der Terrasse?
- In welchem Zeitraum will ich die Terrasse errichten?
Wenn Ihr euch diese Fragen nicht beantwortet habt, kann es passieren, dass Ihr später Fehler macht, welche in der Korrektur teuer werden und zusätzliche Zeit kosten.
Es gibt nichts schlimmeres als ein Baustop, weil Euch das Geld ausgeht oder wenn Ihr am Ende auf billige Materialen zurückgreifen müsst. Auch die Terrassengröße im Nachgang zu ändern, ist extrem aufwändig und sollte daher vorher gut überlegt sein.
Sofern Ihr Strom an Eurer Terrasse möchtet, solltet außerdem Ihr direkt am Anfang die Stromkabel mit verlegen. Immerhin habt Ihr den Boden schon aufgerissen und könnt dies auch zum Kabelverlegen nutzen.
Ein gutes Fundament
Die Arbeit, die Ihr in das Fundament steckt, ist sehr wichtig. Sie bildet immerhin ist Basis für Eure neue Terrasse. Wenn Ihr beim Bau des Fundaments schlampig seid, kann es Euch passieren, dass Eure Terrasse im Nachgang uneben wird oder absackt.
Am besten mietet Ihr Euch für den Erdaushub einen Minibagger. Tragt dabei mindestens 30 bis 40 cm der Erde ab.
Ich persönlich war hier zu geizig und habe mir den Minibagger gespart und die komplette Erde mit einer Schaufel abgetragen. Das hat nicht nur unglaublich viele Stunden gedauert, sondern war auch sehr anstrengend und damit mein erstes Learning beim Terrassenbau.
Nachdem Ihr die Erde abgetragen habt, könnt Ihr die Borde setzen. Diese dient als Umrandung für Eure Terrasse. Damit die Borde gerade verläuft, solltet Ihr unbedingt einen Faden spannen und Euch daran ausrichten.
Achtet beim Setzen der Umrandung unbedingt darauf, dass Ihr ein Gefälle von 1-2 % weg um Haus einbaut. Dadurch bleibt Regenwasser nicht auf der Fläche stehen und läuft entspannt zum Garten ab. Wenn Ihr hier pfuscht, dann läuft das Wasser im schlimmsten Fall zum Haus und verursacht Schäden durch Feuchtigkeit.
Der Unterbau
Wenn Eure Terrasse jetzt aussieht wie auf dem letzten Bild, solltet Ihr eine 5 bis 10 cm dicke Schicht aus Frostschutz und Unkrautflies verteilen. Auf diese tragt Ihr anschließend eine 15 bis 20 cm dicke Schicht aus Mineral auf. Wenn beide Schichten angelegt wurden, müssen diese mit einer Rüttelplatte verdichtet werden.
Damit habt ihr den Unterbau und das Fundament abgeschlossen.
Die Splittschicht
Wenn Ihr den Unterbau abgeschlossen habt, verteilt Ihr auf der gesamten Fläche feinen Splitt. Dieser muss nun ganz glatt abgezogen werden. Das ist wichtig, damit Eure Terrassenplatten eben nebeneinander liegen. Hier solltet ihr also auch sorgfältig vorgehen.
Damit ihr diese Schicht glatt bekommt, benötigt Ihr zwei Stahlstangen und einen Richtscheit. Die beiden Stahlstangen legt Ihr auf das Fundament und füllt alles darum mit Splitt auf. Anschließend legt Ihr das Richtscheit auf die Stahlstangen und zieht dieses immer wieder auf den Stangen nach unten. Mit jeder Wiederholung zieht ihr dabei nicht benötigtes Splitt ab. Wenn Ihr an einer Stelle fertig seid, zieht ihr die Stangen vorsichtig weiter nach unten und fangt an der nächsten Stelle an den Splitt glatt zu ziehen. Auf diese Weise zieht ihr nach und nach die gesamte Terrasse ab.
Kleiner Tipp: Guckt Euch dazu unbedingt vorher ein Erklärvideo an. Das hat mir sehr dabei geholfen alles richtig zu machen und die Terrasse optimal für die Platten vorzubereiten.
Terrassenplatten verlegen
Wenn Ihr an diesen Schritt angekommen seid, könnt Ihr schon wirklich stolz auf Euch sein. Der größte Teil der Arbeit liegt jetzt bereits hinter Euch und es beginnt der Teil, bei dem Ihr am schnellsten Fortschritte seht. Mit jeder verlegten Platte kommt Ihr dem Projektende einen Schritt näher und so langsam nimmt die Terrasse wirklich Formen an.
Achtet beim Verlegen der Platten darauf, dass Ihr zwischen den Platten mit Abstandshaltern arbeitet. Dadurch verhindert Ihr, dass die Fugen zu schmal, zu breit oder ungleichmäßig werden. Außerdem solltet Ihr regelmäßig mit einer Wasserwage überprüfen, ob Eure Platten parallel sind und das leichte Gefälle zum Garten noch vorhanden ist.
Wenn alle Platten verlegt wurden, bleibt noch eine letzte Aufgabe. Die Fugen ausfüllen. Ihr solltet Euch dabei überlegen, ob Ihr mit Fugensand oder mit Mörtel arbeiten wollt. Informiert Euch auch, ob es für Eure ausgewählten Platten Vorgaben gibt und eventuell nur eins von beiden möglich ist.
Ich habe meine Fugen mit Fugenmörtel verschlossen. Dieser wird auf die Platte verteilt und mit Wasser nass gemacht. Anschließend lässt sich dieser mit einem Wischer in die Fugen schieben. Schiebt dabei immer wieder Mörtel nach. Dieser setzt sich nämlich nach einigen Minuten und eine Fuge die bereits gefüllt aussah, bietet dann noch Platz.
Nachdem der Fugenmörtel getrocknet ist, habt Ihr es geschafft. Die Terrasse ist fertig und kann nun genutzt werden, um gemütliche Sommertrage zu nutzen. Ihr müsst Sie also nur noch einrichten und es Euch gemütlich machen. Das habt ihr Euch nach der harten Arbeit auch mehr als verdient.
Ich hoffe mein Beitrag hat Euch einen guten Einblick in das Errichten einer Terrasse gegeben und vielleicht dem ein oder anderen Mut gemacht, selbst handwerklich tätig zu werden. Das Gefühl nach so einem erfolgreichen Projekt und vielen harten Arbeitsstunden auf der selbstgebauten Terrasse zu sitzen, ist für mich nämlich wirklich etwas besonderes gewesen. Fragen beantworte ich Euch gerne in den Kommentaren.
Mal schauen welche Projekte in der Zukunft noch auf mich Warten. Mit Haus und Garten hat man ja immer was zu tun.
Bis bald,
Euer Ogfox
!LOL
lolztoken.com
I decided to go for a wok.
Credit: reddit
@ogfox, I sent you an $LOLZ on behalf of thehockeyfan-at
(2/6)
NEW: Join LOLZ's Daily Earn and Burn Contest and win $LOLZ
The planing and execution of this is so impressive. Bravo
Tank you :)
the next contribution i will publish in the diy community
The terrace is nice and the info superb, but what really caught my eyes is that beautiful roof, holy smokes the tiles look awesome.
Ty :)