I Built a Sliding Rail System for Studio Lighting
A Matter of Cost
A few months back we were beginning to get into a situation where we needed more studio lighting. However, our studio is much smaller than what we had available in our previous house, so we really didn't have the floor space to continue positioning more gear around the room.
I starting researching options online and eventually came across some really amazing rail systems on various websites. However, they were quite expensive. Some where several thousand dollars and still required a lot of assembly. This got me thinking about if it would be possible to simply build it myself from parts that I could purchase locally from Home Depot or Lowes.
Choosing the Lights
When I first decided to take on this project, I was humming and hawing about what kind of lights I wanted to get. Being that it was already getting a bit cramped in the studio, I wanted to find some soft lighting that emitted a lot of lumens yet in a low profile form factor. After reading a lot and watching quite a view review videos on YouTube, I ended up settling on pancake, or flapjack lights.
As the name implies, these lights are round and flat. But don't let that fool you - these lights are way more powerful than you might expect! They are a massive upgrade to my previous LEDs and are generations ahead of my old, extremely hot traditional lighting. And through quite ingenious design, these units emit beautifully diffuse light without the need for a softbox. This dramatically reduces the space requirements.
The actual lights that I purchased are Neweer brand. I believe these are a knock off of the Fotodiox pancake lights, but from everything that I can find online; they seem to be virtually identical- except for having a much lower price tag. They are still available for purchase on Amazon here in the US.
The Rail System
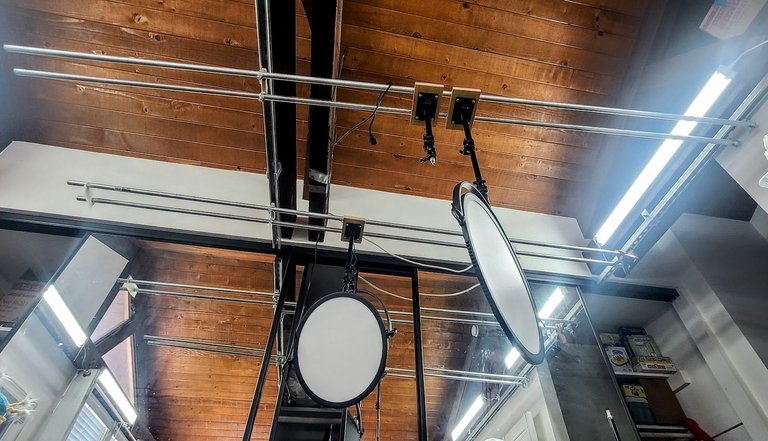
This part worked out surprisingly well once I acquired the right components and got my head around exactly how I was going to mount everything. I knew that I wanted to use some kind of rolling system. I came across a video on YouTube of a guy who used channel struts and wheels to hang and roll objects across the ceiling. This seemed like a perfect system for my needs.
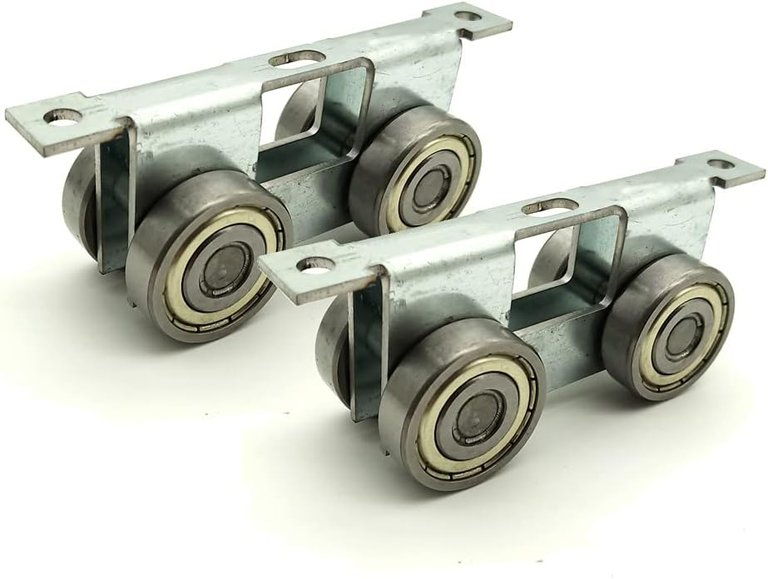
I knew that I was going to be using 4 wheel roller trolleys which require 1 5/8" slotted Unistrut. I ordered the Trolleys online here but I still needed to get the struts themselves. I didn't want to get them online because I was pretty sure that the weight would make the price quite prohibitive. I had never purchased Unistrut before, but I did recall seeing them at Home Depot.
After a trip to several Home Depots around town I was unable to find the 1 5/8" variety, so I took a trip across town to Lowes where I finally found the motherload! I wish that I had just looked there to start with after not finding them at the first Home Depot. I kept looking there because they actually did have a space for them on the shelf; they were just out of stock everywhere for whatever reason.
So now, armed with the struts and the trolleys, I went ahead and grabbed some 3/4" pipes to and ran them across, between the two struts. If you look at the animated gif at the bottom of this post, you can see how the dual pipes are attached to the trolleys. Basically, they are evenly spaced using a piece of wood and held together by two clamps on either side.
The last important part that I needed was the channel strut hangers that would allow the trolley to pass through unimpeded. They needed to be rated to hold a decent amount of weight so I paid a bit extra for them. I picked up a 6 pack for about $40 on Amazon here.
Mounting the Boom Arms
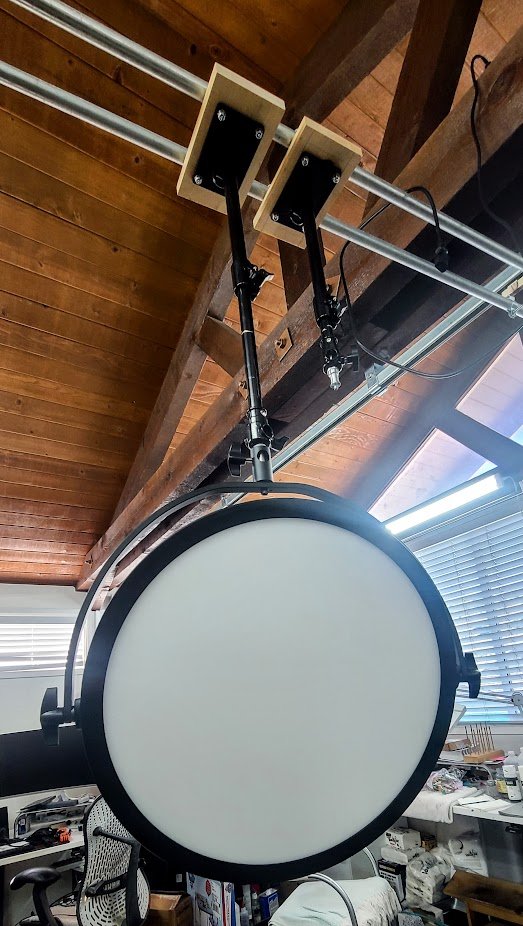
When deciding how to mount the boom arms to the rails, I initially thought to use some kind of fancy trolley system similar to the struts, but in the end I decided against it because I actually wanted a bit of friction when sliding the lights back and forth. Even though it would make it a lot easier to move the lights if they were on wheels, this would also have the side effect of allowing the boom arms to roll around on their own at the slightest movement. This is not ideal once you have you setup fine tuned. I also bought the boom arms on Amazon here.
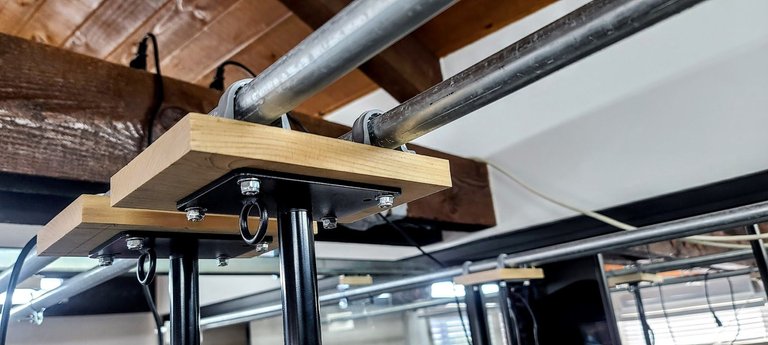
As you can see in the above image, I used 3/4" PVC pipe straps to hang the boom arm assembly. These allow the arm to slide, but with enough friction that it won't move around on it's own. Time will tell if this was a good decision - but so far it has worked out great! We have already done several projects with them and it has really made it a lot less stressful on set not having everything on the floor.

My Final Thoughts on the Project
It is hard for me to make an argument that this was not worth the money I saved doing it on my own. There was certainly a bit of trial and error, but it really wasn't that difficult. In total, I believe the whole thing ended up costing me about 200 USD to complete. Don't hold me to that though, I can't remember the exact number! But when you compare that to $2000-4000, it is a no brainer. I am sure that the systems you can order are a bit slicker, but in my opinion it can't make up for the wildly massive price difference.
I would really appreciate your support!

Oh, I get it now. Thanks for including the animation. I was totally confused before that. I was only thinking of the lights moving one way, not two different ways. That is pretty cool! Very ingenious!
Thanks! It has made things much easier around here. We were falling all over lights and cables doing our last Star Trek video.
I think I need to make the animation a bit smaller in file size. I think it takes to long to load and people get confused as you said. I could add a few more images to make it clearer.
I think it worked out well. I have a pretty fast Internet connection though. I was just saying today I wish Hive had a better way of sharing short videos (with sound) that doesn't require you to upload them to somewhere else first. Like if I was making a long form post and I wanted to include a video clip. Using 3Speak doesn't really fit that model well.
I agree, it has been a while, but every time I have tried to use 3Speak something goes wrong. It may have improved since the last time I used it, but for me it was a bit buggy. Of course it is certainly quite an undertaking to try to build something like that.
When you are dealing with such massive amount of data it becomes really challenging. But yes, it is something that is really missing from Hive. I wonder if it would be easier to make something like Vine. You remember that? The super short video clips?
Yeah, I kind of remember Vine. I think that Tik Tok has kind of filled that space, but I refuse to use Tik Tok or create an account. I just want something that stores short videos like the photos so if I want to add one to a post, I just drag it over and boom it's there.
Nice, that was a good solution.
It's really lovely work. It's looking fabulous. Have a nice day great work 😍😋
Thanks! I appreciate it. Itwas totally worth the effort.
Absolutely your work is adorable 😍
https://twitter.com/JunaidFazal1111/status/1723931993136623759
Anyone can do anything, that is if they want to and if they have the determination to push through with it. The problem is most people tend to give up at the first sight of a hiccup.
You on the other hand seemed to have swallowed the hiccups.
Nicely done bud!
!PIZZA
!LUV
!BEER
I am guilty of that sometimes myself! I think it is my ADHD. I am trying to be much better at completing tasks these days!
$PIZZA slices delivered:
@technicalside(3/5) tipped @nuthman
Congratulations @nuthman! You have completed the following achievement on the Hive blockchain And have been rewarded with New badge(s)
Your next payout target is 43000 HP.
The unit is Hive Power equivalent because post and comment rewards can be split into HP and HBD
You can view your badges on your board and compare yourself to others in the Ranking
If you no longer want to receive notifications, reply to this comment with the word
STOPTo support your work, I also upvoted your post!
Check out our last posts:
!BEER
View or trade
BEER.Hey @nuthman, here is a little bit of
BEERfrom @cryptoyzzy for you. Enjoy it!Learn how to earn FREE BEER each day by staking your
BEER.Esooo realmente eres muy ingenioso, increíble armado de luces...quien pensaría semejante idea, 💡 bueno usted mismo obviamente.
orale, gracias man.. jaja, pues no creo que soy tan ingenioso pero si salio bien. La verdad es que no estaba seguro si iva funcionar, pero al fin me ha ayudado demasiado. Ahora el problema es que sigo pegando las luzes con la cabeza. 😂
Jajajaja 🤣😂
https://twitter.com/lee19389/status/1724075538266951871
#hive #posh
https://twitter.com/LovingGirlHive/status/1724117784056205326
https://twitter.com/jewellery_all/status/1724148356329382097
That turned out nice, and the price tag is one hell of a lot more palatable. Great creativity!
Oh yeah. The price was the driving factor.
Like seriously to see the rail in the motion was what I was seriously curious to see and after seeing it I wasn't disappointed. You really did a great job to compile this great work. Keep it Buddy