Building a mouse proof raised bed
I hope!
We have a lot of mice around our homestead, which is only to be expected. I will never put down poison because of the impact on anything that happens upon the poisoned creature - it will suffer the same fate. There's also the chance that any of my animals could be poisoned by ingesting the stuff and that's too great a risk. Instead, we set traps and then put out the dead mouse on a post for the buzzard to take. We've not had much of a mouse problem through the summer, but during the winter, if we get any in the house or outbuildings, then the sacrifice to the buzzard will be made. He/she quickly gets used to our offerings and sits on the post, demanding his/her breakfast.

Don't want this beautiful lizard being poisoned

Or the ducks

Another beautiful lizard

The chickens eat mice when they see them and if a mouse is poisoned, the chicken also gets poisoned
Last year's Spring, we planted out lots of peas and beans, only to be rewarded by finding the exact same number of holes, in exactly the same places where the peas and beans had been carefully planted.

Wild cherry/plum

Although the garden thinks it's Spring again... These pictures were taken a few days ago. The pear trees are also puzzled
This year, I put the peas and beans into pots and grew them into seedlings before planting them out. It's a LOT easier to plant direct into the garden, I can tell you!
Because of that palaver, we have been thinking about mouse and mole proof beds.
It's going to be more expensive and more labour-intensive to start with, but in the end, I hope we'll have beds where we can save time and effort in planting direct into the ground, where the mice can't get to the seeds before they have chance to grow.

The trick is to keep them out!
So we decided to build a sturdy raised bed, lined with wire mesh. We decided that the new garden would be somewhere convenient and easy for us to maintain and harvest. The field at the side of the house is lined with Japanese Maple trees and Sycamore. The Sycamore have to go because they are poisonous to our horses. The Maple are quite toxic too, so we decided that the best thing to do would be to make sure the horses can't graze close to the trees.

So we made a new area of garden.
Trev mowed the area and made sure we have enough room to get around the beds with the ride-on mower.

The area is approximately 10 metres by 30 metres (not including the path through the garden, to the barn that we need to keep)

Aforementioned path

Measured by eye and 'guesstimation' and then measured it

He says: 'Retirement is working harder for no pay.'

So far, he's used my quadbike and my electric chainsaw...

The start of things to come!
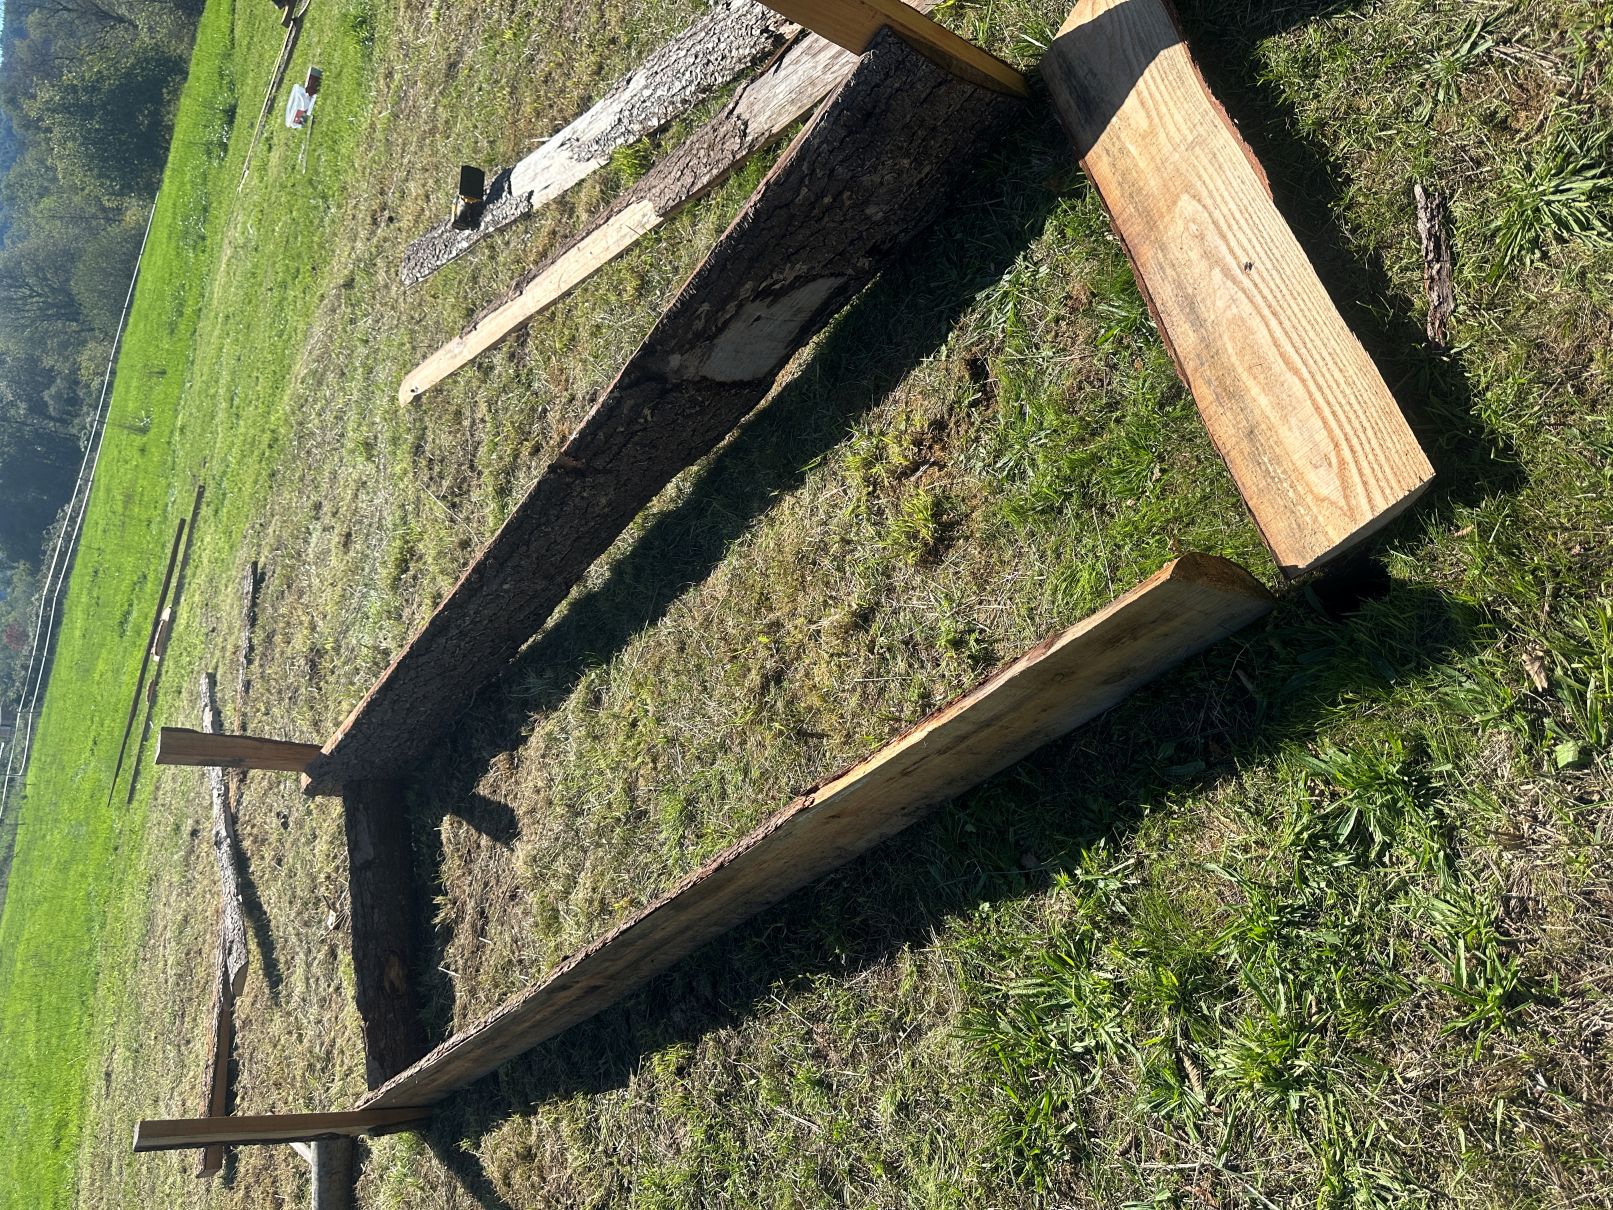
The bed looks ok, but it's not quite square...

We ended up pulling out one of the stakes and re-setting it

The wood is from the local woodyard. He delivers 5 bundles at at time for 60 Euro per bundle.

This is going to be deep enough to grow potatoes, carrots and sweet potatoes

He can stay. I rescued him from a bucket of water down at the field shelter

We decided to make the whole bed level on the top so we can fit a wire frame on top to try to make it entirely mouse proof

Levelling the top took more measuring and jiggery-pokery than we did on the other beds. Not quite a bespoke build, but it will be worth the effort.

The next job is to fit the mesh to keep out moles from underneath and mice from the sides and top.
Once the sides are on, the bottom of the bed is made secure with mesh also.

Then line it all with cardboard. The cardboard works in two ways. The first is to keep everything inside the bed. As you can see from the pictures, there are holes and gaps between the planks, all of which allow the material inside the bed to get outside. The cardboard also adds to the carbon needed to improve the soil structure. Carbon is found in many places at the moment, dead, dried-out leaves are especially abundant and straw is a great source of carbon - although, hay is not.
To make a good, productive soil or compost, you need at least a 50-50 mix of 'browns' (carbon) to 'greens' (nitrogen-rich). If you can err on the side of more carbon, you're on to a winner!
We have compost bins in situ near to our original raised beds, and we have to start another one to supply our new set-up. I am being lazy when it comes to filling this new bed; because it's so deep, I can afford to fill it with the raw ingredients of the compost, rather than the compost that has been 'cooking' for a long time - 6 months at least.

One

Two

Three bags of carbon-dense bark, woodchips and assorted debris

That's a lot of carbon - first bag
Carbon, such as tree bark, steals nitrogen from the surrounding area as it decomposes and therefore, the mix has to be balanced. Seedlings need nitrogen to begin their growing process, so too much carbon, stealing the nitrogen isn't good for new plants.


Spread it about a bit, make the base even and ready for the next bag

Fetching the bag of 'greens' from the bottom of the original garden.
We spent a bit of time a couple of months ago, cutting the grass and fetching up the early fall of leaves. We put those grass clippings into bags and let them start the decomposition process - 'cooking'.
When the mixture is right, the debris will heat up, killing pathogens and even weeds and seeds to make the compost safe and ready to grow your food.

This bag looked like it had only leaves in it, but this is one of the bags that also had grass clippings in it. The bags were full when we collected the clippings etc. This has decomposed to less than half a bag.

One slimy lump of grass and leaves - 'greens' and 'browns'

The grey stuff is the product of the composting process - it has heated up and seems charred.

Spreading the goodness through the raised bed as evenly as possible

One full bag of leaves on top

Then the new garden area and the front garden was mowed to collect more 'greens' and two full collections of grass was dumped onto the bed.


More dry leaves!

We collected around 10 bags of leaves from under the trees in the horses' fields. This helped us in two ways - we have material for the beds and the grass that was covered by leaves can grow for the horses

This took a couple of bags of leaves

Then the horses provided more material for the new bed! At the far end of the bed is dry, 'fresh' horse poo from the shelter. It has been picked-through by the chickens and collected by Trev just for this process. The rest of the material in this picture is from the 'muck heap' at the side of the shelter. That has been rotting and decomposing for almost a year and is full of worms! All good for the new bed!


Almost full?

You'd think so, but no!

We then collected 12 large buckets (30 litre/15 gallon each) of good quality soil from the beds in the original garden. We're deconstructing the beds in the original garden and so we can use the soil from there to prepare the new bed for the autumn sowing.

Almost finished!
The next-to-last step for this bed is to enrich the soil with potash - ash from our wood fire (ONLY wood, no plastics). The potassium in the ash is needed for plants (especially the nightshade family, potatoes, tomatoes, aubergines/eggplant) to prevent (or treat) blossom-end rot. The potassium is water-soluble so we keep it in the garage all winter so the nutrients are not wasted.
HOWEVER! The potassium can 'burn' delicate roots of new seedlings, and so it's necessary to water it in well before planting anything into the bed. This bed will be watered before we add one last layer of sifted topsoil to make the bed ready to grow!

Mini watermelon from our summer crop

Not sure these will get there before the weather turns cold

This one may just make it to harvest - otherwise, the ducks and chickens (and horses) like watermelon

Red sky at night...

We have the most spectacular skies here


Update


The wood ash has been wetted down and left to drain a little.
We sifted 4 trugs of topsoil to put on top of the wood ash.
Spread it around a bit...
And all we have to do is put the seeds in - we should have carrots, peas and potatoes for Christmas!