Como configurar un nodo Witness de Hive con Privex [ES-EN]
! [Importante]
Voten por el Testigo de Hivecuba
Tras varias semanas estudiando sobre como montar un nodo Witness de Hive, aquí les traigo un poco de mieles sobre todo lo que encontré. Les hablare de la vía difícil, de la normal y de la fácil. Si, hay para todos los gustos, tanto si tienes conocimientos básicos como si no.
¿Cuáles son las tres vías?
- Configurar todo desde cero
- Utilizar Docker para evitarte mucho trabajo y solo configurar cosas mínimas
- Utilizar la versión preinstalada de @privex donde pocas cosas necesitas hacer
En las vías 1 y 2 puedes contratar el VPS que desees. Yo siempre busqué formas de pagar el costo en alguna criptomoneda, por eso siempre tuve Privex en la mira, dado que permite el pago con Hive y HBD. Cuando supe de que ya tenían servidores con versiones preinstaladas de un nodo Witness me decidí por la tercera vía.
Es una buena forma de ahorrar en tiempo y también para meter menos la pata, para que vamos a engañarnos. Aun así, tuve mis problemas y aquí les voy a explicar paso a paso lo que deben hacer para montar un nodo Witness con Privex.
Pasos a seguir
1. Contrata el servidor que desees
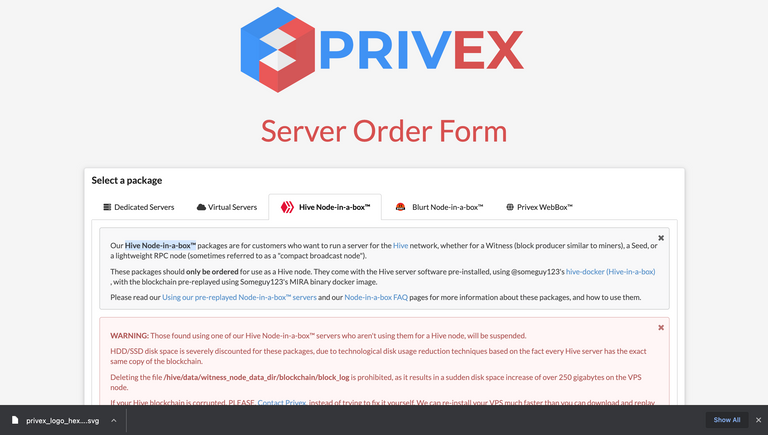
Lo primero es ir al sitio web privex.io y familiarizarte con ello. Veras una opción que dice ¨View All¨ que, tras aceptar los términos y condiciones, te llevara a ver todos paquetes que tienen disponibles. Aquí solo nos interesa la sección ¨Hive Node-in-a-box™¨ que es donde podrás contratar los servidores con la preinstalación. Elige entre los que tienen disponibles, que en el momento de hacer esta publicación existen ofertas entre 40 y 80 dólares. La diferencia de precio la hacen las prestaciones de cada servidor y su localización.
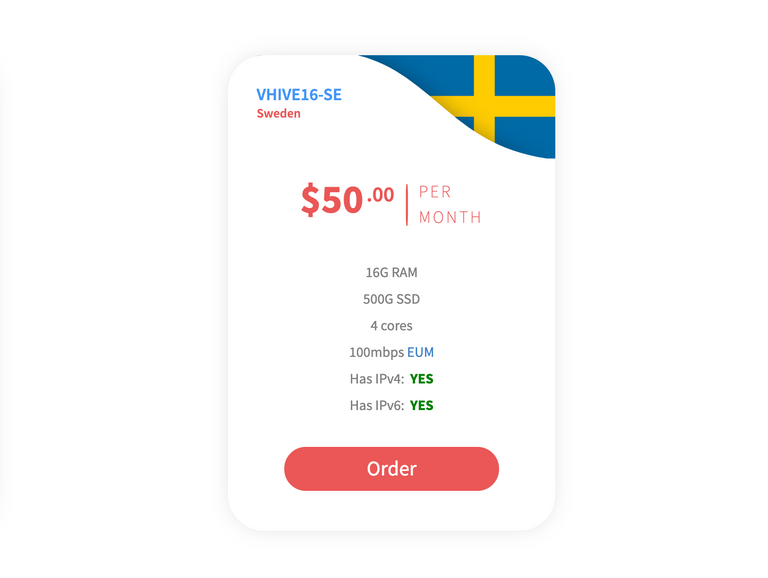
Al ser nuestro primer servidor, elegí la opción que les muestro por ser la mejor en calidad/precio desde mi opinión. Debo decirles que funciona de maravilla, incluso el tiempo de sincronización es bastante rápido con esta opción. Si ya tienes tu decisión tomada, solo queda que lo órdenes. Para esto solo necesitas darle al botón ¨Order¨, rellenar un pequeño formulario y hacer el pago. Ambos pasos son muy sencillos y la información sobre ello te la muestran, por lo que solo lea atentamente la información que te muestran. Pagar con HBD y Hive hace el proceso muchísimo más rápido que cualquier otra forma y tener @keychain ayuda también.
2. Entrar a tu servidor
Si ya realizaste el pago, veras que te llega un correo al email que agregaste en el formulario anunciándote que han recibido el pago y que tu servidor comenzara a ser activado. Una vez hecho esto te enviaran otro correo con los datos que necesitas para poder entrar al servidor, recomiendo que guardes todos esos datos y elimines los correos. Veras también la invitación a entrar al Dashboard desde donde podrás gestionar los distintos servidores que tengas, es ahí donde debes ir y cambiar la contraseña que te dieron. Tras cambiarla debes reiniciar el servidor, esperas unos minutos y estarás listo para entrar.
Solo debes usar una terminal y el comando ssh junto a tu usuario y el ip que te dieron. Quedaría de la siguiente manera, solo cambia el usuario y el ip. Nos pedirá la contraseña y ahí pondremos la nueva que creaste hace poco, o la que te dieron si no la cambiaste.
ssh [email protected]
3. Configurar el servidor
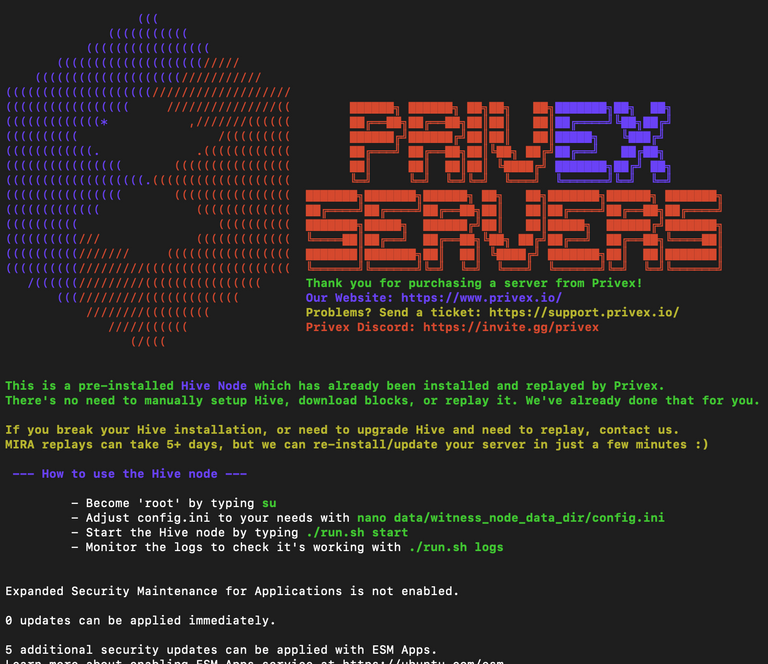
Algo como esto veras una vez que accedas. Podrás ver que incluso te dice los pasos a seguir que en parte son las que te diré con un par de ajustes. Lo primero es ser usar el comando ¨su¨, con ello serás superadmin dentro del servidor y podrás trabajar sin problemas de autorización, además de que ya entraras al directorio que necesitas.
Una vez ahí vamos a hacer algo distinto antes de continuar y es que vamos a configurar el cliente de la billetera de antemano. Para esto vamos a seguir los siguientes comandos y fíjate en los comentarios que te hago para que sepas que hace cada uno y lo que debes cambiar.
# Comienza a correr la imagen del Docker
./run.sh start

# Creas una billetera
./run.sh wallet

# Le añades una contraseña a esta billetera, cambia los números por la contraseña que quieras poner. No la olvides, así que guárdala bien.
setpassword 12345678

# Desbloqueas la contraseña
unlock 12345678

# Generas una llave privada y pública para firmar los bloques
suggest_brain_key

#Sales presionando Control + D y paramos la imagen del Hive
./run.sh stop
Con este último comando vas a ver como te muestra una llave privada y otra publica, debes copiar ambas y guardarlas. Si en algún momento se te olvidan o las pierdes, puedes crear una nueva siguiendo los mismos pasos. Ahora si podemos continuar con los pasos que nos muestra el servidor al inicio. Comenzando por añadir el usuario y la llave privada para el firmado que habíamos copiado antes. Pero sin salir de este archivo, vamos a cambiar un par de cosas. Lo primero es que busques la variable share-file-size y cambies su valor a 25G. Luego vas a buscar la sección de Plugins y vas a añadir la siguiente línea sin las comillas: "plugin = wallet_bridge_api".
nano data/witness _node_data_dir/config.ini
Luego de eso vas a guardar los cambios con Control + O, aceptas con Enter y sales del archivo con Control + D.
4. Sincronizar el servidor
Ya estamos listos para correr la imagen de Hive con el comando que ya conoces.
./run.sh start
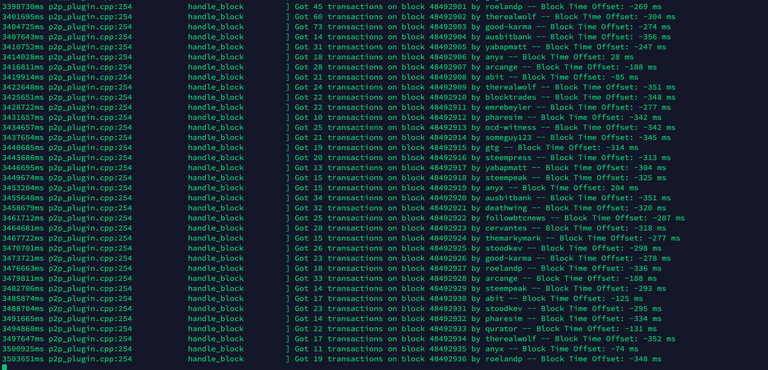
Luego puedes sentarte a mirar los logs, un registro de todo lo que acontece en la imagen. Podemos ver algunos errores, pero básicamente comenzara a sincronizar los datos que ya existen en el servidor con los reales de la blockchain. Es posible que falten los datos de meses de uso en la blockchain y es por ello que este proceso puede durar días. En mi caso fueron casi 3 días luego de haber solucionado los problemas. Algo importante que te sugiero hagas al menos dos veces por días es mirar los logs y fijarte en el tiempo de cada bloque que va sincronizando para ver si cada nueva entrada que vez es más reciente que la anterior. Mientras eso suceda todo va bien. No debes tener ningún error pues ya los solucionamos con los pasos anteriores, pero siempre puede haber un error distinto a los que yo tuve dado que con el tiempo las versiones cambian. Sabrás que todo está totalmente sincronizado cuando veas lo siguiente:
5. Importar tu llave privada y el paso final
Si llegaste hasta aquí, felicidades, ya casi terminamos. Solo te queda desbloquear tu wallet como en el tercer paso para importar tu llave Activa privada de la siguiente manera. Luego vamos a decirle a la blockchain de quien es este nodo testigo y pasarle algunos parámetros que necesita. Lee atentamente los comentarios de los siguientes comandos
# Abre la billetera
./run.sh wallet

# Desbloquear con la contraseña
unlock 12345678

# Importar la llave active privada, cambia la secuencia alfanumérica que me invente por la llave
import_key rguygf72g3fweubfu2gfuewgr73ufbf

# Aquí cambia solamente el nombre de usuario, el link que desees y la llave pública de firmado del tercer paso
update_witness "username" "https://example.com" "STM1111111111111111111111111111111114T1Anm" {"account_creation_fee":"3.000 HIVE","maximum_block_size":65536,"hbd_interest_rate":0} true
Listo, terminamos. Ahora puedes ir al listado de Testigos de Peakd o donde prefieras y ver tú testigo corriendo. Veras que desde ahí mismo podrás cambiar varios parámetros. Hablare de ellos en una siguiente publicación.
No quiero terminar sin agradecer a @arcange, @hivetrending, @dimeilaz y @rishi556 por toda la ayuda durante este proceso de aprendizaje. Los volví un poco locos preguntándoles tantas cosas. Y hasta aqui llegamos hoy, sin dejar de pedirles que me dejen su opinión en los comentarios para cualquier ayuda que necesiten.
ENGLISH VERSION (click here!)
After several weeks of studying how to set up a Hive Witness node, here I bring you a little bit of honeys on what I found. I will tell you about the hard way, the normal way and the easy way. Yes, there is something for everyone, whether you have basic knowledge or not.
**What are the three ways?
- Configure everything from scratch
- Use Docker to avoid a lot of work and only configure minimal things.
- Use the pre-installed version of @privex where you only need to do a few things.
In ways 1 and 2 you can hire the VPS you want. I always looked for ways to pay the cost in some cryptocurrency, that's why I always had Privex in my sights, since it allows payment with Hive and HBD. When I found out that they already had servers with pre-installed versions of a Witness node I decided to go the third way.
It's a good way to save time and also to screw up less, let's face it. Even so, I had my problems and here I am going to explain step by step what to do to set up a Witness node with Privex.
Steps to follow
1. Hire the server of your choice
The first thing is to go to the privex.io website and familiarize yourself with it. You will see an option that says ¨View All¨ which, after accepting the terms and conditions, will take you to see all the packages they have available. Here we are only interested in the section ¨Hive Node-in-a-box™¨ which is where you can hire the servers with the pre-installation. Choose among those available, which at the time of this publication there are offers between 40 and 80 dollars. The price difference is made by the features of each server and its location.
Being our first server, I chose the option that I show you for being the best in quality/price in my opinion. I must tell you that it works great, even the synchronization time is quite fast with this option. If you have already made your decision, the only thing left to do is to order it. For this you just need to click on the "Order" button, fill out a small form and make the payment. Both steps are very simple and the information about it is shown to you, so just read carefully the information they show you. Paying with HBD and Hive makes the process much faster than any other way and having @keychain helps too.
2. Login to your server
If you have already made the payment, you will see that you get an email to the email you added in the form announcing that they have received the payment and that your server will begin to be activated. Once this is done they will send you another email with the data you need to enter the server, I recommend that you save all this data and delete the emails. You will also see the invitation to enter the Dashboard from where you can manage the different servers you have, it is there where you should go and change the password you were given. After changing it you must restart the server, wait a few minutes and you will be ready to enter.
You only have to use a terminal and the command ssh together with your user and the ip you were given. It will look like this, just change the username and ip. We will be asked for the password and there we will put the new one that you created recently, or the one they gave you if you did not change it.
ssh [email protected]
3. Configure the server
You will see something like this once you login. You will see that it even tells you the steps to follow which in part is what I will tell you with a couple of tweaks. The first thing is to use the command ¨su¨, with this you will be superadmin inside the server and you will be able to work without authorization problems, besides that you will enter the directory you need.
Once there we are going to do something different before continuing and that is that we are going to configure the wallet client beforehand. For this we are going to follow the following commands and look at the comments I make so you know what each one does and what you should change.
# Start running the Docker image
./run.sh start

# Create a wallet
./run.sh wallet

# You add a password to this wallet, change the numbers to the password you want to set. Don't forget it, so keep it safe.
setpassword 12345678

# Unlock the password
unlock 12345678

# Generate a private and public key to sign the blocks
suggest_brain_key

# Exit by pressing Control + D and stop the Hive image
./run.sh stop
With this last command you will see how it shows you a private and a public key, you must copy both and save them. If at some point you forget them or lose them, you can create a new one following the same steps. Now we can continue with the steps that the server shows us at the beginning. Beginning by adding the user and the private key for the signed that we had copied before. But without leaving this file, we are going to change a couple of things. The first thing is to find the share-file-size variable and change its value to 25G. Then you are going to find the Plugins section and add the following line without the quotes: ```plugin = wallet_bridge_api.
nano data/witness _node_data_dir/config.ini
After that you are going to save the changes with Control + O, accept with Enter and exit the file with Control + D.
4. Synchronize the server
We are now ready to run the Hive image with the command you already know.
./run.sh start
Then you can sit down and look at the logs, a record of everything that happens in the image. We may see some errors, but basically it will start synchronizing the data that already exists on the server with the actual data on the blockchain. It is possible that data from months of use in the blockchain is missing and that is why this process can take days. In my case it took almost 3 days after having solved the problems. Something important that I suggest you do at least twice a day is to look at the logs and look at the time of each block that is synchronizing to see if each new entry you see is more recent than the previous one. As long as that happens everything is fine. You should not have any errors as we already solved them with the previous steps, but there can always be a different error than the ones I had because over time the versions change. You will know that everything is fully synchronized when you see the following:
Importing your private key and the final step
If you made it this far, congratulations, we're almost done. All that's left is to unlock your wallet as in the third step to import your private Active key as follows. Then we are going to tell the blockchain whose token node this is and pass it some parameters it needs. Read carefully the comments of the following commands
# Open the wallet
./run.sh wallet

# unlock with the password
unlock 12345678

# Import the active private key, change the alphanumeric sequence I made up for the key
import_key rguygf72g3fweubfu2gfuewgr73ufbf

# Here change only the username, the link you want and the public signing key from the third step
update_witness "username" "https://example.com" "STM1111111111111111111111111111111114T1Anm" {"account_creation_fee":"3.000 HIVE","maximum_block_size":65536,"hbd_interest_rate":0} true
That's it, we're done. Now you can go to the Peakd Witness list or wherever you prefer and see your witness running. You will see that from there you can change several parameters. I will talk about them in a next post.
I don't want to finish without thanking @arcange, @hivetrending, @dimeilaz and @rishi556 for all the help during this learning process. I drove them a little crazy asking them so many questions. And that's it for today, but I'd like to ask you to leave me your opinion in the comments for any help you need.
! [Important]
Vote for the HiveCuba Witness
Puedes contactarme y seguir mi trabajo aquí

I'm happy to help!
You got a friend here!
The Hive.Pizza team manually curated this post.
You can now send $PIZZA tips in Discord via tip.cc!
Me siento feliz de estar mencionado por acá, gracias por haberme contactado para pedir ayuda, porque eso también me ayuda a mí a manejar mejor la información, siempre será un placer el poder realizar aportes significativos para nuestra comunidad, ¡sigamos creciendo! ¡Un abrazo, bro!
Así mismo y vamos a ver si en el HF podemos vernos.
No sabes cómo me gustaría eso de verdad, estoy tratando de planificarme lo mejor posible
Dale y hacemos algún podcast juntos
Nice!
Thank you 🙏
This is great!