How To Start Light Painting
For a long time I had planned to write an article in which I would describe as briefly and simply as possible how to get started in light painting. Now I have finally found the time. One thing right away: light painting is not easy. Light painting is not something you can do on the side. Without a lot of practice, you will hardly get usable results on the memory card. Watching and photographing the performance of a self-proclaimed master will not improve your own skills any more than reading this article.
Ich hatte mir schon lange vorgenommen, einen Beitrag zu schreiben, in dem ich möglichst kurz und einfach den Einstieg ins Lightpainting beschreibe. Jetzt habe ich endlich die Zeit dafür gefunden. Eins gleich vorweg: Lightpainting ist nicht einfach. Lightpainting macht man nicht mal so schnell nebenbei. Ohne viel Übung wird man kaum brauchbare Ergebnisse auf die Speicherkarte bekommen. Vom Zusehen und Mitfotografieren der Performance eines selbsternannten Meisters wird man seine eigenen Fähigkeiten genauso wenig verbessern wie vom Lesen dieses Beitrags.
This was one of my first light paintings. Well, not quite, this painting is a remake from 2017. The original painting was from 2012. This brings us to one of the most important points in light painting, reproducibility. Since in most cases the planned light painting cannot be realised right away, it makes the work much easier if you don't wave the torches around unmotivatedly. It should be possible to repeat each individual step. After each failed attempt, the part that went wrong is improved. All other steps are simply repeated. Before you start to realise the picture, you should have as clear a plan as possible as to the order in which you will carry out the various steps. In the picture above, I first lit my model Erik, then painted the light trails behind him, shone the torch behind Erik towards the camera and, as a last step, illuminated the surroundings. Basically, the order doesn't matter. However, if the model moves during the illumination or if I don't paint the light traces cleanly, I stop immediately without carrying out the remaining steps. So you should always start with the most difficult part.
Dieses war eines meiner ersten Lightpaintings. Also nicht ganz, bei diesem Bild handelt es sich um ein Remake aus dem Jahr 2017. Das Originalbild stammt von 2012. Damit sind wir gleich bei einem der wichtigsten Punkte im Lightpainting, der Reproduzierbarkeit. Da in den meisten Fällen das geplante Lightpainting nicht auf Anhieb umgesetzt werden kann, erleichtert es die Arbeit ungemein wenn man nicht unmotiviert mit den Taschenlampen rumfuchtelt. Jeder einzelne Schritt sollte sich wiederholen lassen. Nach jedem Fehlversuch wird der Teil verbessert, der schiefgegangen ist. Alle anderen Arbeitsschritte werden einfach wiederholt. Bevor man mit der Umsetzung des Bildes beginnt, sollte man einen möglichst klaren Plan haben, in welcher Reihenfolge man die verschiedenen Arbeitsschritte ausführt. Im Bild oben habe ich zuerst mein Model Erik eingeleuchtet, dann die Lichtspuren hinter ihn gemalt, mit der Taschenlampe hinter Erik in Richtung Kamera geleuchtet und als letzten Schritt die Umgebung ausgeleuchtet. Grundsätzlich ist die Reihenfolge egal. Wenn sich allerdings das Model während der Beluchtung bewegt oder ich die Lichtspuren nicht sauber male breche ich sofort ab ohne die restlichen Arbeitsschritte auszuführen. Man sollte also immer mit dem schwierigsten Teil beginnen.

EQUIPMENT
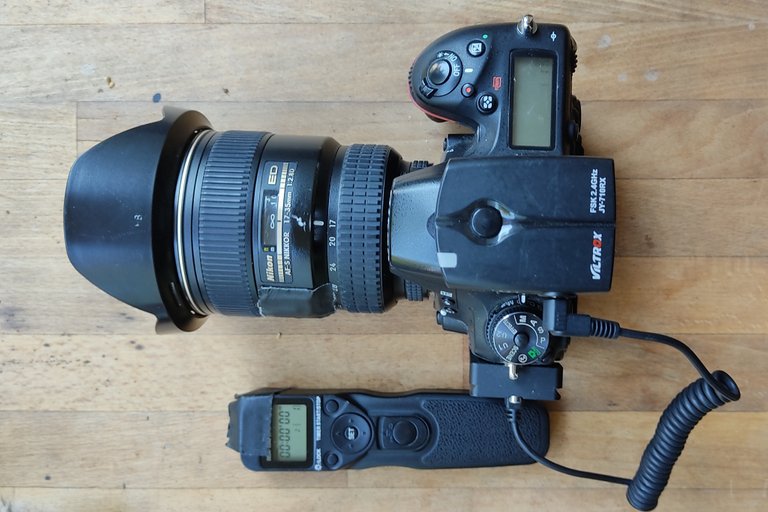
First of all, you need a camera that is capable of controlling exposure times of any length (bulb). Secondly, you have to ensure that the camera is stable. A good tripod is best suited for this. A lens with the shortest possible focal length makes the work easier because the distance between the camera and the light source is small. So that you don't have to keep your finger on the shutter release for several minutes in bulb mode, it makes sense to use a remote shutter release. I currently use a Nikon D750, the Laowa 12/2.8 or the Nikkor 17-35/2.8 and a Benro TMA48CXL with a geared head for my pictures. But impressive light paintings can also be taken without expensive professional equipment.
Man braucht zuallererst eine Kamera, die in der Lage ist beliebig lange Belichtungszeiten zu steuern (bulb). Als zweites muss man für einen stabilen Stand der Kamera sorgen. Ein gutes Stativ ist dafür am Besten geeignet. Ein Objektiv mit möglichst kurzer Brennweite erleichtert die Arbeit weil der Abstand zwischen Kamera und Lichtquelle gering ist. Damit man im Modus "bulb" nicht mehrere Minuten den Finger auf dem Auslöser haben muss ist ein arreitierbarer Fernauslöser sinnvoll. Aktuell verwende ich eine Nikon D750, das Laowa 12/2,8 oder das Nikkor 17-35/2,8 sowie ein Benro TMA48CXL mit einem Getriebeneiger für meine Bilder. Aber auch ohne teures Gerät aus dem Profibereich lassen sich beeindruckende Lightpaintings aufnehmen.
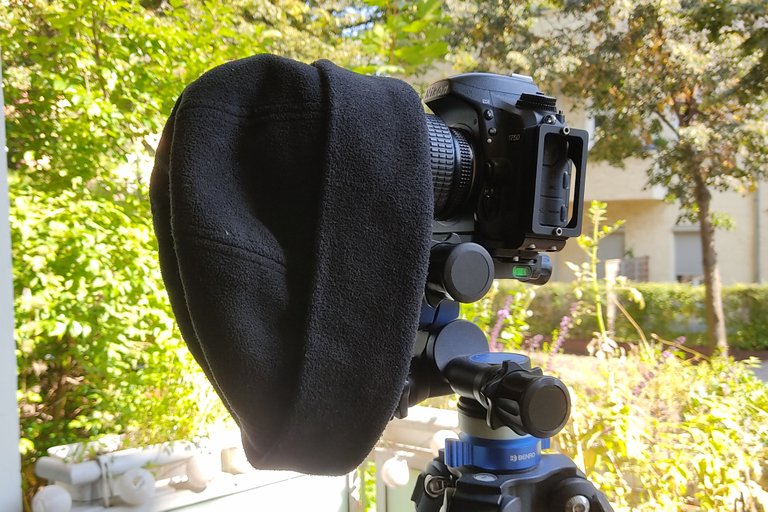
I use a thick woollen cap to cover the lens quickly and securely during the exposure. I cover the lens to avoid unwanted light traces. Some light sources (fire, fireworks, glow lights, etc.) cannot be switched off at all. Other light sources are not easy to reach because they are mounted on a long pole. Furthermore, it is for your own safety to walk through the rocked-out lost place with your headlamp switched on.
Um das Objektiv während der Belichtung schnell und sicher abdecken zu können verwende ich eine dicke Wollmütze. Ich decke das Objektiv ab um keine ungewollten Lichtspuren auzunehmen. Manche Lichtquellen (Feuer, Feuerwerk, Knicklichter usw.) lassen sich gar nicht ausschalten. Andere Lichtquellen sind nicht leicht erreichbar, weil sie an einem langen Stab montiert sind. Darüber hinaus dient es der eigenen Sicherheit wenn man mit eingeschalteter Stirnlampe durch den abgerockten Lost Place läuft.
And then, of course, you need one or more light sources. Basically, you can paint traces of light into the picture with anything that shines. There is absolutely nothing to be said against testing everything that can be found in the household for your first own experiments before transferring money for torches and light painting tools to the online dealer. LED toys, bicycle lamps, torches, sparklers, glow sticks or other things can be sufficient for the first attempts.
Und dann braucht man natürlich noch eine oder mehrere Lichtquellen. Grundsätzlich kann man mit allem was leuchtet Lichtspuren ins Bild malen. Es spricht absolut nichts dagegen, alles was sich im Haushalt finden lässt, für die ersten eigenen Versuche zu testen bevor man Geld für Taschenlampen und Lightpainting Tools zum Onlinehändler transferiert. LED Spielzeuge, Fahrradlampen, Taschenlampen, Wunderkerzen, Knicklichter oder andere Dinger können durchaus für die ersten Versuche genügen.

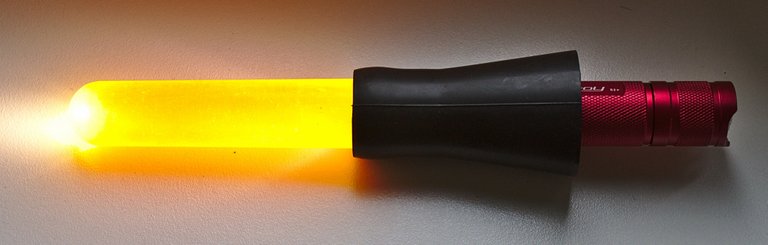


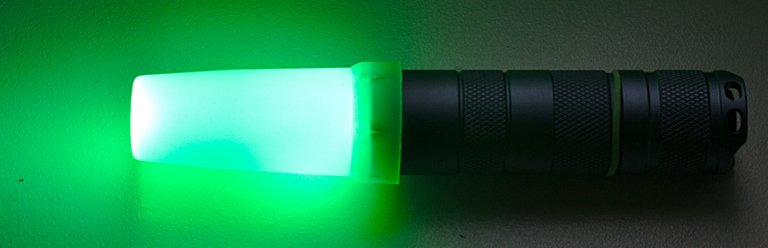
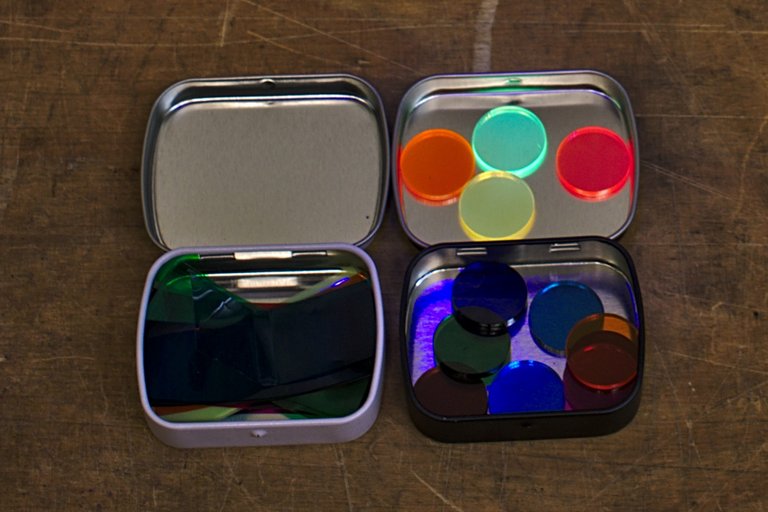
In the pictures you can see some very inexpensive light painting tools. Most of them I have misused (film cans, an acrylic salt shaker, coloured plastic test tubes, a bubble container and a diffuser for the Convoy S2+).
In den Bildern sind einige sehr preiswerte Lightpainting Tools zu sehen. Die meisten habe ich zweckentfremdet (Filmdosen, ein Salzstreuer aus Acryl, farbige Reagenzgläser aus Kunststoff, ein Seifenblasenbehälter und einen Diffusor für die Convoy S2+)
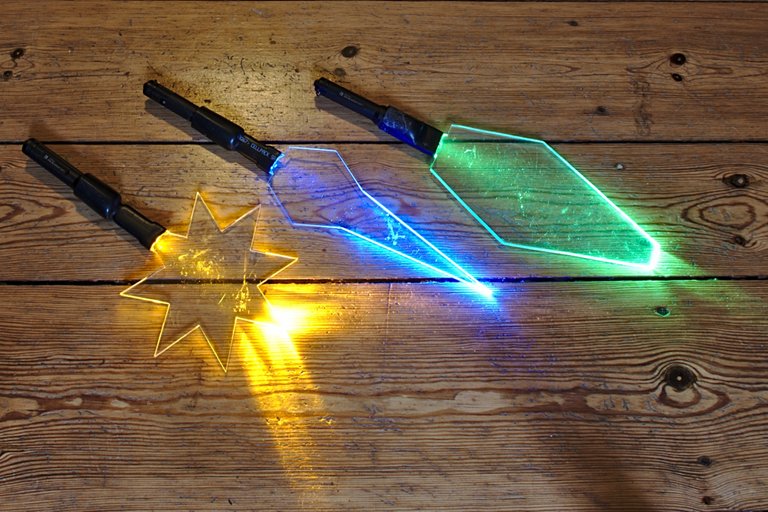
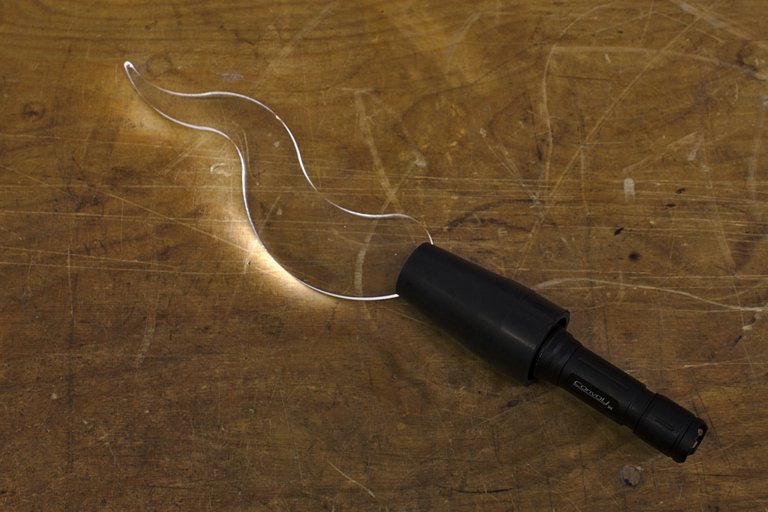
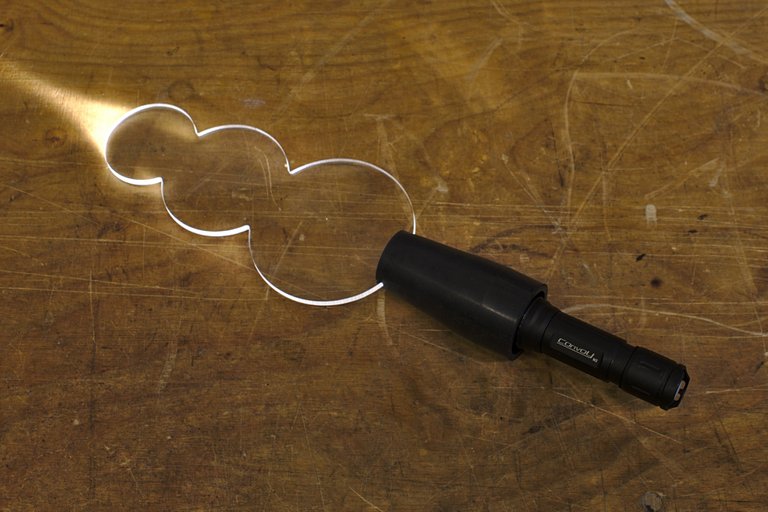
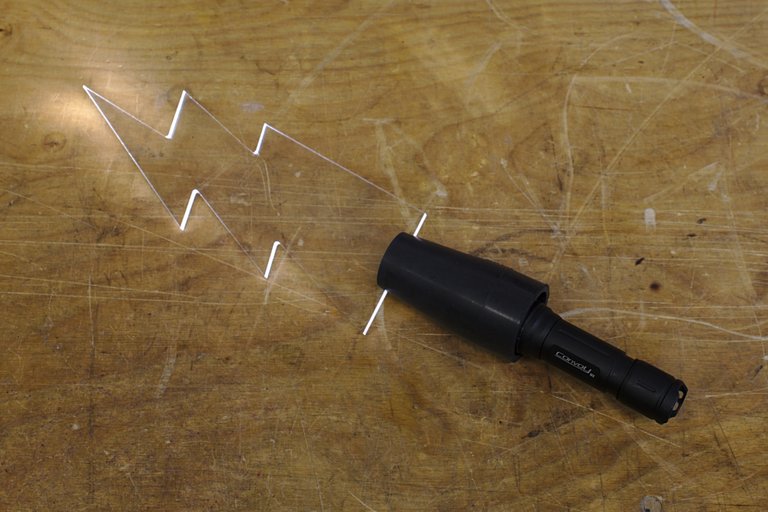
Acrylic blades can be used to paint very beautiful traces of light into the picture. In the first picture you can see blades that I cut out myself. In the other three pictures you can see blades from the online shop of Lightpainting Paradise.
Mit Blades aus Acryl lassen sich sehr schöne Lichtspuren ins Bild malen. Im ersten Bild seht ihr Blades, die ich selbst ausgeschnitten habe. In den anderen drei Bildern seht ihr Blades aus dem Onlineshop von Lightpainting Paradise.
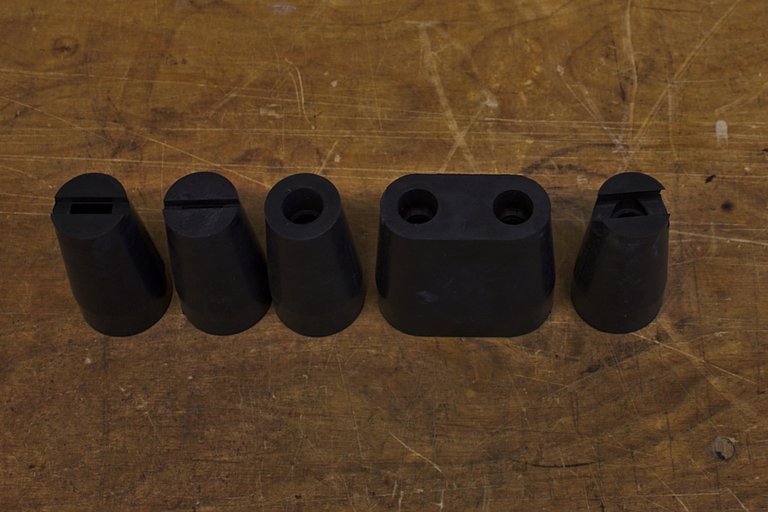
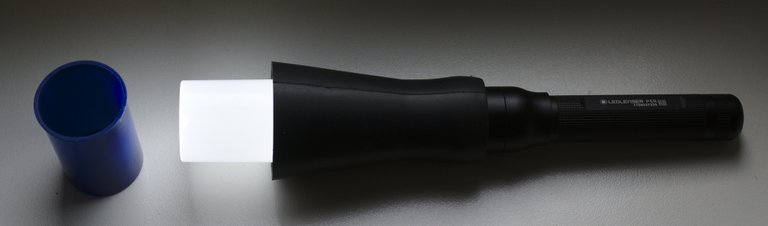
To connect the torch and the light painting tool, special adapters are best suited. But in a pinch, you can also use gaffa tape.
Um Taschenlampe und Lightpainting Tool miteinander zu verbinden sind spezielle Adapter am besten geeignet. Aber zur Not geht das natürlich auch mit Gaffa Tape.
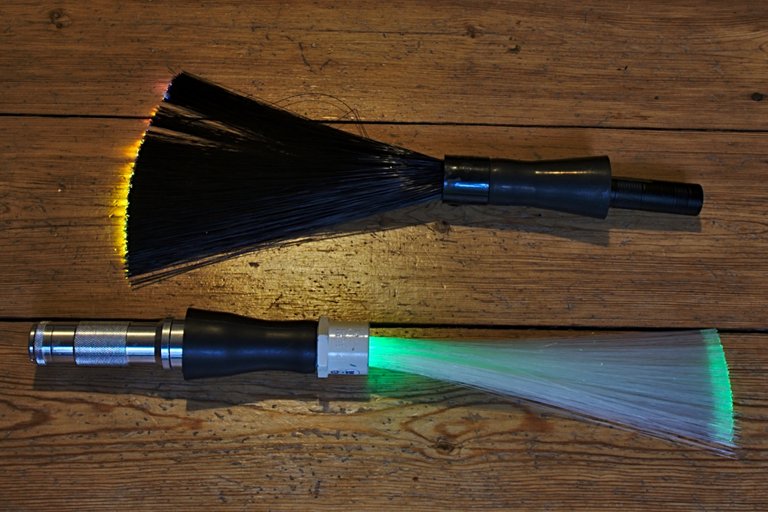
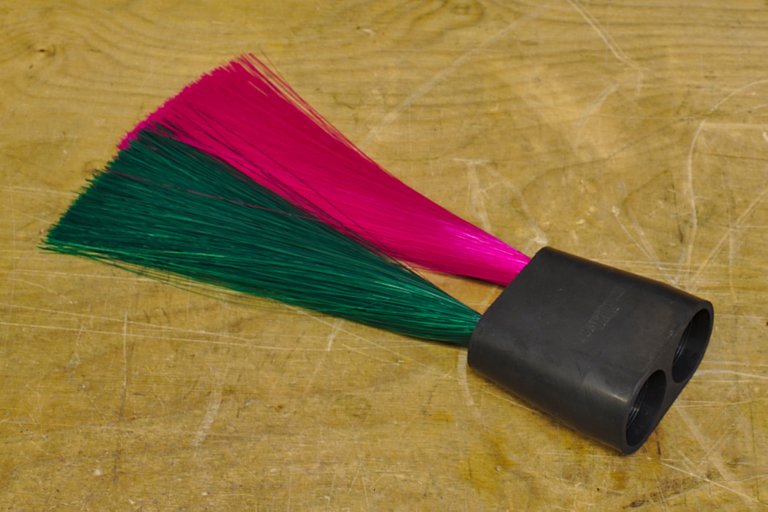
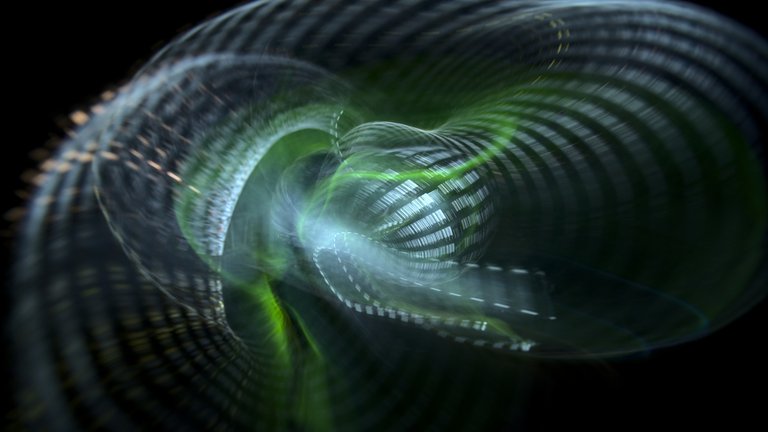
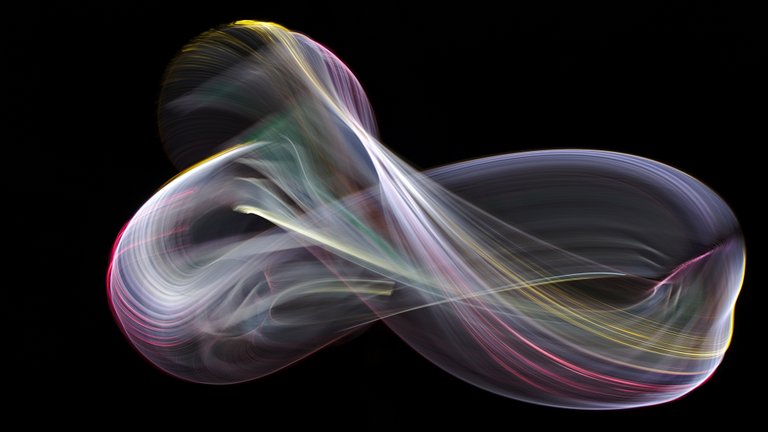
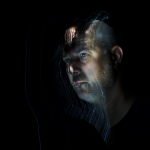
I like to use different fibreglass tools in my lightpaintings, especially for portraits.
Ich verwende gerne verschieden Glasfaser Tools in meinen Lightpaintings, vor Allem für Portraits.

Here is a result of a portrait with fibre optics.
Hier mal ein Ergebnis eines Portraits mit Glasfasern.
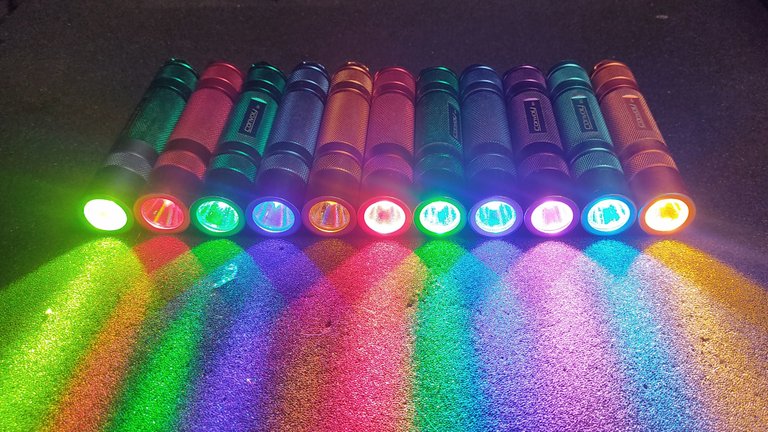

To bring colour into the picture I use colour filters made of acrylic, colour filter foil, torches with coloured LEDs or RGB lamps like the Critter.
Um Farbe ins Bild zu bringen verwende ich Farbfilter aus Acryl, Farbfilterfolie, Taschenlampen mit farbigen LEDs oder RGB Lampen wie die Critter.
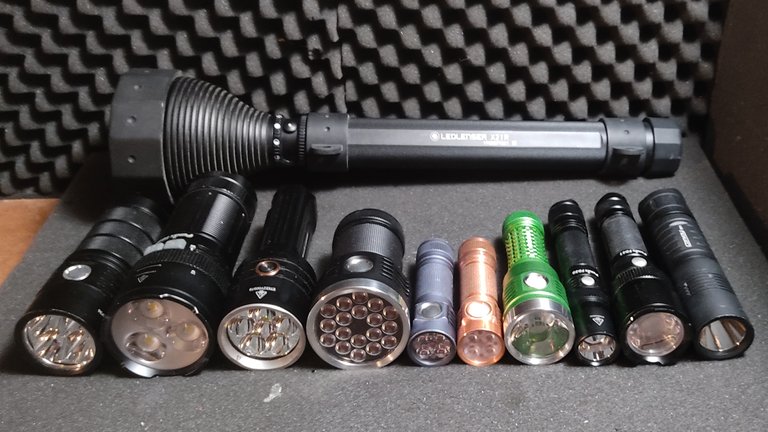
To illuminate larger areas, I use powerful torches like the Fenix LR35R (third from left) or the Emisar D18 (fourth from left). Both torches have a luminous flux of 10000 lumens.
Zur Ausleuchtung größerer Bereiche benutze ich leistungsstarke Taschenlampen wie die Fenix LR35R (dritte von links) oder die Emisar D18 (vierte von links). Beide Taschenlampen haben einen Lichtstrom von 10000 Lumen.
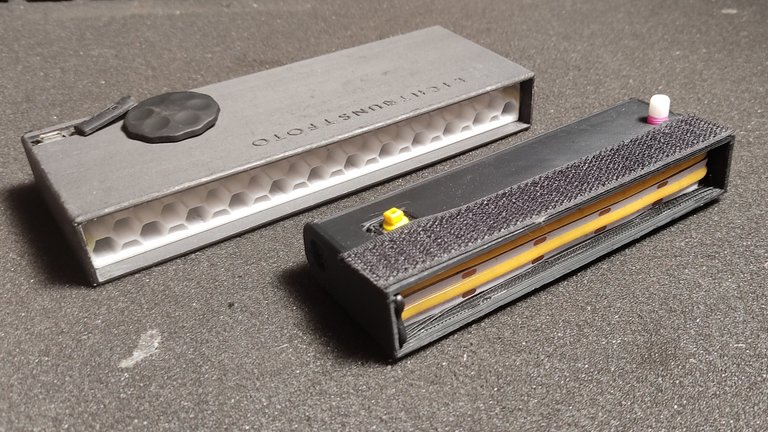
To illuminate people, I use a narrow light source and scan the person from top to bottom, like a scanner. I built both of these myself. The housings are from the 3D printer. But this technique also works with a narrow work lamp. You simply attach strips of black cardboard or black plastic to the lamp.
Um Personen einzuleuchten benutze ich eine schmale Lichtquelle und fahre mit dieser die Person von oben nach unten ab, wie bei einem Scanner. Die beiden Exemplare habe ich selbst gebaut. Die Gehäuse stammen aus dem 3D Drucker. Aber auch mit einer schmalen Arbeitslampe funktioniert diese Technik. Dazu bringt man einfach Streifen aus schwarzer Pappe oder schwarzem Kunststoff an der Lampe an.
Once again: For the beginning it is not necessary to buy 10000 lumen torches, expensive light painting tools or expensive special lamps like the AOAM RGB Critter. Only when you reach insurmountable limits with your existing equipment should you think about buying new torches and tools. Furthermore, in my opinion, an important aspect of light painting is that you build tools yourself as far as possible. This is also part of the creative work with moving light.
Noch einmal: Für den Anfang ist es nicht nötig 10000 Lumen Taschenlampen, teure Lightpainting Tools oder teure Speziallampen wie die AOAM RGB Critter zu kaufen. Erst wenn man mit dem vorhandenen Material an unüberwindbare Grenzen stößt, sollte man über den Kauf neuer Taschenlampen und Tools nachdenken. Darüber hinaus ist meiner Meinung nach ein wichtiger Aspekt im Lightpainting, dass man Tools, soweit möglich, selbst baut. Auch das ist ein Teil der kreativen Arbeit mit bewegtem Licht.
SETTINGS
The following things influence the brightness of the light trace: ISO, aperture, brightness of the light source, distance of the light source from the camera and the speed of movement of the light source. Basically, you should set the lowest (native) ISO value on the camera to keep the image noise as low as possible. The aperture should then be chosen first of all under creative aspects (depth of field). I usually work with apertures in the range of 5.6 to 11. Starting from this, I test the brightness of the tool in the picture with the chosen torch. It is most convenient if the torch used has as many brightness levels as possible. It is usually the best choice to change the brightness of the light source and only change the settings on the camera when you reach the limit with it.
Einfluss auf die Helligkeit der Lichtspur haben folgende Dinge: ISO, Blende, Helligkeit der Lichtquelle, Entfernung der Lichtquelle zur Kamera und die Bewegungsgeschwindigkeit der Lichtquelle. Grundsätzlich sollte man den kleinsten (nativen) ISO Wert an der Kamera einstellen um das Bildrauschen möglichst gering zu halten. Die Blende wählt man dann zuerst einmal unter gestalterischen Aspekten (Schärfentiefe). Gewöhnlicherweise arbeite ich mit Blenden im Bereich von 5,6 bis 11. Davon ausgehend teste ich die Helligkeit des Tools im Bild mit der gewählten Taschenlampe. Am komfortabelsten ist es, wenn die verwendete Taschenlampe möglichst viele Helligkeitsstufen hat. Es ist meist die beste Wahl, die Helligkeit der Lichtquelle zu verändern und erst wenn man damit an die Grenze kommt, die Einstellungen an der Kamera zu verändern.
In most cases, the exposure time depends on the length of the performance. I start the exposure painting the light trails into the image and then finish the exposure. Normally I don't pre-select an exposure time.
Die Belichtungszeit richtet sich in den meisten Fällen nach der Länge der Performance. Ich starte die Belichtung male die Lichtspuren ins Bild und beende dann die Belichtung. Normalerweise wähle ich keine Belichtungszeit vor.
PROCEDURE
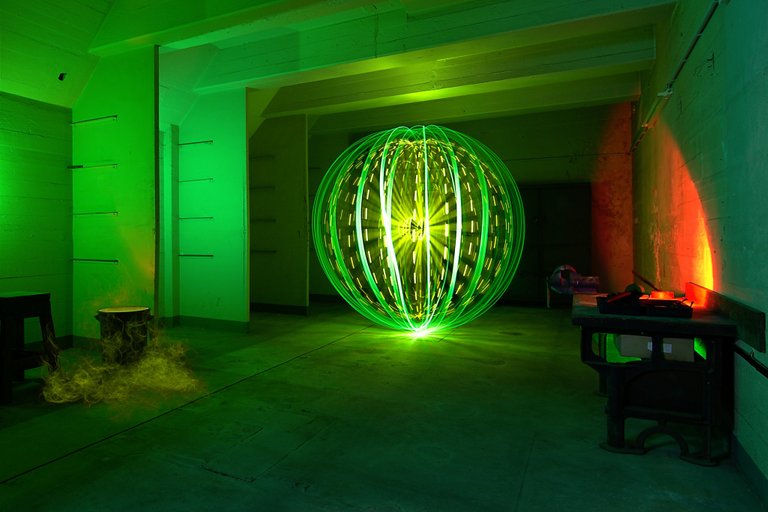
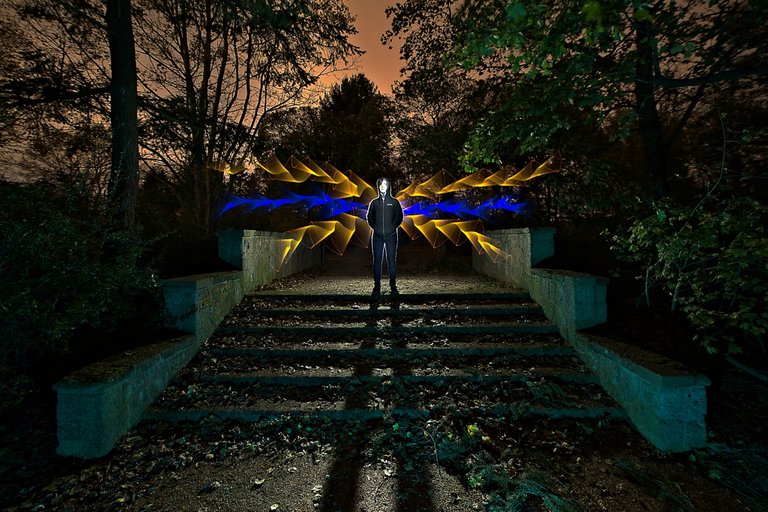
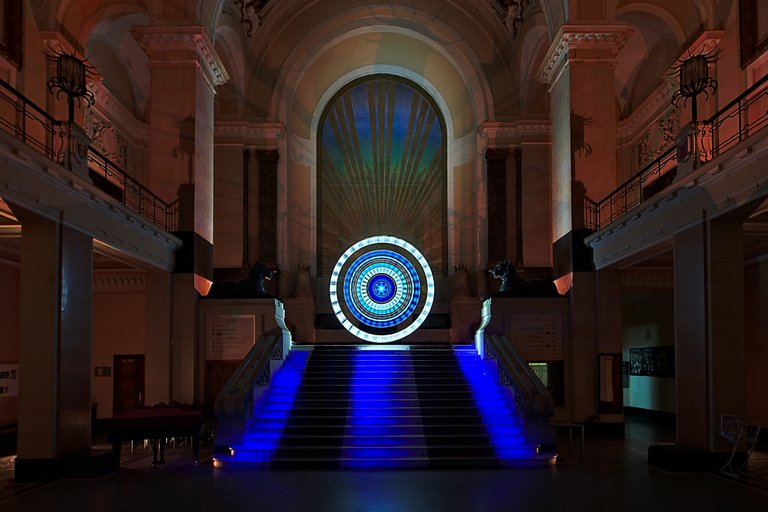
Especially in the early days, you should not go out into the night alone. A helper who covers the lens during exposure is extremely helpful. Besides, light painting alone is hardly fun. It is advisable to cover the lens first and then start the exposure. The light painter then commands the assistant to uncover the lens when he starts painting the light trails. At the right moment, the lens is then covered again and the next step is carried out. In the picture above, I first turned the Orb, then painted the yellow light traces into the picture with EL-Wire, briefly switched on the red torch on the table and finally illuminated the room with green light. The exposure time was 335 seconds. For your first own experiments, you should start with a few steps. However, you should refrain from taking test shots and always take a meaningful picture with a well thought-out composition.
Gerade in der Anfangszeit sollte man nicht alleine in die Nacht ziehen. Ein Helfer, welcher das Objektiv während der Belichtung abdeckt, ist extrem hilfreich. Außerdem macht Lightpainting alleine kaum Spaß. Es empfiehlt sich zuerst das Objektiv abzudecken und dann die Belichtung zu starten. Der Lightpainter gibt dann an den Helfer das Kommando das Objektiv aufzudecken wenn er mit dem Malen der Lichtspuren beginnt. Im richtigen Moment wird dann das Objektiv wieder abgedeckt und dann der nächste Arbeitsschritt ausgeführt. Im Bild oben habe ich zuerst den Orb gedreht, dann die gelben Lichtspuren mit EL-Wire ins Bild gemalt, kurz die rote Taschenlampe auf dem Tisch eingeschaltet und zum Schluss den Raum mit grünem Licht ausgeleuchtet. Die Belichtungszeit betrug 335 Sekunden. Für erste eigene Versuche sollte man mit wenigen Arbeitsschritten beginnen. Allerdings sollte man auf Testaufnahmen verzichten und immer ein aussagekräftiges Bild mit überlegtem Bildaufbau planen.
To start with, you should limit yourself to as few tools and torches as possible. Only when you can work safely with these should you think about new tools. It makes work much easier at the beginning if the location is completely dark and you can control all the light that the camera picks up yourself. Bright ambient light from the moon, street lamps or other light sources at the location that cannot be influenced make the work more difficult.
Für den Anfang sollte man sich auf möglichst wenige Tools und Taschenlampen beschränken. Erst wenn man mit diesen sicher arbeiten kann sollte man über neue Tools nachdenken. Es erleichtert die Arbeit am Anfang ungemein, wenn die Location komplett dunkel ist und man selbst das gesamte Licht, welches die Kamera aufnimmt, selbst steuern kann. Helles Umgebungslicht durch den Mond, Straßenlaternen oder andere nicht beeinflussbare Lichtquellen am Aufnahmeort, erschweren die Arbeit.
Ohh... This post is already very long. I actually wanted to write something about the illumination of the landscape or the big lost place. I think it's better to put that in another post. I'm sure hardly anyone wants to read that much.
Until then, I wish you lots of fun and success with your own first attempts and good light at all times.
Ohh... schon sehr lang der Beitrag. Ich wollte eigentlich noch etwas über die Ausleuchtung der Landschaft oder des großen Lost Place schreiben. Ich denke, es ist besser, das in einem weiteren Beitrag unterzubringen. So viel will sicher kaum jemand lesen.
Ich wünsche Dir bis dahin viel Spaß und viel Erfolg bei den ersten eigenen Versuchen und allzeit gutes Licht.
WHAT IS LIGHT PAINTING?
LICHTKUNSTFOTO
If you like my art visit www.lichtkunstfoto.de for more Light Art Photography and informations about Light Painting. Join me on Flickr Twitter

For more great Light Art Photography, Light Painting and inspiration check these light painters: @marlasinger666 @fadetoblack @fastchrisuk @dawnoner @oddballgraphics @martbarras @stepko @rod.evans.visual @yo-hoho @maxpateau @gunnarheilmann @neilru75 @maximepateau @ryuslightworks @lightstabeu @candelart @lacelight

WE ARE LIGHT PAINTERS
To help and support the LightPainters community here on Hive I would appreciate your delegation of HivePower. Any amount is appreciated. It does not require much to get started, we are happy for any gesture. @lightpainters
How to delegate?
Delegate 50HivePower, [50HP]
Delegate 250HivePower, [250HP]
Delegate 500HivePower, [500HP]
Delegate 1000HivePower, [1000HP]
All the Hive Power will help to upvote the artist's contribution as part of the LightPainters community.
https://twitter.com/3051073748/status/1582662284912242688
The rewards earned on this comment will go directly to the people( @lichtkunstfoto ) sharing the post on Twitter as long as they are registered with @poshtoken. Sign up at https://hiveposh.com.
Your content has been voted as a part of Encouragement program. Keep up the good work!
Use Ecency daily to boost your growth on platform!
Support Ecency
Vote for new Proposal
Delegate HP and earn more
Congratulations @lichtkunstfoto! You have completed the following achievement on the Hive blockchain and have been rewarded with new badge(s):
Your next target is to reach 250 posts.
You can view your badges on your board and compare yourself to others in the Ranking
If you no longer want to receive notifications, reply to this comment with the word
STOPTo support your work, I also upvoted your post!
Support the HiveBuzz project. Vote for our proposal!
Excellent post detailing in a nicely organized manner all the aspects of lightpainting you've spoken of. Not too long at all. It'd be so interesting to be onsite to observe the process. I'm limited to what I can do on my own and I noticed it's best to pick dark locations with minimal light interference, yet some light source, or sources that offer me something to work with in terms of painting.
When you are painting light trails in, such as you did behind Eric and the portrait (very cool expressiveness in it) using the fiberglass tool, how quickly are you moving? Also, when you say you "turned the orb", how did you create that?
The fibre optics absorb light. I use flashlights around 1000 lumens at ISO 100, f8 in a distance of 1 meter. I hope you understand the metric system. 😏
To spin a orb you can swing a light source at a line or mounted on a stick. I prefer the stick. You rotate the light source and move around a fix point marked on the ground.
LOL, Canada uses the metric system (far easier mathematically), but I use both measurement systems. So the fibre optics absorb light...hmmm. Maybe I can get my hands on some to play around with. Such precision and accuracy. You've had quite a bit of practice at this.
Canada uses the metric. Sure. I forget about. 😂
You need some practice for good results. And don't hit your models eyes with it.
LOLOL, believe me, it's easy to forget Canada, especially when living here.
😂Ouch! Yeah, I'd need a LOT of practice and especially care with a model.
You can move the fibre optics very slow or faster if you like. Best set the brightness of your flashlight or the aperture to your preferred work speed.
I see, so there is some flexibility and you don't have to move like literal lightening. I'm attempting to picture the process. I take it that you don't get any light bleed at all through the wool cap, which must be very thick indeed. I had wondered how you would cover the lens.
It is thick. But you can use other things too. I don't light direct to the camera when the lens is capped.
Ahhh, okay, I see now. Really helps to have an environment you can set up without any other light source interference.
Yes. That's the easy way.
Thanks, enjoyable chat!
😊
Super awesome post! I've been wondering when a how-to was going to come! =)
I hope I will find the time for part two soon.
Great work here buddy. Really in depth and I wish something like this existed when I was starting out. Top job 👊👊
Thanks Tim.
Thank you for sharing this post on HIVE!
Your content got selected by our fellow curator desro & you received a little thank you upvote from our non-profit curation initiative. Your post will be featured in one of our recurring curation compilations which is aiming to offer you a stage to widen your audience within the DIY scene of Hive.
Next time make sure to post / cross-post your creation within the DIYHub community on HIVE and you will receive a higher upvote!
Stay creative & hive on!