A Night at the Rusty Bridge Part 3 - Astrophotography on HIVE
Milky Way Panorama
Seid gegrüßt, Freund des nächtlichen Sternenhimmels. Im letzten Teil des Berichts über meinen Ausflug zur rostigen Brücke im Nirgendwo zeige ich euch heute einen Panorama. Die ersten beiden Teile findet ihr hier:
Greetings, friends of the starry night sky. In the last part of the report on my trip to the rusty bridge in the middle of nowhere, I'm showing you a panorama today. You can find the first two parts here:

https://ecency.com/hive-194913/@lichtkunstfoto/another-night-at-the-rusty
https://ecency.com/hive-194913/@lichtkunstfoto/star-trails-astrophotography-on-hive
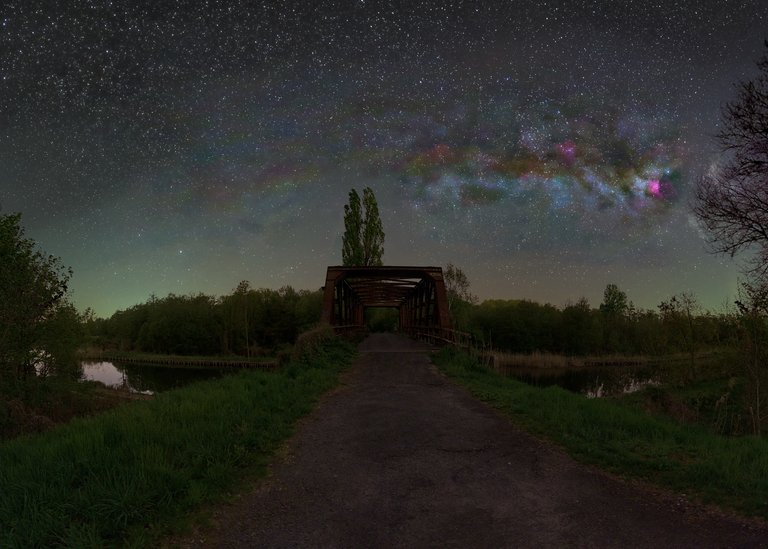
Aufgenommen habe ich das Bild mit der modifizierten Nikon Z5. Vor dem Sensor hatte ich ein Astrofilter von Kolari Vision montiert. An der Nikon steckte das Voigtländer Color Skopar 20/3,5. Die Kamera war im Hochformat auf dem Stativ befestigt.
Zuerst nahm ich die Bilder für den Vordergrund auf. Den ISO Wert hatte ich auf 3200 eingestellt, der Blendenring des Objektivs stand auf 3,5. Am LRTimelapse Timer stellte ich die Belichtungszeit von 2 Minuten ein. Ich nahm dann sechs Einzelbilder auf und stitchte diese dann in Hugin zum Panorama. Der Bildwinkel beträgt ungefähr 180°.
I took the picture with the modified Nikon Z5. I had mounted an astro filter from Kolari Vision in front of the sensor. The Voigtländer Color Skopar 20/3.5 was attached to the Nikon. The camera was mounted on the tripod in portrait format.
First I took the pictures for the foreground. I had set the ISO value to 3200, the aperture ring of the lens was set to 3.5 and I set the exposure time to 2 minutes on the LRTimelapse timer. I then took six individual images and stitched them into a panorama in Hugin. The angle of view is approximately 180°.

Im nächsten Schritt drehte ich die Kamera wieder zurück zum Startpunkt und richtete sie in Richtung Himmel. Ich erhöhte den ISO Wert auf 6400 und stellte am Timer auf ein Intervall von 15 Sekunden, eine Belichtungszeit von 13 Sekunden und 8 Aufnahmen ein. Ich nahm dann wieder sechs Panels mit dem gleichen Winkel wie für den Vordergrund auf. Die jeweils 8 Bilder habe ich dann mit Sequator gestackt und die gestackten Bilder dann mit Hugin zum Panorama zusammengefügt.
In the next step, I turned the camera back to the starting point and pointed it towards the sky. I increased the ISO value to 6400 and set the timer to an interval of 15 seconds, an exposure time of 13 seconds and 8 exposures. I then took another six panels at the same angle as for the foreground. I then stacked each of the 8 images with Sequator and stitched the stacked images together with Hugin to create the panorama.
Aus dem Panorama habe ich dann mit Starnet++ die Sterne entfernt. Im sternenlosen Bild habe ich dann in Darktable Kontrast, Weißabgleich, Sättigung, Chrominanz und Luminanz angepasst und das Bild entrauscht und geschärft.
I then used Starnet++ to remove the stars from the panorama. In the starless image I then adjusted the contrast, white balance, saturation, chrominance and luminance in Darktable and denoised and sharpened the image.
Danach bearbeitete ich das Bild mit den Sternen ebenfalls in Darktable. In GIMP habe ich dann die beiden Bilder wieder vereint. Dann öffnete ich das Bild des Vordergrundes, maskierte den Himmel und erstellte eine Ebenenmaske . Ich vereinte dann die Ebenen. Und passte den Schnitt des Bildes an.
I then edited the image with the stars in Darktable as well. I combined the two images again in GIMP. Then I opened the image of the foreground, masked the sky and created a layer mask. I then merged the layers. And adjusted the crop of the image.

Da ich ohnehin schon eine gefühlte Ewigkeit mit der Bearbeitung des Bildes verbrachte hatte, entschied ich mich dafür, die Absperrungen vor der Brücke sowie meine zweite Kamera, welche auf der Brücke stand, zu entfernen. Dafür nutzte ich den Inpaint Filter in GIMP. Wegen der Struktur der Brücke und den recht großen Betonteilen war das nicht ganz so einfach. Nach mehreren Versuchen mit verschiedenen Einstellungen des Filters und etwas nachträglicher manueller Retusche war ich mit dem Ergebnis zufrieden. Eigentlich sitze ich nicht so gerne vor dem Rechner um Bilder zu bearbeiten. Ich verbringe meine Zeit viel lieber mit der Kamera unter dem nächtlichen Sternenhimmel. Aber es gibt leider keinen anderen Weg solch ein Bild ohne aufwändige Bildbearbeitung zu erstellen.
Allzeit gutes Licht.
As I had already spent what felt like an eternity editing the image, I decided to remove the barriers in front of the bridge and my second camera, which was standing on the bridge. I used the Inpaint filter in GIMP for this. Due to the structure of the bridge and the rather large concrete parts, this was not so easy. After several attempts with different filter settings and some manual retouching afterwards, I was happy with the result. I don't really like sitting in front of the computer to edit pictures. I much prefer to spend my time with my camera under the starry night sky. But unfortunately there is no other way to create such a picture without extensive image processing.
Always good light.
Software used:
https://sites.google.com/view/sequator/
https://www.starnetastro.com/download/
https://www.gimp.org/downloads/
WHAT IS LIGHT PAINTING?
LICHTKUNSTFOTO
If you like my art visit www.lichtkunstfoto.de for more Light Art Photography and informations about Light Painting. Join me on Flickr Twitter

For more great Light Art Photography, Light Painting and inspiration check these light painters: @marlasinger666 @fadetoblack @fastchrisuk @dawnoner @oddballgraphics @martbarras @stepko @rod.evans.visual @yo-hoho @maxpateau @gunnarheilmann @neilru75 @maximepateau @ryuslightworks @lightstabeu @candelart @lacelight

WE ARE LIGHT PAINTERS
To help and support the LightPainters community here on Hive I would appreciate your delegation of HivePower. Any amount is appreciated. It does not require much to get started, we are happy for any gesture. @lightpainters
How to delegate?
Delegate 50HivePower, [50HP]
Delegate 250HivePower, [250HP]
Delegate 500HivePower, [500HP]
Delegate 1000HivePower, [1000HP]
All the Hive Power will help to upvote the artist's contribution as part of the LightPainters community.
nice
Great photography,
Those stars in the sky looks pretty good..!!
Thanks
Das ist ein sehr beindruckendes Ergebnis. Gratuliere! 👍 Der Aufwand ist aber immens. Dafür muss man schon einen Nagel im Kopf haben, oder? Für die Bearbeitung würde ich wahrscheinlich Tage brauchen. 😵💫
Einen rostigen Nagel... 🤣
Mit etwas Übung und einem klaren Plan dauert die Bearbeitung nicht lange, 2 bis 3 Tage.
Wunderschön :-) Rehived.
Danke
Tolles Bild, gefällt mir
!LUV
@lichtkunstfoto, @mein-senf-dazu(2/5) sent you LUV. | tools | discord | community | HiveWiki | <>< daily
Das freut mich.
Congratulations @lichtkunstfoto! You have completed the following achievement on the Hive blockchain And have been rewarded with New badge(s)
Your next target is to reach 54000 upvotes.
You can view your badges on your board and compare yourself to others in the Ranking
If you no longer want to receive notifications, reply to this comment with the word
STOP