Fotografia con móvil. Consejos para mejorar tus fotos [Es-En]
Intro
Aunque parecería que este es un tema para una comunidad de fotografía, pues les cuento que lo publico en la nuestra porque algunos de acá son los que han comentado alguna vez por el grupo de Telegram que les gustaría saber un poquito más de de fotografía.
Además, que en las comunidades de fotografías, generalmente se publica fotografía y no todo este "teque" teórico. 😏
Una cámara profesional de fotografía, e incluso una semi-pro no está al alcance del bolsillo de todos, y como es nuestro caso en Cuba, a veces ni teniendo el dinero podemos comprarla. Acá no existe ni Amazon, ni Mercado Libre, Ebay, ni nada similar, o sea un dolor de cabeza para los que nos dedicamos a ese mundo un poco más.
Pero si muchos disponemos de un móvil con mejores o peores prestaciones para la fotografía, pero lo tenemos (menos mal 😅). Así que esta sería la mayor herramienta para la fotografía de la mayoría de los cubanos y cuidaíto no de muchos otros países.
Así que, entremos en materia...
Intro
Although it would seem that this is a topic for a photography community, I'm posting it in ours because some of the users here are the ones who have commented on the Telegram group that they would like to know a little more about photography.
Also, that in photography communities, generally photography is published and not all this theoretical " speech". 😏
A professional camera, and even a semi-pro is not affordable for everyone, and as is our case in Cuba, sometimes even if we have the money we can't buy it. Here there is no Amazon, Mercado Libre, Ebay, or anything similar, that is a headache for those of us who are dedicated to that world a little more.
But if many of us have a mobile with better or worse features for photography, but we have it (thank goodness 😅). So this would be the greatest tool for photography for most Cubans and careful not many other countries.
So, let's get down to business....
Fuente/Source
Configura tu móvil
Gamas bajas, medias, altas, 1 cámara, 2 o 5. Casi todos los celulares tiene algunas opciones que son importantes que sepas:
-Limpia el lente: ¡Parece obvio no?! Pues no siempre lo hacemos!😂 🎵 Chiki chiki chiki, agua y jabón!🎵 NOOOOOOO !!😅🤣, nada de agua y jabón!
De hecho, 🚫 agua! Un pañito suave por encima del cristalito es suficiente.
Evita pegarle los dedos encima.
-Flash apagado: El flash provoca que las fotos salgan quemadas muchas veces, ojos rojos, etc., con un aspecto extraño, es preferible utilizarlo a modo linterna, en caso de que no puedas hacer uso de la luz natural que es la mejor siempre. Tienen sus funcionalidades, ejem, pocas, pero sirve para algunas cositas como las fotos a contraluz, pero si te lo puedes evitar... hazlo.
-Mayor resolución: Siempre pon la mayor de que disponga tu cámara. Ten en cuenta que esto hará que los archivos que se generen sean de mayor peso también así que te recomiendo una tarjetita externa o que vacíes el celular si sabes que vas a hacer muchas fotos.
-Activa la cuadrícula: En los ajustes de la cámara lo encontrarás, Te puede llegar a parecer molesto si no estás acostumbrado, pero la cuadrícula es tu amiga, y más adelante enteras por qué cuando te explique la ley de los tercios.
-Modo Pro Hay algunos teléfonos y aplicaciones que tienen este modo, que es lo más parecido a las características que tendría una cámara digital. Si lo tienes, configura tu foto para que el archivo que se genere sea Raw en vez de jpg. Así podrás tener mucho más rango a la hora del revelado.
Este modo tiene muchas otras características como son el ISO, la apertura del diafragma, velocidad de obturación, balance de blancos en fin... acá ya la cosa se complica porque tienes que tener algunas nociones de fotografía como tal para saber qué parámetros utilizar mejor en cada caso.
Eso se nos sale un poco de este post, pero no dudes en dejarme en los comentarios si te interesa conocer más sobre ese tema.
- Olvídate de hacer zoom: El zoom digital es algo a lo que NO queremos recurrir, pues puede provocar una imagen con muy poco enfoque y baja resolución.
-No confíes siempre en la IA: Es cierto que aporta bastante en algunas escenas, pero experimenta antes de usarla siempre encendida, pues he visto fotos megasaturadas (con los colores muy subidos) que más que aportarle a la imagen le restan naturalidad. Prueba los diferentes modos de imagen que tienes y experimenta con ellos. Eso te podrá encaminar hacia cuándo emplearlos y cuando no.
Configure your mobile
Low, medium, high ranges, 1 camera, 2 or 5. Almost all cell phones have some options that are important for you to know:
-Clean the lens: Seems obvious doesn't it?! Well we don't always do it!😂 🎵 Chiki chiki chiki chiki, water and soap!🎵 NOOOOOOOOO !!😅🤣, no water and soap!
In fact, 🚫 water! A soft wipe on top of the crystal is enough.
Avoid sticking your fingers all over it.
-Flash off: The flash causes the photos to come out burnt many times, red eyes, etc., with a strange look, it is preferable to use it in flashlight mode, in case you can't make use of natural light which is always the best. It has its functionalities, ahem, few, but it is useful for some little things like backlit photos, but if you can avoid it... do it.
-Higher resolution: Always use the highest resolution your camera has. Keep in mind that this will cause the files generated to be heavier too, so I recommend an external card or empty your cell phone if you know you are going to take a lot of pictures.
**-You may find it annoying if you are not used to it, but the grid is your friend, and you will find out why later when I explain the law of thirds.
-Pro Mode There are some phones and apps that have this mode, which is as close to the features that a digital camera would have. If you have it, set your photo so that the file that is generated is Raw instead of jpg. This way you will have much more range when developing.
This mode has many other features such as the ISO, aperture, shutter speed, white balance, etc.... Here it gets complicated because you have to have some notions of photography as such to know which parameters to use better in each case.
That's a bit beyond the scope of this post, but feel free to let me know in the comments if you are interested in learning more about this topic.
- Forget about zooming: Digital zoom is something we DON'T want to resort to, as it can result in an image with too little focus and low resolution.
-Don't always rely on the AI: It is true that it contributes a lot in some scenes, but experiment before using it always on, as I have seen megasaturated photos (with very high colors) that detract from the naturalness of the image rather than adding to it. Try the different image modes you have and experiment with them. This will help you decide when to use them and when not to use them.
Aspectos a tener en cuenta al hacer la foto
Como diríamos en cubano, vamos al pollo del arroz con pollo.
Aspects to take into account when taking the picture
As we would say in Cuban, let's go...

Fuente/Source
La iluminación
Mi recomendación es usar la luz natural siempre que sea posible.
- Evita los horarios en que la luz sea demasiado fuerte, para que las sombras no sean muy duras, además que tiene a resaltar las imperfecciones del rostro cuando es un retrato con un plano más cercano.
- Trata de que la fuente de iluminación principal esté detrás de quien retrata y no del sujeto a fotografiar.
Pero como todo, igual puedes experimentar con esto.
Por ejemplo:
Lighting.
My recommendation is to use natural light whenever possible.
- Avoid times when the light is too strong, so that the shadows are not too harsh, plus it has to highlight the imperfections of the face when it is a portrait with a closer shot.
- Try to have the main light source behind the portrait subject and not behind the subject.
But like anything else, you can still experiment with this.
For example:
El encuadre:
Aquí es donde decidiremos qué fotografiar y qué dejar fuera. Además, tenemos que determinar el sujeto principal de la imagen. Dentro de la Composición fotográfica esto tiene un enorme peso, pero acá ahora nos referiremos a los aspectos más básicos.
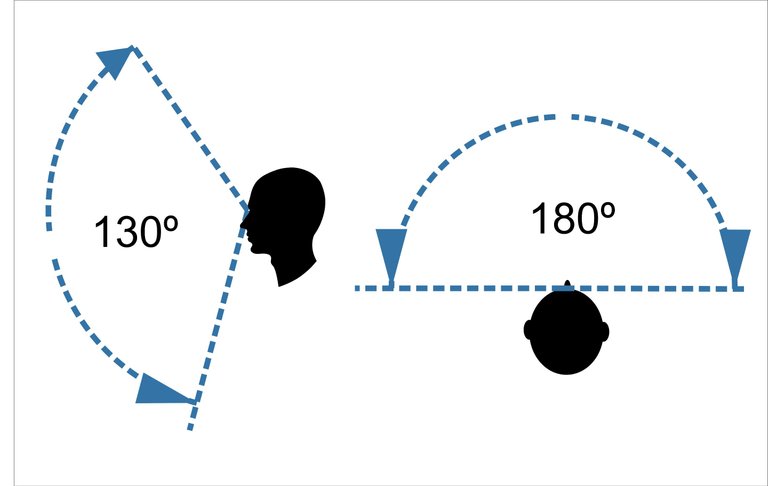
- Lo principal es elegir si vamos a por una foto horizontal o una vertical. El formato apaisado, como también se le conoce al horizontal, es el que generalmente utilizamos más. Esto se debe a que nos parece la manera de poder "mostrar" más. ¡También es que así es como vemos!
Si! ¡Vemos en formato apaisado! Aunque no todos con los grados que se muestran en la figura se "ve" igual, pues ahí influye en área de visión tridimensional y la de visión monocular, entre otros aspectos.
Framing:
This is where we will decide what to photograph and what to leave out. In addition, we have to determine the main subject of the image. Within the photographic composition this has an enormous weight, but here we will refer to the most basic aspects.
- The main thing is to choose whether to go for a horizontal or a vertical photo. The landscape format, as it is also known as horizontal, is the one we generally use the most. This is because it seems to us to be the way we can "show" more. It's also because that's how we see!
Yes, we see in landscape format! Although not all with the degrees shown in the figure "see" the same, because there influences the area of three-dimensional vision and monocular vision, among other aspects.
Hecho en Corel Draw
Fuente/Source
Si o tienes ideas de cómo sería mejor tu fotografía, puedes usar un truco bien simple: ¿Cuál es tu sujeto a fotografiar? El sujeto: (persona, paisaje, ave, lo que sea nuestro principal objetivo)
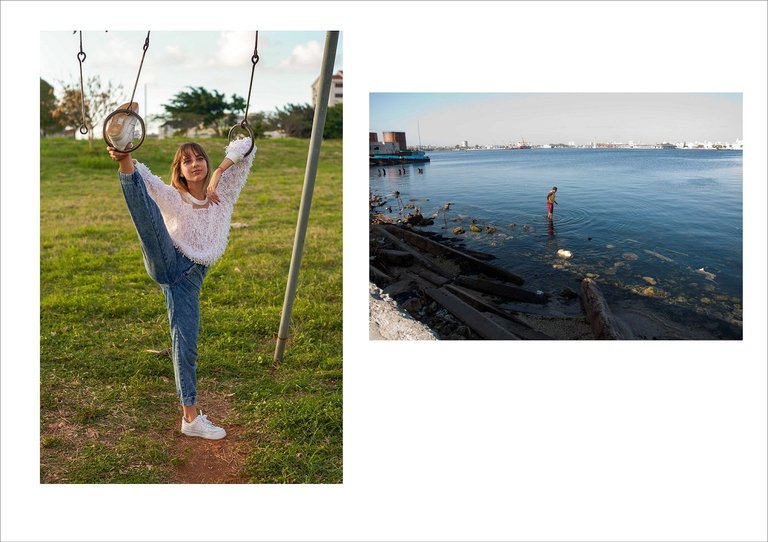
La forma de una persona es vertical, y el paisaje horizontal, de ahí que la mayoría de los retratos de cuerpo entero sean verticales y la de los hermosos paisajes sean apaisadas.
If you don't have an idea of how your photograph would be better, you can use a simple trick: What is your subject to be photographed? The subject: (person, landscape, bird, whatever is our main objective).
A person's form is vertical, and a landscape is horizontal, hence most full-length portraits are vertical and most beautiful landscapes are landscape.
Hecho en Corel Draw con fotos propias
But in those formats, in case we portray a person, we have to take into account in the photo if the person will be located in full body or just a part of it. And, to know where to make our cuts properly, we can use the following guide.
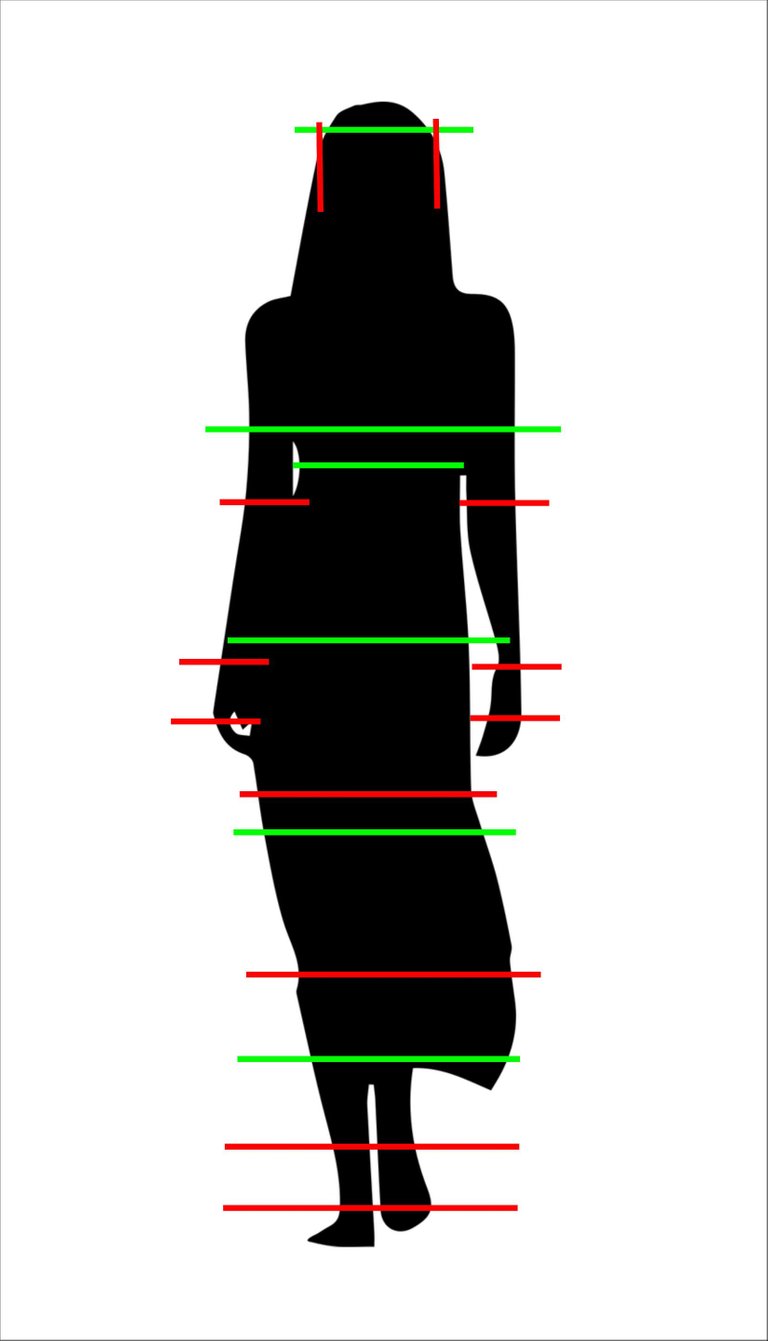
Hecho en Corel Draw
Fuente/Source de la silueta
Por supuesto, esto no es nada exacto, pues recuerda que la fotografía en sí es como un sistema, y ni el ser humano, ni el paisaje, son estáticos completamente. Lo importante es qué definas, qué quieres fotografiar y sus jerarquías y en función de eso, encuadres.
Ley o Regla de Tercios
No es más que uno de los aspectos más básicos y a y a su vez esenciales para una buena composición fotográfica.
Of course, this is not at all exact, because remember that photography itself is like a system, and neither the human being nor the landscape are completely static. The important thing is what you define, what you want to photograph and its hierarchies and according to that, you frame.
Law or Rule of Thirds.
It is just one of the most basic and essential aspects for a good photographic composition.
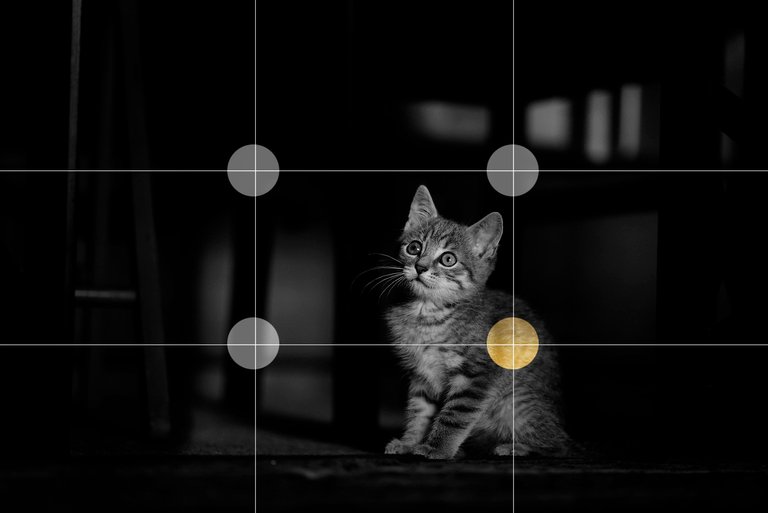
Esta regla es, básicamente, dividir el área a fotografía en 3 partes iguales de arriba a abajo y de izquierda a derecha. Los puntos de intersección, son áreas que nuestro cerebro enfoca con mayor rapidez y, por tanto, hacia donde se dirige la mirada inmediatamente. De ahí que nos resulte más agradable encontrar en esos puntos los sujetos principales de atención de la fotografía.
This rule is basically to divide the area to be photographed into 3 equal parts from top to bottom and from left to right. The intersection points are areas that our brain focuses on more quickly and, therefore, where our eyes are immediately directed. Hence, it is more pleasant for us to find the main subjects of attention in the photograph at these points.
Pero no temas experimentar, al final la fotografía tiene que ver con expresarse, contar una historia.
But don't be afraid to experiment, in the end photography is about expressing yourself, telling a story.
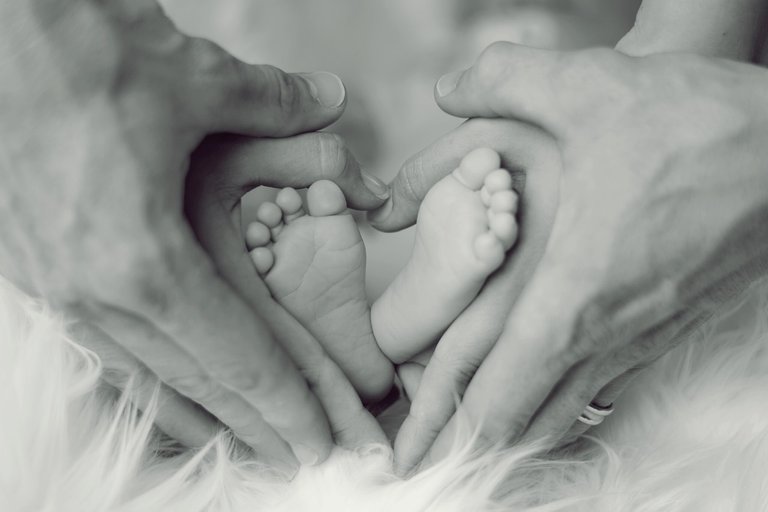
Ejemplo de Foto centrada. Fuente/Source
Ley de la Mirada
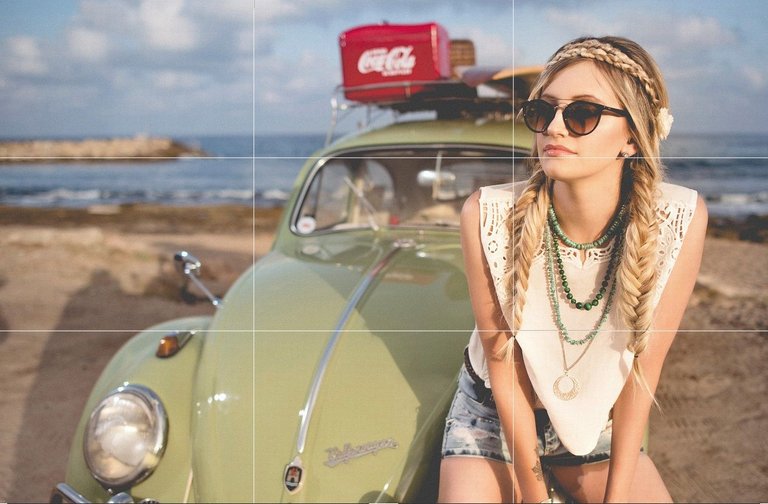
Esta regla de composición se aplica al retrato, y consiste en darle "aire" o dejar un espacio delante de la dirección en la que nuestro sujeto está mirando.
Law of the look.
This rule of composition applies to portraiture, and consists of giving "air" or leaving a space in front of the direction in which our subject is looking.
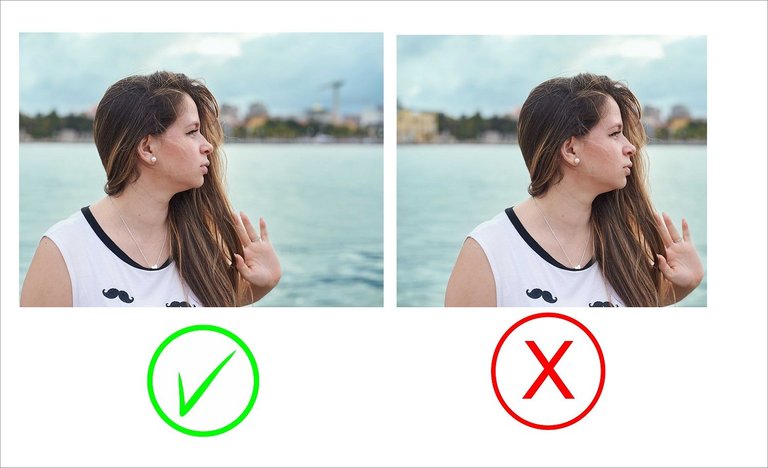
Hecho en Corel Draw con fotos propias
De esta manera, la foto no causará una sensación de opresión o ahogo. Igual, si esa es la intencionalidad, pues ahí tienes una buena receta.
Postprocesado en el movil
Casi siempre terminaremos pasando las fotos por algún programa de revelado y postprocesado. Existen algunas aplicaciones que pueden ayudarte a mejorar un poco más o corregir algun problemilla de encuadre, entre otros.
Acá te voy a dejar algunas que me parecen muy buenas:
This way, the photo will not cause a feeling of oppression or suffocation. However, if that is the intention, then there you have a good recipe.
Post-processing on the mobile phone
We will almost always end up running our photos through a post-processing and developing program. There are some applications that can help you improve a little more or correct some framing problems, among others.
Here I am going to leave you some that I think are very good:
Fuente/source Screenshots
Teniendo en cuenta que hemos tocados algunos aspectos de composición fotográfica, dime si te gustaría saber más sobre este tema o algun otro relacionado con el mundo de la fotografia y la edición.
Un saludo y espero que pongas en practica algunos de estos consejos para mejorar tus fotos!
Considering that we have touched on some aspects of photographic composition, let me know if you would like to know more about this topic or any other related to the world of photography and editing.
Best regards and I hope you put into practice some of these tips to improve your photos!

 |
|MIS REDES SOCIALES
INSTAGRAM ♦️ TWITTER ♦️ LINKEDIN
Apoyo a la comunidad @hivecuba😍

Congratulations @janetedita friend, this is a great post and extremely helpful!.... You have done a wonderful job... Thanks for sharing!
!discovery 40
Thanks to you! I hope some of you can make use of the tips that are in the post. Photography has a lot of very interesting theory, which when studied helps to improve a lot. Not many people have a good camera in their hands, and even less go through a photography school, but that doesn't have to be an obstacle for creativity.
This post was shared and voted inside the discord by the curators team of discovery-it
Join our community! hive-193212
Discovery-it is also a Witness, vote for us here
Delegate to us for passive income. Check our 80% fee-back Program
Your content has been voted as a part of Encouragement program. Keep up the good work!
Use Ecency daily to boost your growth on platform!
Support Ecency
Vote for new Proposal
Delegate HP and earn more
https://twitter.com/jalp21/status/1570474846253101059
https://twitter.com/Jane_greyes/status/1570479102615846912
https://twitter.com/Dariel_Fdez/status/1570584413695778818
The rewards earned on this comment will go directly to the people( @jlinaresp, @janetedita ) sharing the post on Twitter as long as they are registered with @poshtoken. Sign up at https://hiveposh.com.
Muy bueno tu post. Fuí uno de los que solicitó este tipo de contenido. Me gustaría conocer un poco más sobre composición y los parámetros utilizados en el modo profesional de las cámaras. Muchas gracias por compartir tu conocimiento con nosotros.
!PIZZA
Así mismo, creo que tu comentario fue el que terminó por decidirme a hacer este post. Está demostrado que hay muchas personas con un grado excelente de creatividad y talento, pero que a veces por no tener una cámara a mano se limitan. Más adelante haré un post con otras cositas de composición. 🤗
PIZZA Holders sent $PIZZA tips in this post's comments:
@jomancub(4/5) tipped @janetedita (x1)
Please vote for pizza.witness!
Hola, muy buenos concejos, muchísimas gracias, a mi en particular me ha sido de gran ayuda.
Saludos y gracias.
Hola! Me alegra mucho que te sirva de apoyo! Para crear contenido en Hive creo que puede ser muy útil pues a la hora de fotografiar un postre, una artesanía, lugares, personas...puede ponerse en práctica y enriquecerse el post.
Exactamente nuevamente agradecido.
Muy buena publicación, espero más contenido sobre fotografía para nuevos en este mundo (como yo). 😁
🤗 gracias!!! Tampoco soy una experta en el tema pero, lo poquito que sepa trataré de compartirlo.
Excelente, gracias por todos los consejos y tips para poder tomar mejores fotos con nuestra cámara.
Te explico... el post esta muy bueno, peroooo... Me quede con ganas de aprender más, asi que agenda entre los contenidos que iras creando de #hive, dar mas mieles sobre fotografía.
El encuadre lo utilice un tiempo, pero no temine adaptandome a tenerlo siempre, no obstante creo que para lograr mejores resultados, tendre que adaptarme ya que da mejores resultados.
Muy buenas mieles... Un abrazo
Prontito prontito publicaré uno con algunos temitas sobre fotografía, que puedan ser aplicados con móvil o cámara. 🤗🤗😘
Al artista con el equipo que le pongan sigue siendo uno♥
¡Así es! He visto muchísimos buenos trabajos hechos con móvil y cámaras más sencillas. 🙌
Me encanta la fotografía. Creo que soy un fotógrafo frustrado. La envidia que me dan los extranjeros por ahí andando con sus cámaras, tirándole a todo. Creo que en mi retiro me dedicaré más a ella. Vuelve con estos temas cuando quieras que aquí tendrás lector.
Excelente tutorial, espero con ansias tus próximos post relacionados con este tema. Nunca me interesó eso de la fotografía pero leyendo esto ya me picó el guzanito😁.
Una duda, ¿algún tip para los que no somos fotogénicos? 😅
🤣 qué buena tu pregunta, de hecho sí 😂, hay tips para aprovechar mejor estar frente a una cámara.
Además del clásico "encuentra tu mejor perfil"(... que no es una broma!) evitar mirar la cámara directamente de frente, girarte un poco de lado unos 3/4 sonríe si quieres, pero poco, y dale intensidad a la mirada, los miopes esto lo llevan más fácil 😂, porque se recomienda como entrecerrar un poco los ojos, como si no vieras bien a lo lejos 😅.
Awesome advice √ !LOLZ 😎
lolztoken.com
The corner—they’re usually 90 degrees.
Credit: reddit
@janetedita, I sent you an $LOLZ on behalf of @andy4475
Use the !LOL or !LOLZ command to share a joke and an $LOLZ
(7/10)