Levitation Photography and Light Painting
Let them hover in mid-air
I love the idea but I don't like the way it's normally done. That is because I am an engineer and I want to see photography capturing a moment in time that hopefully existed in one or the other way. Let's see what Light Painting as a technique offers that could make it a bit more interesting.
Ich liebe die Idee, aber ich mag nicht, wie sie normalerweise umgesetzt wird. Das liegt daran, dass ich Ingenieur bin und die Fotografie als Technink betrachte die einen Moment in der Zeit einfangen soll, der hoffentlich irgendwie auch existierte. Lasst uns mal sehen, was Light Painting als Technik bietet, die es etwas interessanter machen könnten.
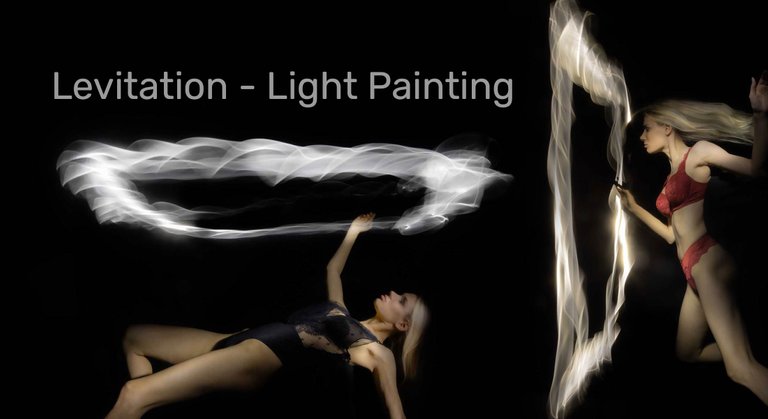
Certainly! Levitation photography is a creative technique where a subject appears to be floating or flying in mid-air without any visible support. This type of photography is often used in advertising, fashion, and artistic photography to create visually striking and surreal images.
How is it normally done? To achieve the levitation effect, most people would take two or more photographs: one with the subject in place and another with the subject removed, but with the background and supporting elements still visible. Then they combine images using photo editing software like Photoshop to make it look like the subject is floating. As Light Painting is a Long exposure technique you may not need all that photoshop. At least I don't need two exposures.
What normally happens and what can be different?
Set up your camera and tripod: Use a tripod to keep the camera steady. Take the first shot: Have your subject pose in the desired position with any supporting elements like a small chair. Be sure to keep the camera in the same position and don't move any supporting elements.
Normally people take a second shot with the subject removed from the scene moving the camera or supporting elements. The school of thought this that you need to make something visible underneath or next to it where you would have a shadow to create the levitation effect. Often that is established by hair falling with gravity. the eye will automatically interpret where the ground was.
In Light Painting, we could also remove the model and the supporting stool or bench and shed some light where the supporting element was to show what's there. could be the ground.
Be careful when your model or subject wears black clothing. That's when keeping the shutter open may get tricky and you make some background elements shine through the dark areas where the model was.
Often people use Software like Photoshop to layer the two images with place the first image with the subject on top of the second image with the subject removed. They layer masks to remove any visible support elements and blend the images together. I love the challenge of not layering the images and doing it in a single shot.
Here I played with the technique in the most simplistic way without any background to bother about. The levitation effect I was after is simply indicated by the hair falling. I did not aim to magically levitate above the hot kitchen stove (wow did I just have a cool idea?)
Sicherlich! Levitationsfotografie ist eine kreative Technik, bei der ein Thema ohne sichtbare Unterstützung in der Luft schwebend oder fliegt. Diese Art von Fotografie wird häufig in Werbung, Mode und künstlerischer Fotografie verwendet, um visuell auffällige und surreale Bilder zu schaffen.
Wie wird es normalerweise gemacht? Um den Levitationseffekt zu erzielen, machten die meisten Menschen zwei oder mehr Fotos: eine mit dem Modell oder Subjekt und ein anderer mit dem Modell entfernt, aber mit dem Hintergrund und den unterstützenden Elementen noch sichtbar. Dann kombinieren die Leute die Bilder mithilfe der Fotobearbeitungssoftware wie Photoshop, damit es so aussieht, als würde das Motiv schweben. Da wir mit Light Painting eine Langzeitbelichtungstechnik ist, benötigen wir möglicherweise doch nicht all diesen Photoshopkram. Also ich jedenfalls nicht.
Was passiert normalerweise und was können wir anders? Klar die Kamera kommt wie immer aufs Stativ damit wir nicht verwackeln. Normalerweise wird dann ein erstes Foto mit dem Model gemacht. Hierbei ist das Model auf einem unterstützenden Element wie einem kleiner Stuhl (verdeckt mit einem Tuch). Die Haare fallen dann schön in Richtung Boden und geben uns den Schwebeeffekt.
Normalerweise machen die Leute dann eine zweite Aufnahme, allerdings ohne Modell. Alles andere bleibt in Position. Beim Light Painting können wir das Modell und den Stuhl oder die tragende Bank entfernen und etwas den Bereich wo der Stuhl stand einleuchten. Damit wird der Boden unter dem Modell sichtbar nach dem der Stuhl weg ist.
Seit vorsichtig, wenn euer Modell schwarze Kleidung trägt. Dann kann es sein das einige Hintergrundelemente durchscheinen wo es dunkle Bereiche am Modell gab. Das passiert auch wenn sich das Model bewegt.
Oft verwenden die Leute Software wie Photoshop, um dann die zwei, drei Bilder miteinander zu verbinden oder zu layern wie man so schön sagt. Ich liebe die Herausforderung, drum versuche ich es in einer einzigen Aufnahme zu tun.
Hier habe ich mit der Technik auf die einfachste Art und Weise gespielt. Dieses Mal kümmere ich mich noch nicht um einen Hintergrund. Der Levitationseffekt, gibt's hier einfach durch das fallende Haar. Ich wollte Sie nicht ´gleich auf magische Weise über den heißen Küchenherd schweben lassen (Oh wow, hatte ich gerade ne coole Idee?).

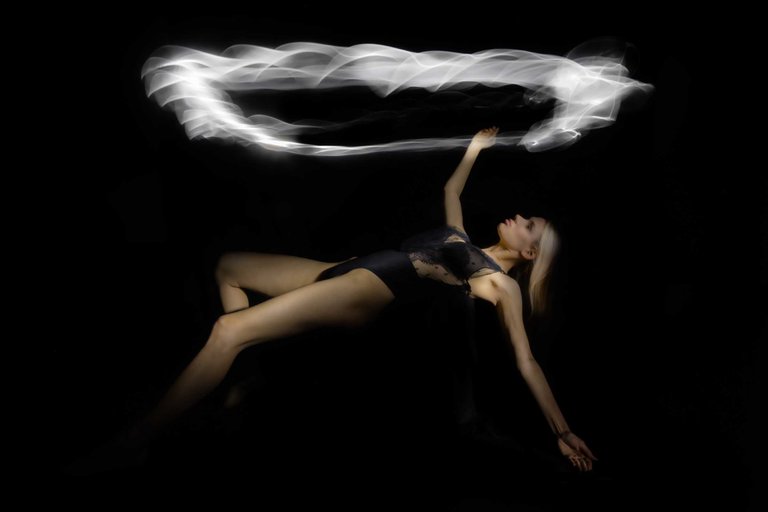
The magic stool
So for the main photos, I put a pillow and a black cloth onto my little stool so Kessy could lay on it comfortably for a few seconds without moving too much. As you see in the next photo the hair of course falls downwards.
Für die Hauptfotos legte ich ein Kissen und ein schwarzes Tuch auf meinen kleinen Hocker, damit Kessy ein paar Sekunden lang bequem darauf liegen konnte, ohne sich zu viel zu bewegen. Wie Ihr auf dem nächsten Foto seht, fällt natürlich das Haar nach unten.
What happened here? What Settings?
Once Kessy was laying comfortably on the chair I triggered the camera and lit her only with a scanner. I had to make sure the hair also gets some extra light. (it fells a bit lost in the first one) Secondly, I used a circular Light Blade and created the rectangular frame above her.
What you see are two single-exposure Light Paintings with a 53-second open shutter and in the second photo (I knew better what to do) 27 seconds. The Camera was set to ISO 100 and the Lens was set to F22.
Als Kessy dann endlich bequem auf dem Stuhl lag, löste ich die Kamera aus und leuchtete sie einfach mit dem Scanner ein (auch schön auf die haare achten). Als Zweitens habe ich dann mit der kreisförmigen Lightblade den rechteckigen Rahmen über ihr erstellt.
Was Ihr hier seht, sind zwei Einzelbelichtungen mit einer 53-Sekunden-langen Belichtung und beim zweiten Foto (ich wusste besser, was zu tun war) 27 Sekunden Belichtungszeit. Die Kamera wurde auf ISO 100 eingestellt und das Objektiv auf F22 eingestellt.
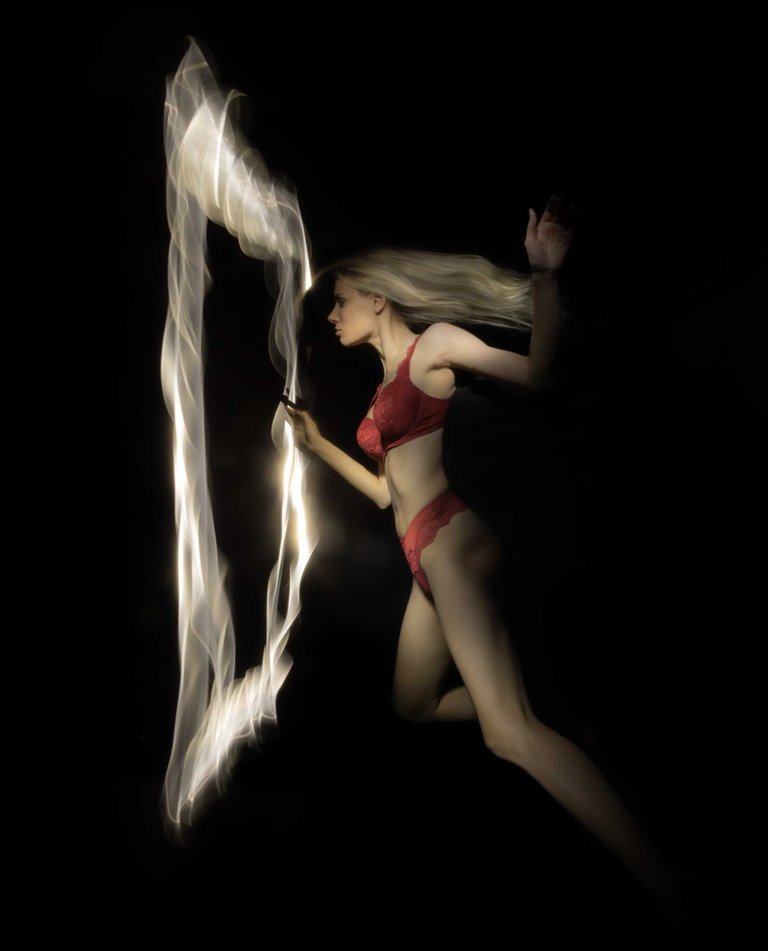
Underwater feel
Inspired by zero gravity situations such as underwater photography I rotated the photo by 90° to see what it looked like. And wow it makes it even more touching impression compared to the regular version. The mirror frame that I created has become a portal now and she seems a milli second from blown away.
Inspiriert von Situationen ohne Schwerkraft wie bei der Unterwasserfotografie, drehte ich das Foto einfach mal um 90 °. Und wow es macht es im Vergleich zur normalen Version viel mehr Eindruck. Der Spiegelrahmen, den ich gemalt habe, ist jetzt ein Portal geworden und sie scheint eine Milli-Sekunde davor zu sein aus dem Bild gefegt zu werden.

I hope you found these images inspirational. If you have more questions please do not hesitate. I am happy to share my knowledge.
If you think this is Spam, why did you read this far, and why the fuck bother you? Move on from your self-righteous mind state and bury yourself. Don't bother about what others may find interesting. Just stay in your bubble and ...
All there is left to say is Cheer Up!
Gunnar Heilmann Photography
If you are interested in more of my art please also see:
My NFT'S on Rarible
Website YouTube Facebook Page Instagram Feed

Since I am one of the co-founders of the LightPainters project, I also help and support the Light Painting community as a curator - not only on the Hive.
We are Light Painters
To help and support the LightPainters community here on Hive I would appreciate your delegation of HivePower. Any amount is appreciated. It does not require much to get started, we are happy for any gesture.
How to delegate?
Delegate 50HivePower, [50HP]
Delegate 250HivePower, [250HP]
Delegate 500HivePower, [500HP]
Delegate 1000HivePower, [1000HP]
All the Hive Power will help to upvote the artist's contribution as part of the LightPainters community.
If you feel like light painting could be interesting for you, feel free to check out this crazy bunch at LightPainters on Hive: @lichtkunstfoto, @stepko, @ryuslightworks, @marlasinger666, @lightandlense, @fastchrisuk @fadetoblack, @maxpateau, @lightstabeu, @yo-hoho, @oddballgraphics, @lacelight, @martbarras, @candelart & @rod.evans.visual
I am super happy that more and more find their way here into the hive.
Thank you so much!
https://twitter.com/3147038709/status/1629807723754790912
The rewards earned on this comment will go directly to the people( @gunnarheilmann ) sharing the post on Twitter as long as they are registered with @poshtoken. Sign up at https://hiveposh.com.
Thank you for your work and appreciateing my effort 🙏
It's brilliant, if you can make the most of the long exposure you get photographs where the only limit is imagination!
Thank you for the encuragement 😎🥳Glad you like my work.
I love seeing how you've turned your studio into a magical levitation emporium. That's really keen foresight and thought. I'm impressed the model was able to stay still for so long!
It turned out much better than I thought. For the first attempt, I was actually surprised myself about the result and how it turned out.
Congratulations @gunnarheilmann! You have completed the following achievement on the Hive blockchain And have been rewarded with New badge(s)
Your next target is to reach 24000 upvotes.
You can view your badges on your board and compare yourself to others in the Ranking
If you no longer want to receive notifications, reply to this comment with the word
STOPCheck out our last posts:
Support the HiveBuzz project. Vote for our proposal!