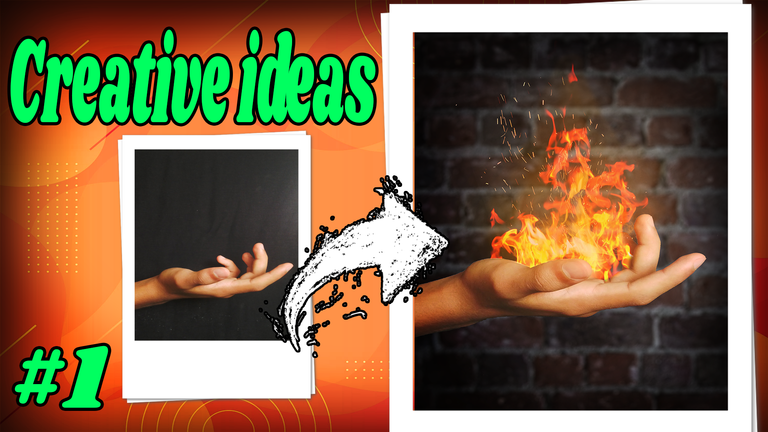
How to turn a simple photograph into something professional! (Eng/Esp)

Good afternoon to all the photographers of this community, in my journey through Hive today I had the great joy of having found this community called #PhotographyLovers, where they all share their great passion for photography, so it caught my attention and as you can expect I also like it.
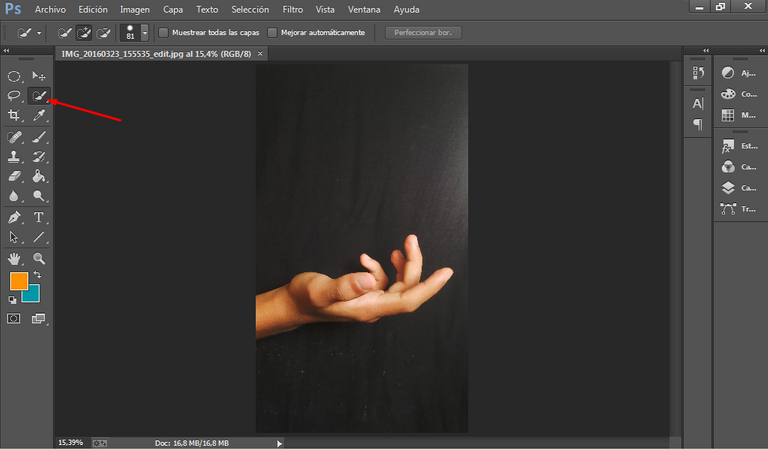
In this case I bring you a short post of how we could go from a simple image taken with an old phone (literally)
to something a little more professional, just using the magic of Photoshop editing, so pay attention because if you follow step by step the process you will become an expert editor.
Buenas tardes a todos los fotógrafos de esta comunidad, en mi travesía por Hive tuve hoy la gran dicha de haber encontrado esta comunidad llamada #PhotographyLovers, donde comparten todos su gran pasión por las fotografías, por lo que me llamo mucho la atención y como han de esperar ami también me gusta.
En este caso les traigo un breve post de como podríamos pasar de una simple imagen tomada con un teléfono viejo (literalmente)
a algo un poco más profesional, solamente utilizando la magia de la edición en Photoshop, así que presta atención porque si sigues paso a paso el proceso te convertirás sin duda en todo un experto editando.
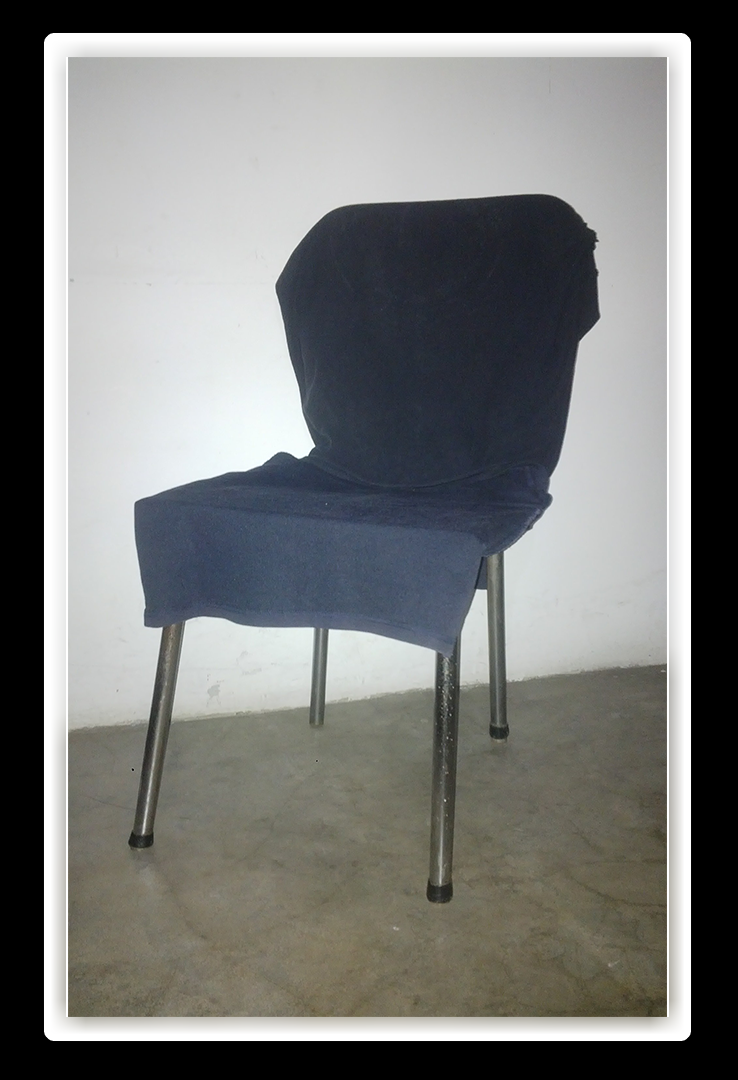
Improvised photography set:
As you read first we must make a small set using materials you will find at home, starting with a chair and a blanket or towel with which you will tuck the chair as you will see in the next image. I recommend that the blanket is a dark color like black or other shades that are not light (this will serve for the background of the image).
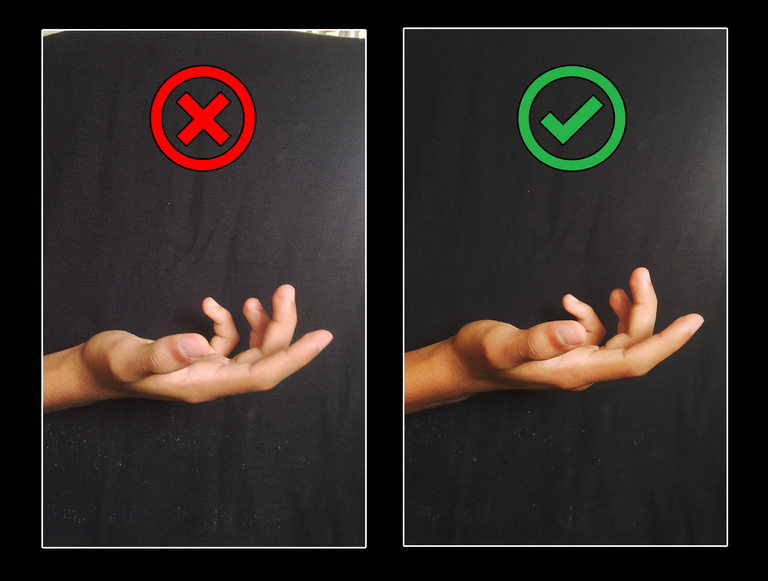
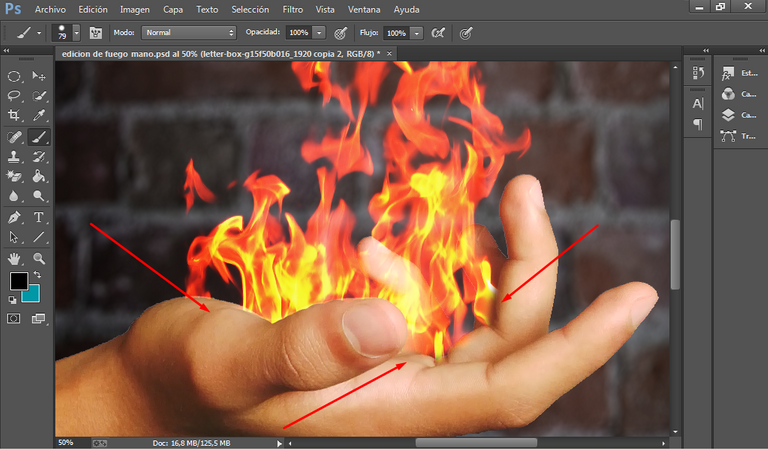
We will move on to the photography part, and we will use our hand as the main focus, as you can see in the pictures, position your hand in front of your camera making some gesture as if you were holding something with the palm of your hand upwards, in this case I did this gesture, but it is up to your imagination depending on how you want the result.
Other recommendations:
- try to focus on the hand.
- Take several photos to compare and choose the best one.
- lastly, don't leave edges of the environment that don't belong to the background fabric.
Set de fotografía improvisado:
Como leíste primero debemos hacer un pequeño set utilizando materiales que encontraras en tu casa, empezando con una silla y una manta o toalla con la que arroparas la silla como lo verás en la próxima imagen. Te recomiendo que la manta sea de un color oscuro como negra u otras tonalidades que no sean claras (esto servirá para el fondo de la imagen).
Pasaremos a la parte de la fotografía y usaremos nuestra mano como enfoque principal, como lo ves en las capturas, posiciona tu mano al frete de tu cámara haciendo algún gesto de como si estuvieras sosteniendo algo con la palma de la mano hacia arriba, en este caso yo hice este gesto, pero ya queda a tu imaginación dependiendo que como quieras el resultado.
Otras recomendaciones:
- trata de enfocar la mano.
- toma varias fotos para así comparar y elegir la mejor.
- por último no dejes bordes del entorno que no pertenezcan a la tela de fondo.
Editing in Photoshop:
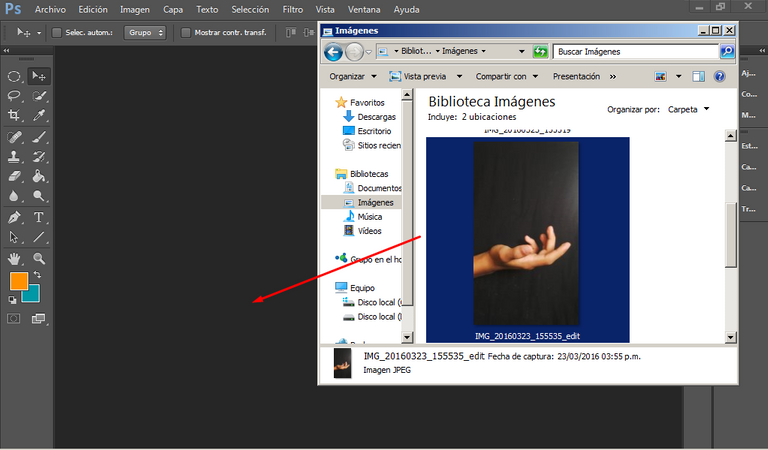
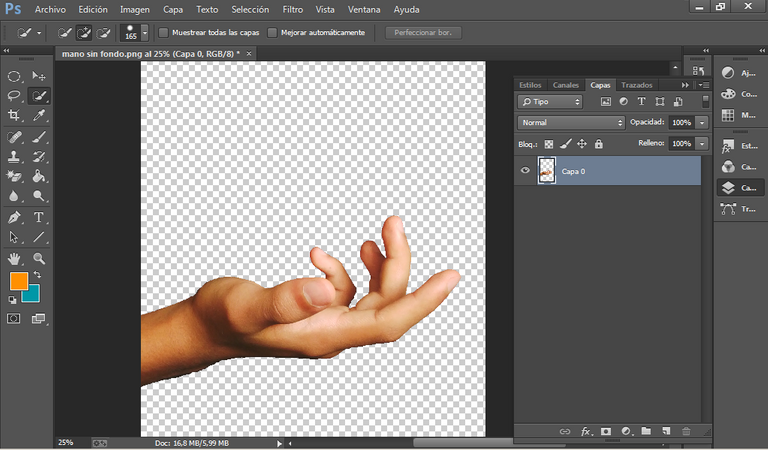
Step 1: once you have the photos on your PC you will drag them to the editor and quickly go to the quick selection tool and start selecting only the background of the image leaving the hand outside the selected field and then crop leaving the hand without background.
Editando en Photoshop:
Paso 1: una vez tienes las fotos en tu PC las vas a arrastrar al editor y a rápidamente iras a la herramienta de selección rápida y comenzarás poco a paco a seleccionar solo el fondo de la imagen dejando la mano fuera del campo seleccionado para luego recortar dejando la mano sin fondo.

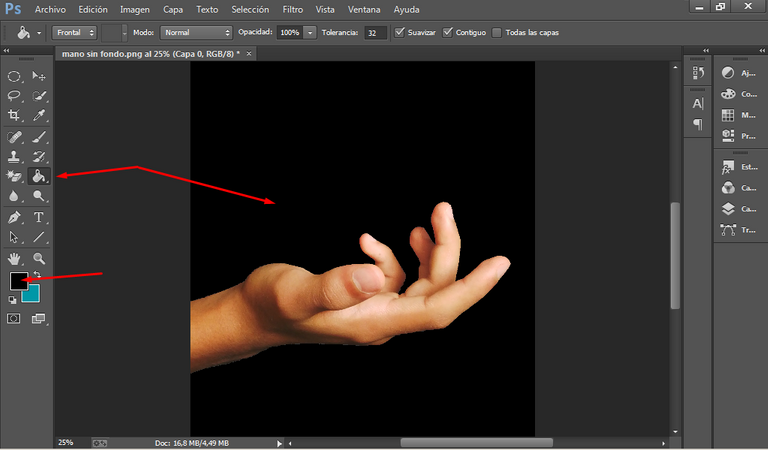
Paso 2: con el bote de pintura pintarás el fondo con color negro, en este caso recuerda que debes pintar en una capa aparte de la mano para que no haya errores después.
Step 2: with the paint can you will paint the background with black color, in this case remember to paint in a separate layer from the hand so that there are no mistakes later.
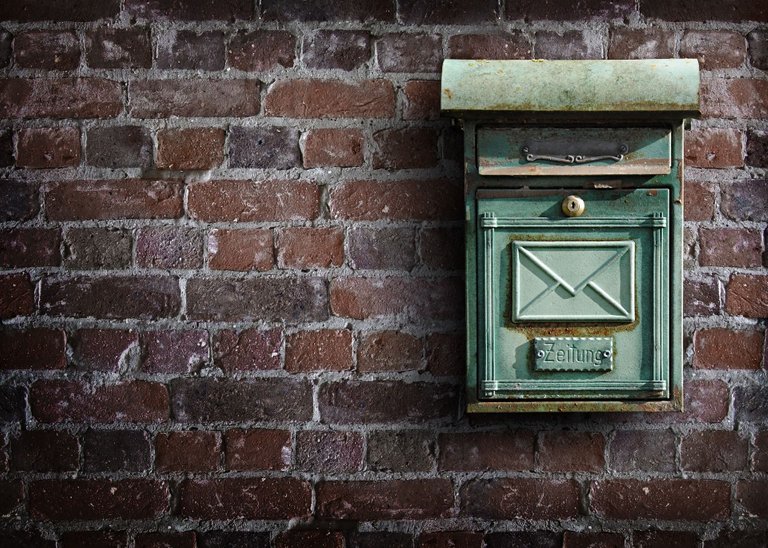
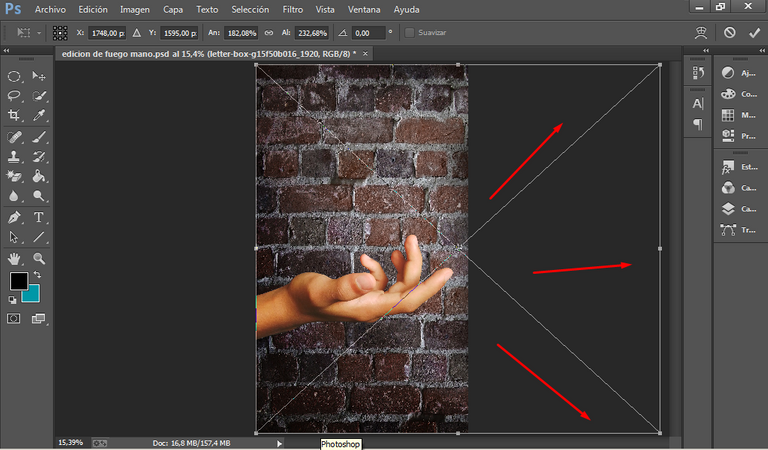
Step 3: then I looked for a royalty free image of a brick wall that will serve as background, of course you can choose the background you want, in this case I have chosen this one. Now drag the background to the editor and place it under the hand layer to have a striking background, taking into account that I have only used the part I was interested in, the rest I have left outside the main frame.
Now go to the filters tab, blur and click on blur fields, there you will graduate the blur of the background to your liking, this is to highlight and give more priority of attention to the hand.
Paso 3: luego busqué una imagen libre de derechos de autor sobre una pared de ladrillo que me servirá como fondo, claro que de igual forma tú podrás elegir el fondo que desees, en este caso yo he elegido este. Ahora arrastra el fondo al editor para luego posicionarlo debajo de la capa de la mano para así ya tener un fondo llamativo, teniendo en cuenta que yo solo he utilizado la parte que me interesaba, el resto la he dejado fuera del marco principal.
Ahora vas a la pestaña de filtros, desenfocar y pulsar en desenfoque de campos, allí vas a graduar el desenfoque del fondo a tu gusto, esto es para así resaltar y dar más prioridad de atención a la mano.

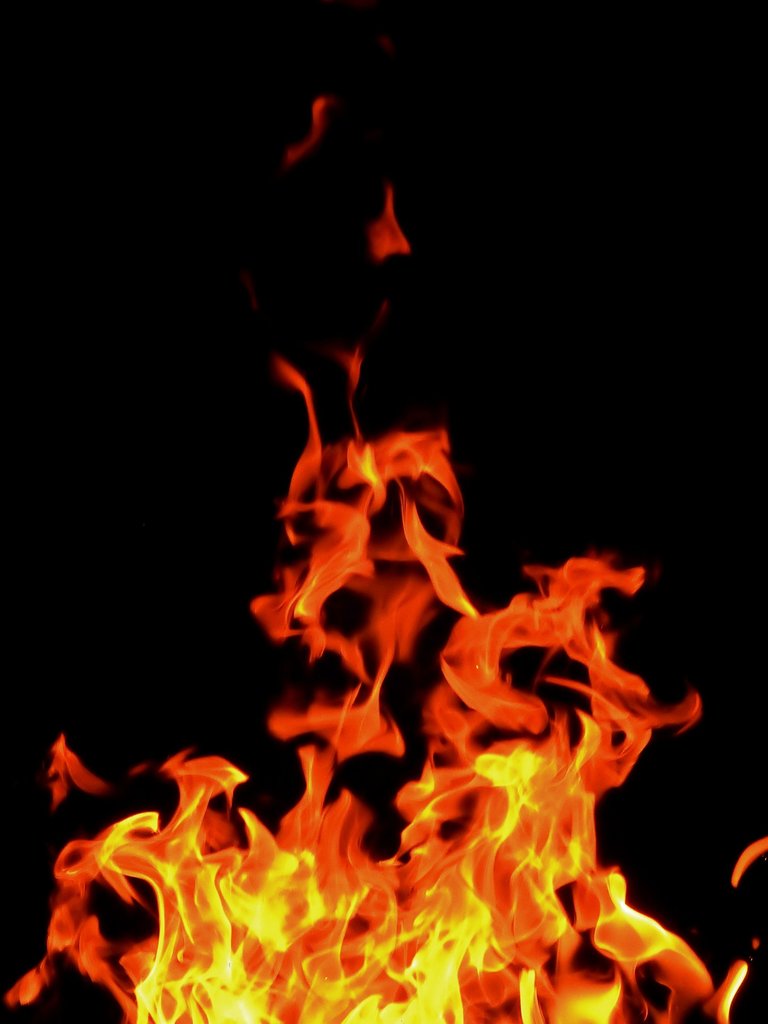
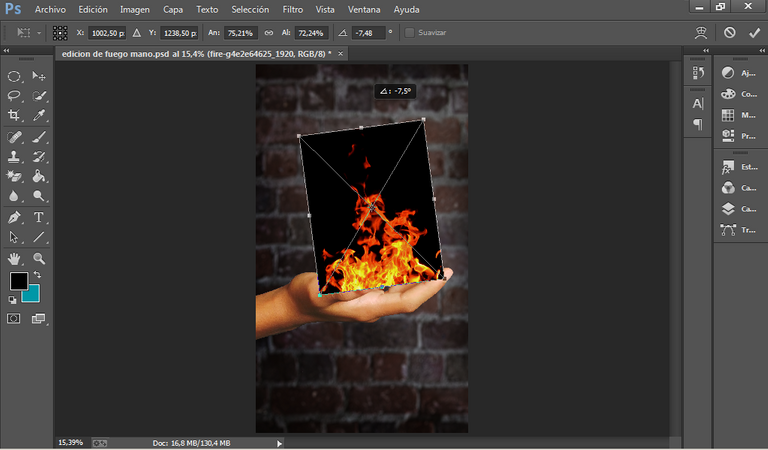
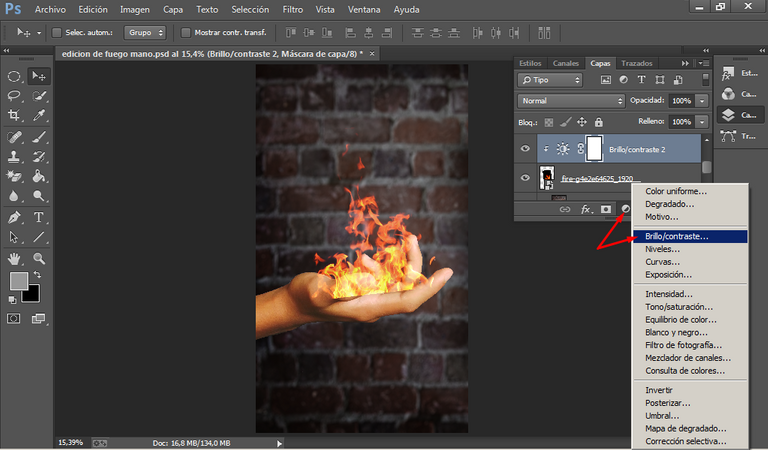
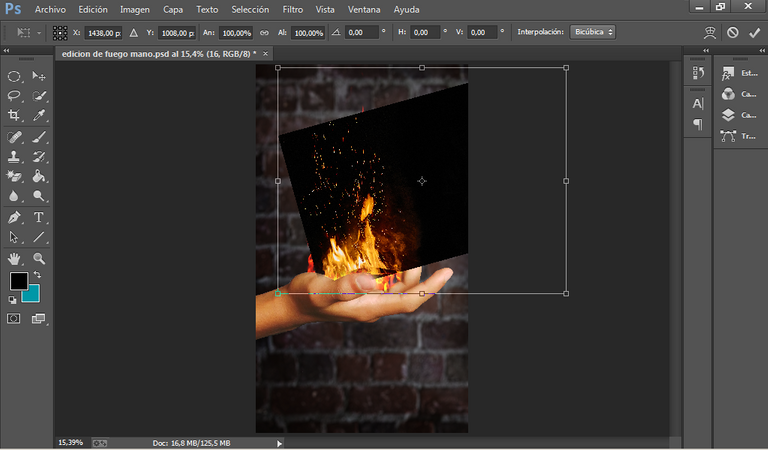
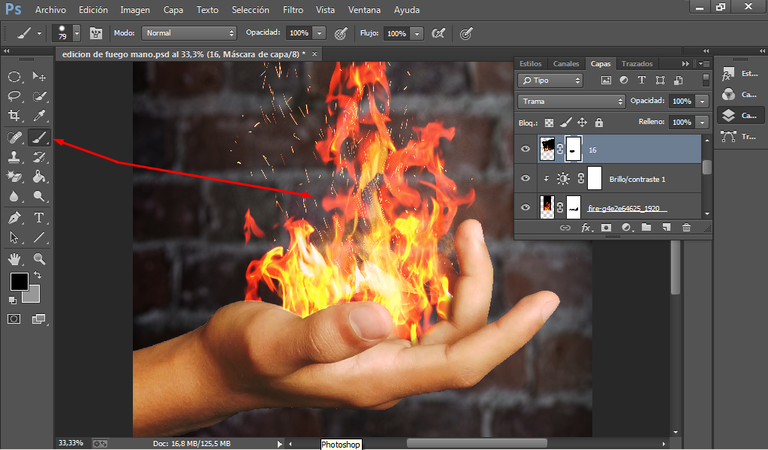
Step 4: now you will look for an image of a flame of fire that is not so big, but that is realistic, we will also do the same, drag it to Photoshop and put it on top of the palm of the hand simulating that it emerges from it.
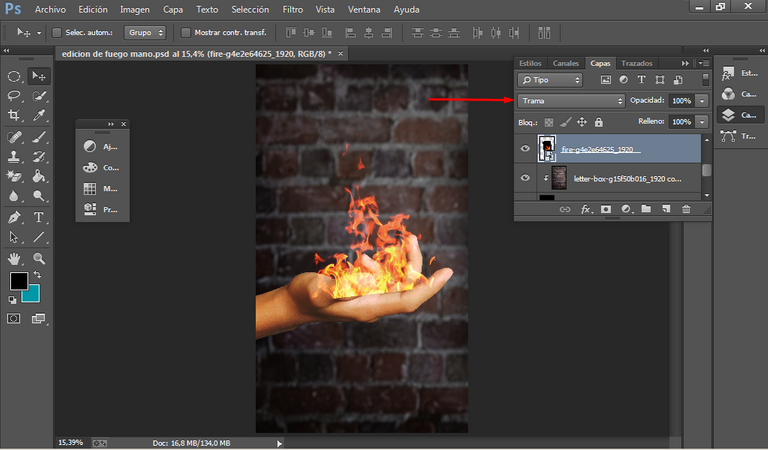
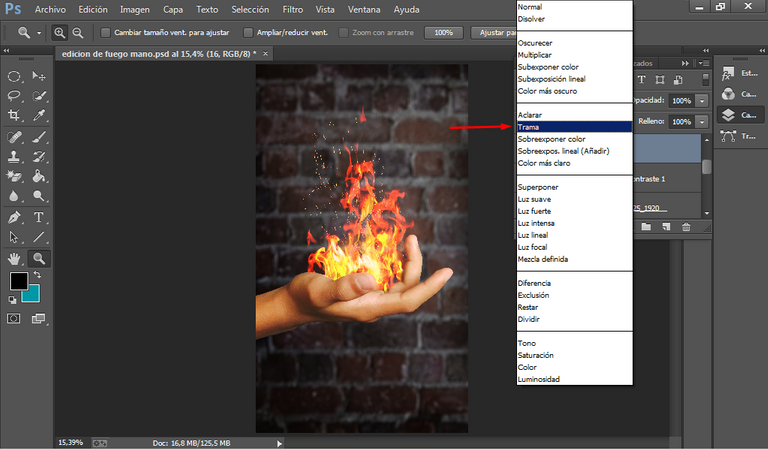
Then go to layers and on the fire layer click on the layer blending mode tab (where it will always be in normal) but as you can see in the image you will change it to raster.
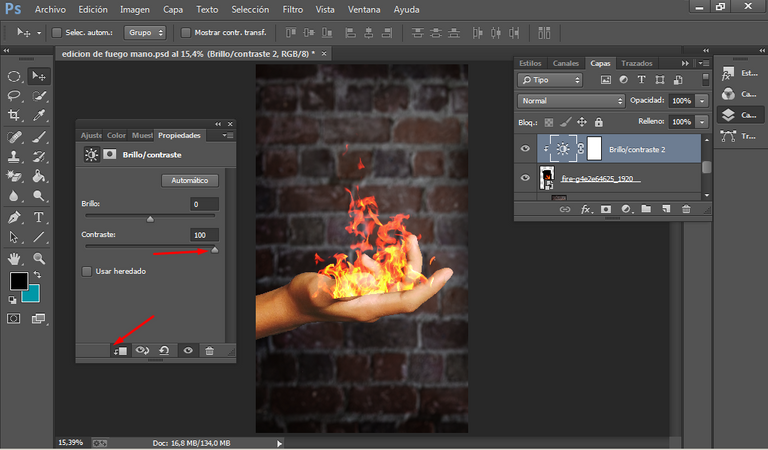
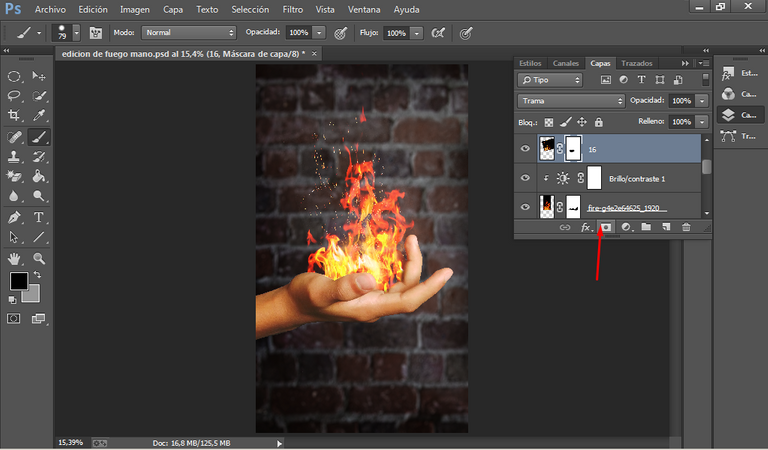
Then as you can see in the image we go to create a new fill layer to click on brightness/contrast, and a window will appear where you will have to increase the contrast to 100%, but for the contrast to affect only the fire, then leave checked the box that has an arrow down as I am showing in the screenshots.
Paso 4: ahora buscarás una imagen de una llama de fuego que no sea tan grande, pero que sí sea realista, también aremos lo mismo, la arrastrarás a Photoshop y vas a ponerla encima de la palma de la mano simulando que esta emerge de ella.
Luego vas a capas y sobre la capa del fuego das en la pestaña de modo de fusión de capas (donde siempre estará en normal) pero como puedes ver en la imagen lo vas a cambiar a trama.
Luego a como ves en la imagen nos dirigimos crear una nueva capa de relleno para así pulsar en brillo/contraste, y te aparecerá una ventana donde tendrás subir el contraste al 100%, pero para que el contraste solo afecte al fuego, entonces deja marcada la casilla del cuadro que tiene una flecha hacia abajo como lo estoy mostrando en las capturas.
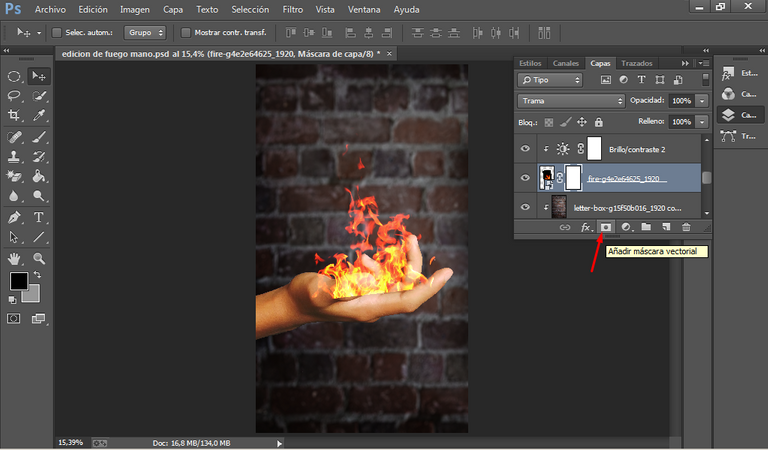
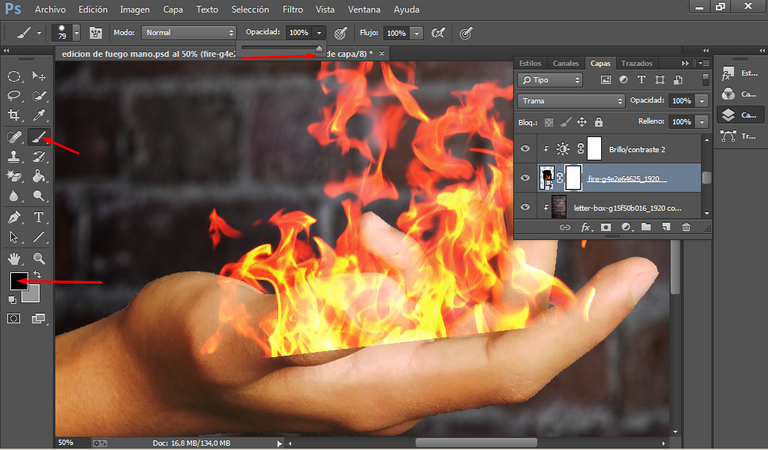
Step 5: now it's time to fix the fire, to do this stand on the fire layer, click where it says add vector mask, and then go to the brush tool, select the black color, make sure you have the opacity at 100%.
Enlarge the image and start painting the fingers to hide the flames in those areas, this is very important, it will look great.
Paso 5: ahora es momento de arreglar el fuego, para ello párate sobre la capa del fuego, cliqueas donde dice añadir mascara vectorial, y luego vas a donde herramienta del pincel, seleccionas el color negro, asegúrate de que tengas la opacidad al 100%.
Amplías la imagen y comienzas a pintar los dedos para así ocultar las llamas de esas zonas, esto es muy importante, ya quedará genial.
Step 6: something very important is to add sparks to the fire to create more realism, so you should look for an image of fire in which there are some sparks, and the steps to follow are the same as we did with the previous image:
1- Drag the image to the editor.
2-Set the blending mode to raster.
3- Add a vector mask to those sparks.
4-paint with the brush in black color to erase parts of the sparks that are not useful.
Paso 6: algo muy importante es agregar chispas al fuego de para crear así más realismo, por lo que debes buscar una imagen de fuego en la que haya algo de chispas, y los pasos a seguir son los mismos que hicimos con la anterior imagen:
1- Arrastrar la imagen al editor.
2-Pones el modo de fusión en trama.
3-añades una máscara vectorial a esas chispas.
4-pintas con el pincel en color negro para así borrar partes de las chispas que no sirven.
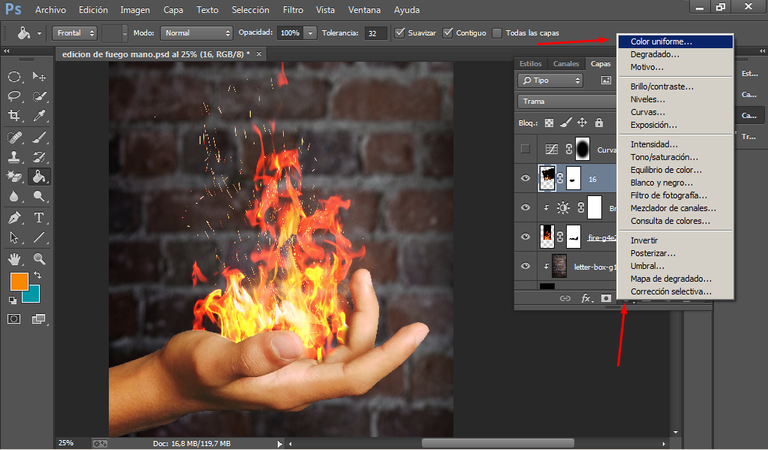
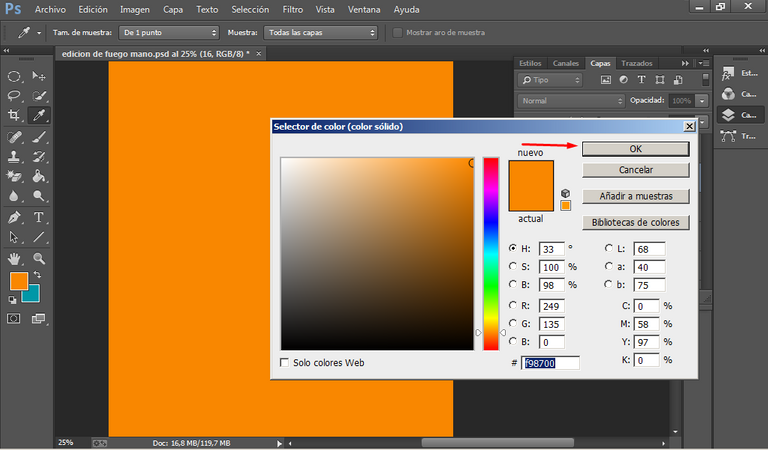
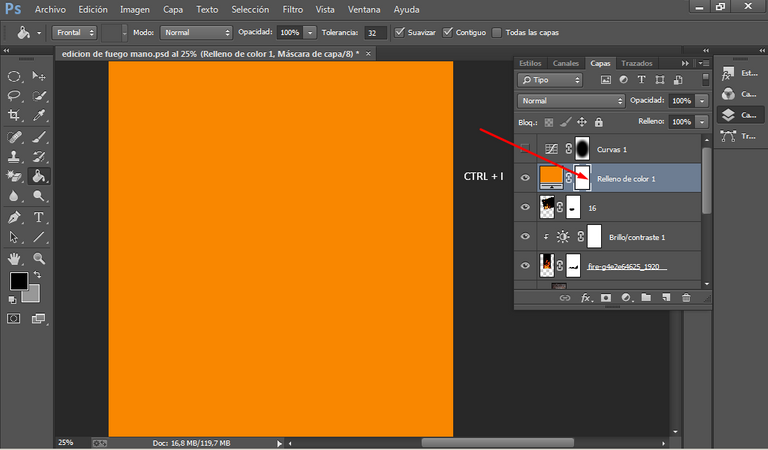
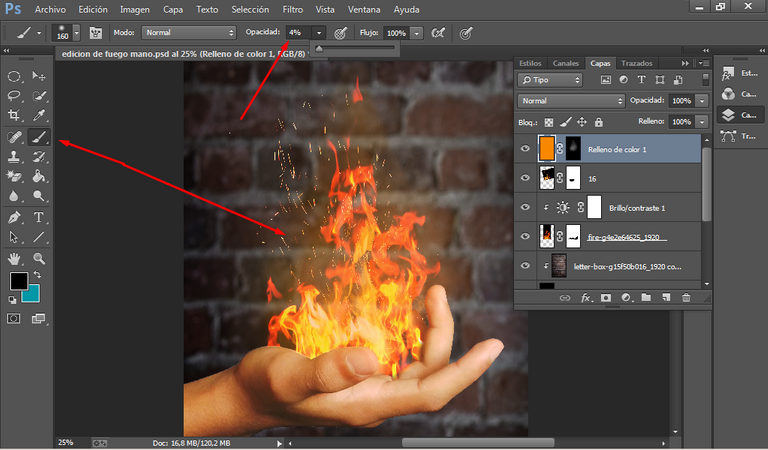
Step 7: add a little glow to that fire by creating a new layer of fill, but this time by giving it a uniform color option, there you choose a not so dark orange color, believe me if you follow these steps to the letter you will have a good effect on the flames.
Then you paint with the brush with the opacity at 4%.
Paso 7: añádele un poco de resplandor a ese fuego creando una nueva capa de relleno, pero esta vez dándole a la opción color uniforme, allí eliges un color naranja no tan oscuro, créeme que si sigues estos pasos al pie de la letra tendrás un buen efecto en las llamas.
Luego pintas con el pincel con la opacidad a un 4%.
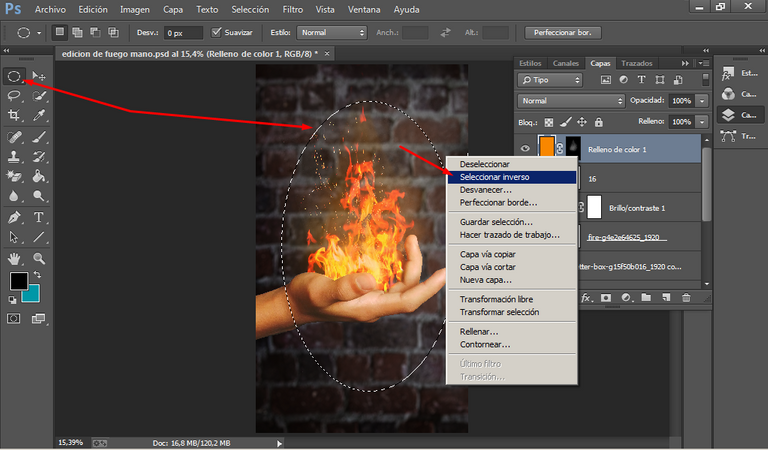
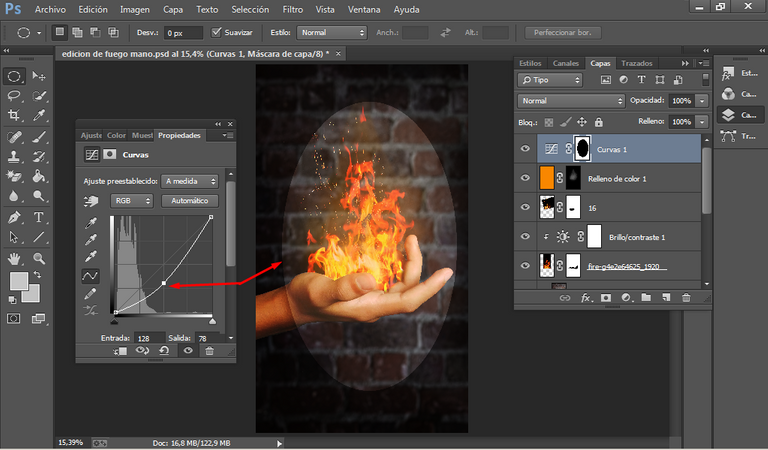
Step 8: you have reached the final step, you just need to add a frame with shadow, so go to the elliptical frame tool and draw a circle around the hand and the fire, and then right click where it says inverse selection.
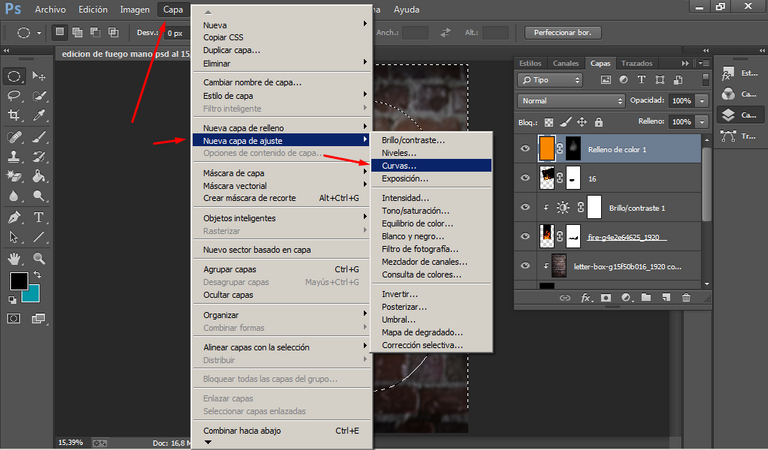
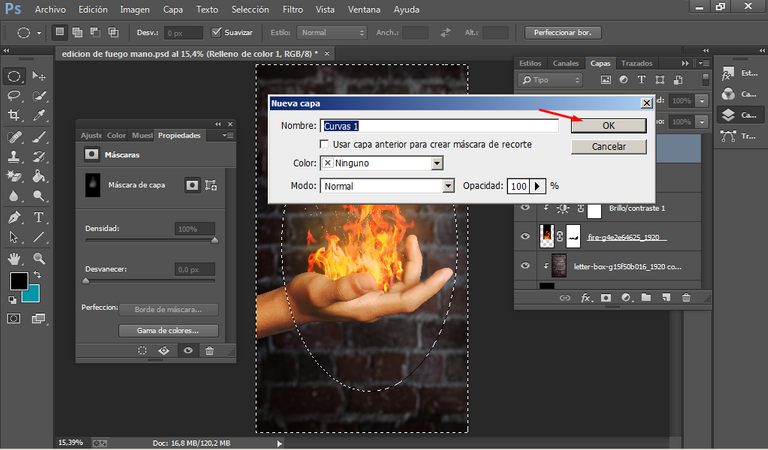
You will then go to the layers tab, new adjustment layer and the curves option and proceed to lower the curves until they are dark as you see in the screenshots.
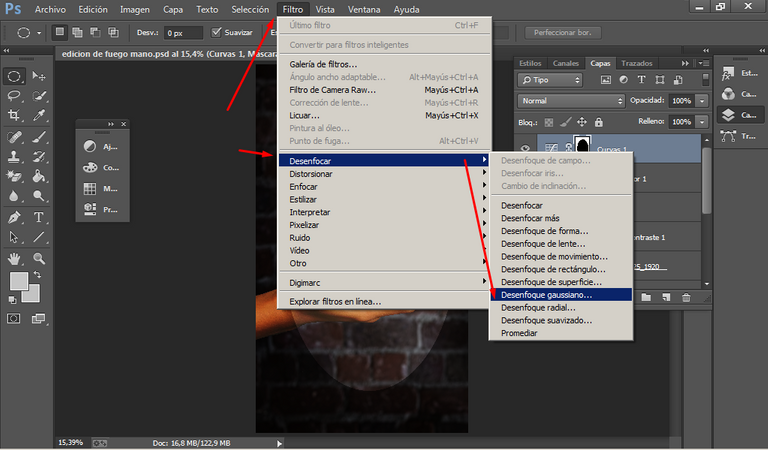
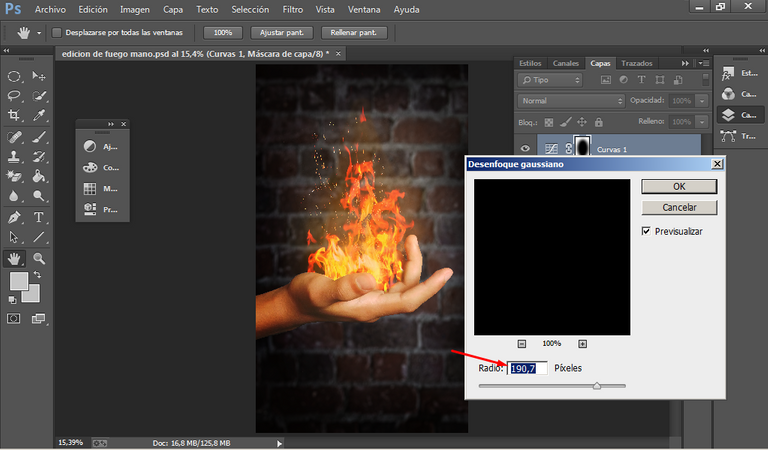
And now to give a finishing touch, click on filters, blur, gaussian blur and in the next box put the amount of 190 or whatever you want depending on the size of your image, you will be testing, this is to make that effect that the fire is the only thing that makes it glow in this image.
Paso 8: ya has llegado a la recta final, solo falta agregarle un marco con sombra, así que ve a la herramienta de marco elíptico y dibuja un círculo alrededor de la mano y el fuego, para luego con clic derecho dar donde dice selección inversa.
Te irás luego a la pestaña de capas, nueva capa de ajuste y la opción de curvas y procedes a bajar las curvas hasta quedar oscuro a como lo ves en las capturas.
Y ya para dar un remate, pulsamos en filtros, desenfocar, desenfoque gaussiano y en el siguiente recuadro pondrás la cantidad de 190 o la que desees según el tamaño de tu imagen, vas a ir probando, esto está para hacer ese efecto de que el fuego es lo único que hace resplandor en esta imagen.
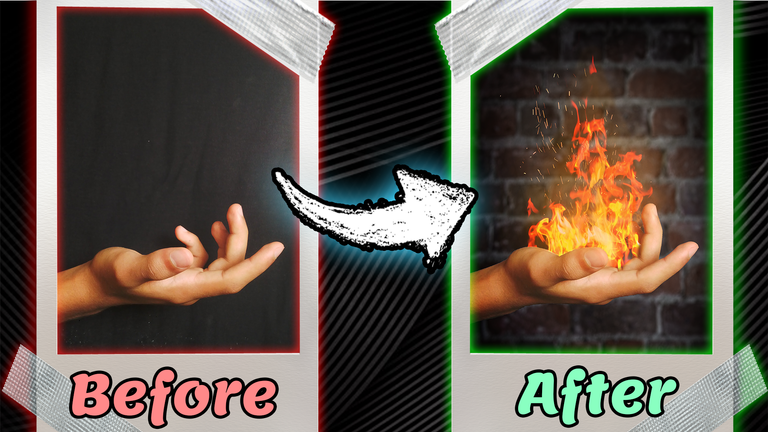
We are done, remember to save the image, and tell me how did you like it, it was a little difficult to be honest, but I think it was worth it, just look at the results, what are you waiting for to try it if you don't see them yet?
I would like to see your comments down here, the truth is that helps me to keep creating more content and above all to improve it even more, see you soon my photography lovers.
Ya hemos terminado, recuerda guardar la imagen, y cuéntame ¿qué tal te pareció?, fue un poco difícil la verdad, pero considero que ha valido la pena, mira nada más los resultados que se obtienen, ¿qué esperas para intentarlo si no los echo todavía?.
Me gustaría ver sus comentarios acá abajo, la verdad eso me ayuda a seguir creando más contenido y sobre todo mejorarlo aún más, nos veremos muy pronto mis amantes de la fotografía.

The images of the fire and the wall that I have used in the edition are copyright free, so below are the respective sources.
Las imágenes del fuego y la pared que he usado en la edición son sin derechos de autor, así que a continuación las respectivas fuentes.
1,2
Congratulations @dnagameroficial! You have completed the following achievement on the Hive blockchain And have been rewarded with New badge(s)
Your next target is to reach 80 posts.
You can view your badges on your board and compare yourself to others in the Ranking
If you no longer want to receive notifications, reply to this comment with the word
STOPTo support your work, I also upvoted your post!
Check out our last posts:
que genial esta esta idea
Si la verdad es que las puedes usar para varias imágenes, ves como se pueden hacer milagros con la edición, gracias por comentar.
La idea esta muyy buena, la magia de la edición puede hacer mucho y transformar las fotos en un arte total. !LUV
@dnagameroficial, @zonadigital21(2/5) sent LUV. | connect | community | HiveWiki | NFT | <>< daily
! help(no space) to get help on Hive. InfoLiteralmente es cierto claro que me falta mejorara mucho, pronto estaré subiendo otras nuevas ideas, gracias por el comentario