How to draw a colorful hummingbird [Esp/Eng]
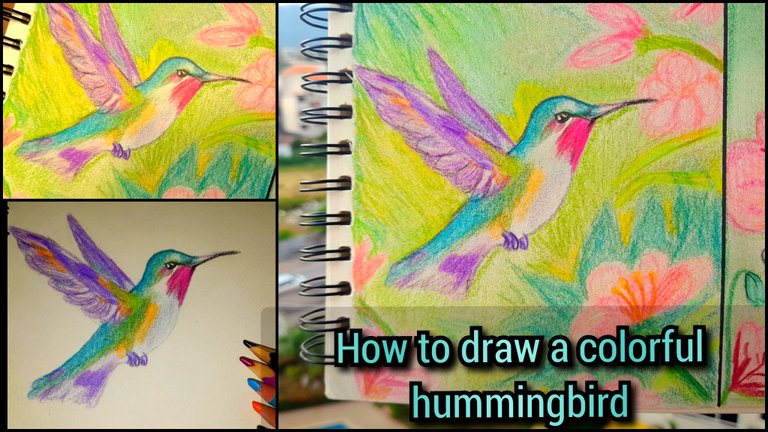 Hello everyone. I'm sharing my first post in this @diyhub community, and I'm so happy to show you the step-by-step process of how to draw a hummingbird, that tiny, sweet, and super fast bird that feeds on flower nectar. I wanted to draw it because my mom used to have a flowering plant on her balcony, and one would always come by, but it flew away so quickly I could barely see it. So I got the idea to make one myself and teach you how to do it too. This DIY will help you create a lovely hummingbird in pencil and then bring it to life with colors. Join me 🖍📷
Hola a todos. Por acá les comparto mi primer post en esta comunidad @diyhub y me tiene muy contenta compartir el paso a paso de cómo hacer un colibrí, ese pajarito tan tierno, pequeñito y super rápido que se alimenta del néctar de las flores. Quise dibujarlo porque antes mi mamá tenía una planta con flores en su balcón y siempre llegaba uno pero se iba muy rápido que casi no me daba tiempo de verlo, así que me vino la idea de hacer uno yo misma y enseñarles cómo lo pueden hacer ustedes también, este DIY los ayudará a crear un lindo colibrí a lápiz y luego darle vida con los colores. Acompáñenme 🖍📷

The materials you’ll need for this drawing are colored pencils, a charcoal pencil, an eraser, and a white sheet of paper. I used one from my sketchbook.
Los materiales que se necesitan para realizar este dibujo son colores, un lápiz de carbón, una goma de borrar y una hoja blanca, en mi caso utilicé una de mi sketchbook.

 |  |
|---|
Step 1✏️
Start by drawing the basic structure of the hummingbird using simple shapes. Draw a circle as a guide for its head and a teardrop shape for its body. Also, sketch the guides for the wings rising upward.
Paso 1✏️
Lo primero que debes hacer es dibujar la estructura del colibrí con formas sencillas. Dibuja un círculo que será la guía para su cabeza y una forma como de gota para su cuerpo. De igual manera dibuja las guías de lo que serán las alas elevándose hacia arriba.

Step 2
Draw its long, thin beak coming out of the head circle, and at the bottom of the body, sketch a fan-like shape as a guide for the tail. Also, add a small circle inside the head for the eye.
Paso 2
Dibuja su pico largo y delgado que salga del círculo de la cabeza y en el inferior del cuerpo dibuja una forma de abanico que será la guía para su cola. Además, añade un círculo pequeño dentro de la cabeza para el ojo.

Step 3
Now the base is ready. It’s time to add details to the drawing. Include lines for the feathers on the wings and tail, curving at the edges. Also, draw the hummingbird’s tiny legs.
Paso 3
Ya tendríamos la base lista. Ya es hora de darle los detalles al dibujo. Incorpora las líneas para las plumas de las alas y la cola, que serían curvas en los bordes. Y añade las pequeñas patas del colibrí.
 |  |
|---|---|
 |  |
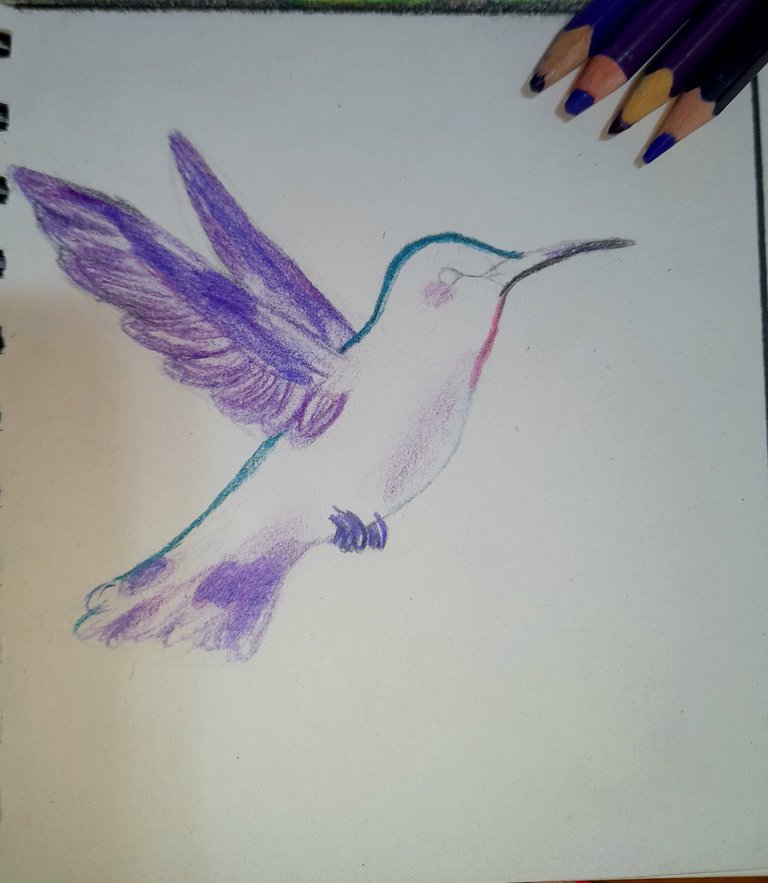
Step 4 🖍
Now the hummingbird gets its color, my favorite part. It’s time to use the colored pencils to fill in the drawing. First, outline the hummingbird according to the colors you want for each part of its body. Then, blend different shades of purple on its wings, tail, and legs. Next, gradually add light blue and green to create a mix on the upper part, along with touches of orange and yellow on the wings and chest. Add pink on the neck too.
Paso 4 🖍
Es ahora es cuando el colibrí toma color, mi parte favorita. Es momento de usar los colores para rellenar el dibujo. Primero, trazar el contorno del colibrí según los colores que quieres que tenga cada parte de su cuerpo. Después, combina diferentes tonos de morado en sus alas, cola y patas. Posteriormente, usa azul claro y verde poco a poco hasta obtener una mezcla de estos dos colores en la parte de arriba, así como un toque de naranja y amarillo en sus alas y pecho. Además rosado en el cuello.
 |  |
|---|---|
 |  |
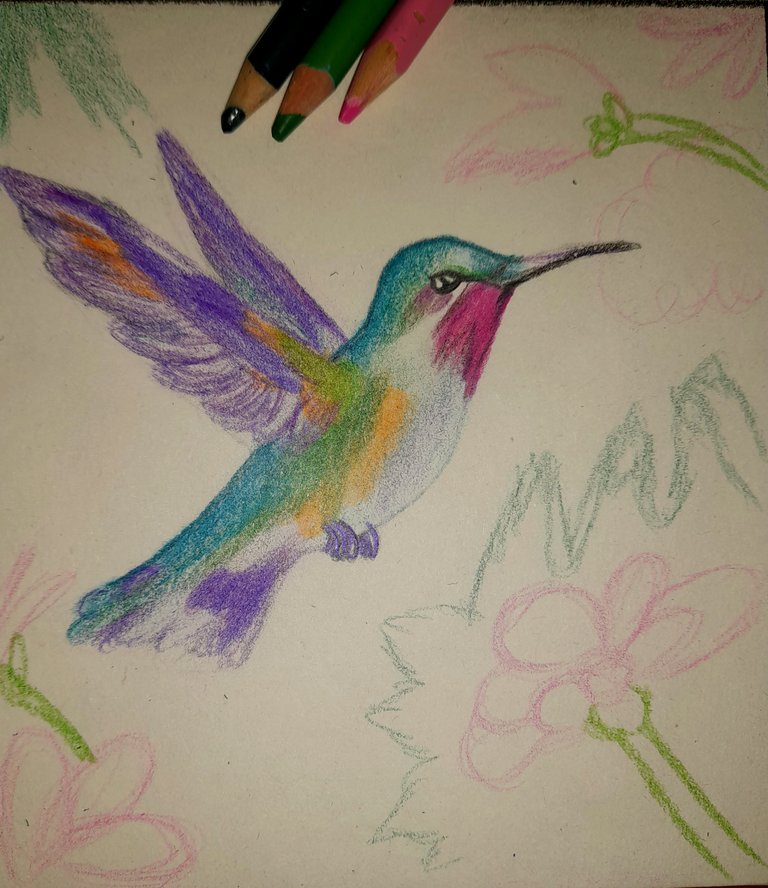
Step 5
To finish, you can add a pretty background to complement the hummingbird. In this case, softly draw some flowers and branches around it to create the forest it’s surrounded by. Use light colors like pastel pink or green for the flowers, and different shades of green in the background to create shadows. And that’s it✅️ You now have a beautiful hummingbird.
Paso 5
Para finalizar, puedes añadir un fondo bonito para complementar al colibrí. En este caso, dibuja suavemente algunas flores y ramas alrededor del colibrí para crear el bosque en el que está rodeado. Usa un colores claros, como un rosa pastel o verde, para darle color a las flores. Y en el fondo diferentes tonos de verde para crear sombras. Y listo✅️ Ya tienes un lindo colibrí.


I love using these kinds of colors because I feel they bring a lot of life to the drawings. I really liked the result. Nature is so beautiful, and the flowers added a touch that complements the hummingbird perfectly. Thanks for reading my post. Until next time 🌴📷🌟
Me gusta utilizar este tipo de colores porque siento que le dan mucha vida a los dibujos. Me gustó mucho el resultado. La naturaleza es muy hermosa y las flores le dieron un toque que se complementa muy bien con el colibrí en el dibujo. Gracias por leer mi post. Hasta la próxima. 🌴📷🌟

This is such a simple and detailed way to draw a humming bird. Thank you for sharing the creative steps, well done.
selected by @ibbtammy
Sending you an Ecency vote! 👍😊✨
What a unique drawing
This is awesome and beautifully
Peace
The choice of a hummingbird is great for this article. Your detailed instructions are inspiring to any artists.
Thanks for sharing your talent!
Your skills are worth a thumbs up👍 the results are very beautiful. It looks like a real bird flying freely in nature.
Hermoso dibujo, elegiste los colores adecuados para resaltar el cuadro, gracias por compartir.