DIY Beaded Seashell Keychain [Esp/Eng]
 Hola a toda la comunidad de Hive DIY. Muy contenta de estar por aquí para compartirles mi más reciente creación y enseñarles cómo pueden hacerla ustedes también paso a paso. Se trata de un llavero en forma de concha de mar hecho con mostacillas y canutillos.
Hello to the entire Hive DIY community. I'm very happy to be here to share my latest creation and show you how to make it step by step. It's a seashell shaped keychain made with seed beads and bugle beads.


Todo lo que sea sobre el mar me parece hermoso y me identifica porque soy de una isla, así que quería hacer un llavero que pudiera llevar a todos lados y que tuviera que ver con el mar que tanto me gusta.
Everything related to the sea feels beautiful to me and represents who I am, since I’m from an island. I wanted to create a keychain I could carry everywhere, inspired by the sea I love so much.

Además, las mostacillas y canutillos me parecieron perfectas para hacer este proyecto que tenía en mente desde hace tiempo. Espero que les guste.
Also, the seed beads and bugle beads seemed perfect for this project I’ve had in mind for a while. I hope you like it.
- 🧵 Materiales / Materials

| Materiales | Materials |
|---|---|
| Canutillos dorados | Gold bugle beads |
| Mostacillas beige | Beige seed beads |
| Una perlita | One small pearl |
| Hilo beige claro o blanco | Light beige or white thread |
| Aguja delgada de coser | Thin sewing needle |
| Tijera | Scissors |
| Bastidor | Embroidery hoop |
| Entretela blanca | White interfacing |
| Fieltro o cuero sintético blanco | White felt or synthetic leather |
| Pega blanca | White glue |
| Silicón líquido | Liquid silicone |
| Pincel | Paintbrush |
| Lápiz o lapicero | Pencil or pen |
| Aro para llavero con cadena | Keychain ring with chain |
- 🪡 Paso a paso / Step by Step
 |  |
|---|
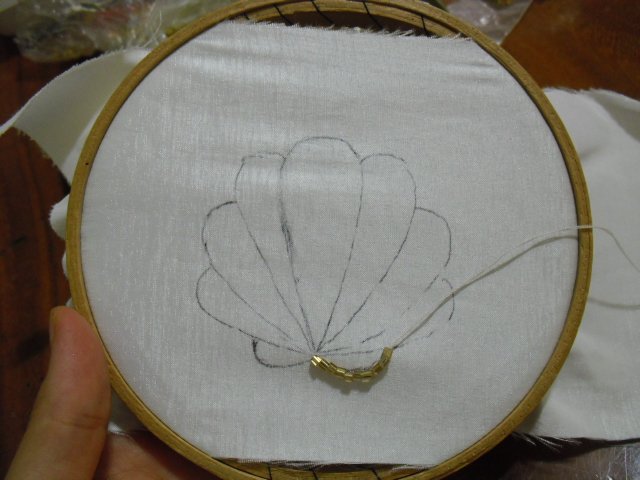
Paso 1️⃣
Coloca un recorte de la entretela en el bastidor, según el tamaño que deseas tu llavero.
Place a piece of interfacing in the embroidery hoop, depending on the size you want for your keychain.
Dibuja la forma de la concha de mar, puede ser con un lápiz o lapicero, yo utilicé los dos para primero hacer el boceto con el lápiz y luego remarcar con el lapicero, aunque puede ser como ustedes prefieran para marcar la forma y guiarse.
Draw the shape of the seashell using a pencil or pen. I used both, first sketching with pencil, then outlining with pen, but you can use whichever you prefer to mark the shape and guide your stitching.
 |  |  |
|---|
Paso 2️⃣
Preparar la aguja con el hilo y hacer un nudo doble, que no sea tan larga la cantidad de hilo para evitar enredos. Además, a medida que se vaya avanzando se irá necesitando más hilo.
Thread the needle and make a double knot. Don’t use too much thread to avoid tangling. As you progress, you’ll need to rethread with more.
Introduce el hilo donde vayas a comenzar el bordado de los canutillos y hacer un remate por el revés de la tela, luego sacar la aguja por el derecho.
Insert the thread where you’ll begin the bugle bead embroidery, secure it with a knot on the back side of the fabric, then bring the needle up through the front.


 |  |  |
|---|
Paso 3️⃣
Para el bordado, tomar dos canutillos con la aguja, introducir nuevamente la misma en la tela dejando espacio suficiente para los dos canutillos, sacarla de nuevo justo en el medio de esos dos y luego insertar en el último y hacer el mismo procedimiento. Este paso se hará para bordar toda nuestra pieza.
For the embroidery, pick up two bugle beads with the needle, insert it back into the fabric leaving enough space for both beads, then bring it up again right between them. Insert into the last bead and repeat the process. Repeat this step to embroider the entire piece.
 |  |
|---|---|
 |  |
Paso 4️⃣
Bordar todo el contorno de la concha de mar, también las líneas internas y además colocar la perla justo en el medio de la misma manera que se coloca un canutillo.
Embroider the entire outline of the seashell, including the inner lines. Place the pearl in the center using the same method as with the bugle beads.
 |  |
|---|---|
 |  |
Paso 5️⃣
Para el relleno, utilicé las mostacillas, fui colocándolas de seis o según me hiciera falta y en la mitad realizar el procedimiento de los pasos anteriores, esto para no tardar tanto de dos en dos.
For the filling, I used seed beads. I added them in groups of six or as needed, and followed the same stitching method as before. This helped speed up the process compared to doing two at a time.


Paso 6️⃣
Una vez bordado todo, recortar el hilo, hacer el remate y recortar toda la pieza que bordamos.
Once everything is embroidered, cut the thread, secure it, and trim the entire embroidered piece.
Marcar la forma en el fieltro o cuero sintético en mi caso y recortar.
Trace the shape onto felt or synthetic leather (I used synthetic leather) and cut it out.

Paso 7️⃣
Con el pincel, aplicar una capa de pega blanca por el revés donde están las terminaciones de los hilos, esto le dará protección para que no se suelte ningún hilo.
Using a paintbrush, apply a layer of white glue to the back side where the thread ends are. This protects the stitching and prevents unraveling.


Paso 8️⃣
Posteriormente, unir con el silicón líquido la pieza que bordamos con el fieltro o cuero sintético que recortamos, dejando un pequeño espacio sin pega que será donde irá la cadena del llavero.
Next, use liquid silicone to glue the embroidered piece to the felt or synthetic leather, leaving a small area without glue where the keychain chain will go.


Paso 9️⃣
En el espacio que dejamos sin silicón, vamos a coserle la cadena del aro de llavero, y luego pegamos esa parte que quedó sin silicón. Yo utilizo unos ganchos para unir las telas.
In the space left without silicone, sew in the keychain ring with its chain, then glue that section shut. I use small clips to hold the fabric together while it sets.
- Resultado final del proyecto 💗


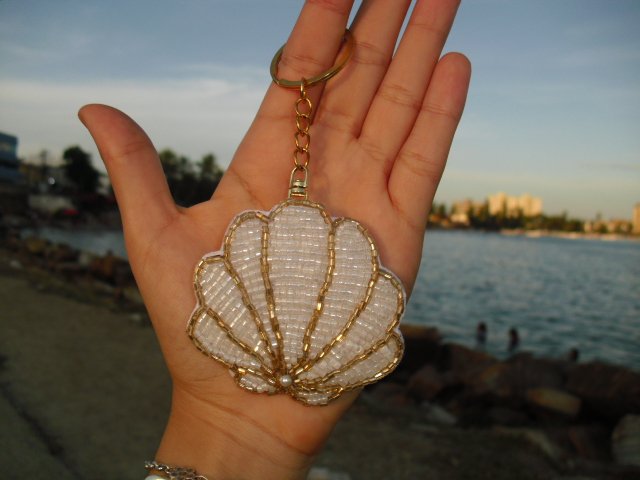
Así quedó mi creación. Me gustó mucho el brillo que tienen los canutillos en el sol. Un llavero así es perfecto para colocarlo en un bolso de playa y complementará mis outfits playeros. El día que lo terminé quise darme una vuelta por la playa para tomarle unas fotos con el mar de Pampatar de fondo y se veía bello. En el sol resalta muchísimo y los colores son mis favoritos.
Here's how my creation turned out. I really loved how the bugle beads sparkle in the sunlight. A keychain like this is perfect to hang on a beach bag and complements my beachy outfits. The day I finished it, I went to the beach to take some photos with the Pampatar sea in the background, it looked beautiful. It really stands out in the sun, and the colors are my favorites.


Por otro lado, es muy fácil de hacer, me tomó una tarde hacerlo y me pareció divertido ver todo el proceso mientras la concha de mar iba tomando forma.
Se siente muy bien iniciar un proyecto así desde cero y luego ver que tu creación queda justo como la imaginaste. Espero que les haya gustado. Nos vemos la próxima 📷🌟💕
On the other hand, it’s very easy to make. It took me just one afternoon, and I had fun watching the seashell take shape throughout the process.
It feels amazing to start a project like this from scratch and see your creation turn out just as you imagined. I hope you liked it. See you next time 📷🌟💕
Dani qué belleza! Se ve muy delicado y súper lindo. Me encanta y el paso a paso muy bien explicado
You received an upvote ecency
El resultado quedó precioso, ese brillo de los canutillos al sol es muy lindo. Y me encanta que además de ser bonito es práctico, porque lo puedes usar en un bolso o incluso como accesorio
Este llavero está hermoso y especial para lucirlo en un día de playa, tiene un diseño elegante, hiciste un lindo trabajo, gracias por compartirnos tu idea, saludos 😊
Bellisimo tu trabajo Daniela, es perfecto. Lo llevaría a todos lados aunque no tenga que ver con el mar
Congratulations @danielaserena! You have completed the following achievement on the Hive blockchain And have been rewarded with New badge(s)
Your next target is to reach 800 replies.
You can view your badges on your board and compare yourself to others in the Ranking
If you no longer want to receive notifications, reply to this comment with the word
STOPHolaa, el trabajo con el llavero de concha me gusta, ojalá yo pudiera hacer algo así jajajaja, pero estoy seguro de que algún día aprenderé, saludos.
Ok. Está muy lindo. Te quedó bellísimo. Gracias por compartir el paso a paso. Saludos