GHOST pins, CROCHETED. / Prendedores FANTASMAS, tejidos a CROCHET.
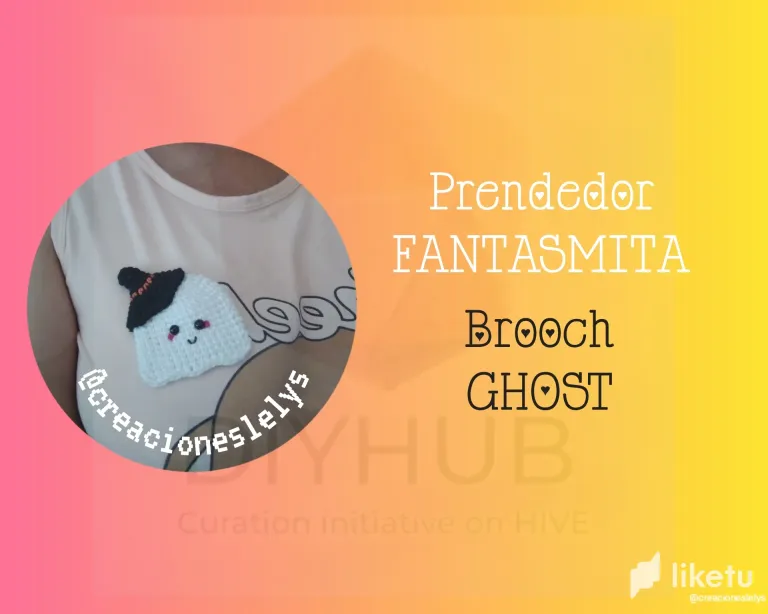
GHOST pins.
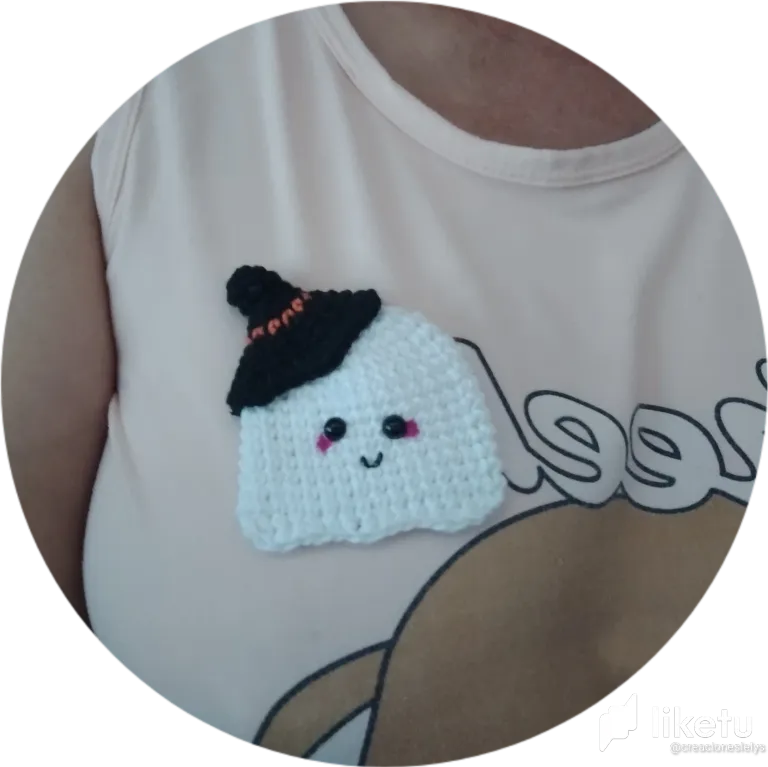
Hello creative friends. Welcome to my blog, in this month dedicated to share with you creations related to the Halloween theme 🎃 I hope you like this little collection. For today I want to show you the step by step to make a not very scary GHOSTMASTER pin.
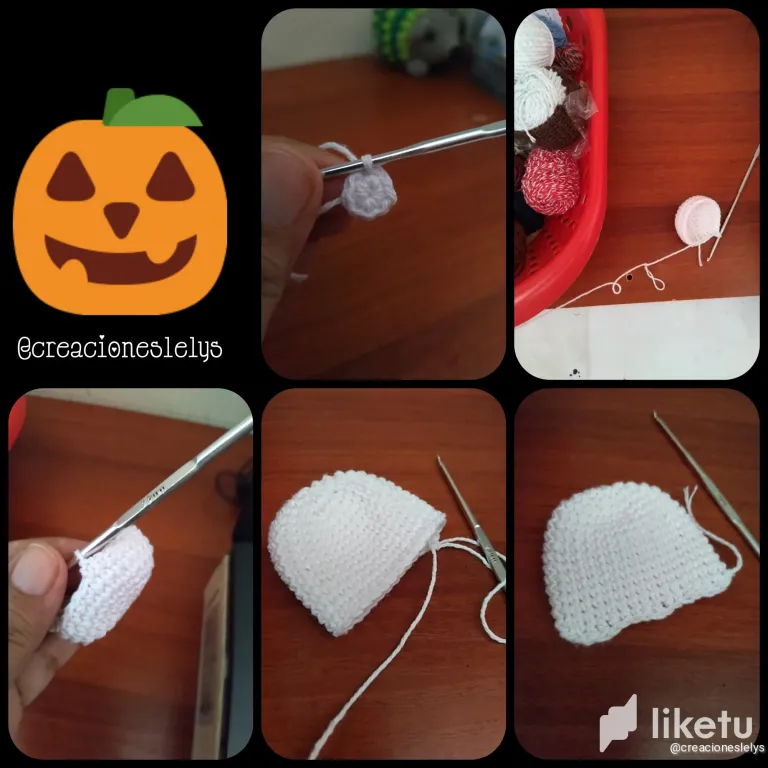
To make it I used: white, black and orange pabilos threads. Crochet needle of 2.25mm, scissors, plastic eyes, markers and glue.
The process of elaboration consists of a crochet knitting that starts with a magic ring of 8 single crochet stitches, then I knit a second round of 8 increases of single crochet stitches. For the third row I knit 1 single crochet and 1 increase in each stitch. In the next row I knit 2 single crochets and 1 increase. From this row on I knitted only single crochet in each of the following rows until I reached row 15.
Then I'm going to leave this knitting flat to start knitting the border. IT HAS NO FILLING.
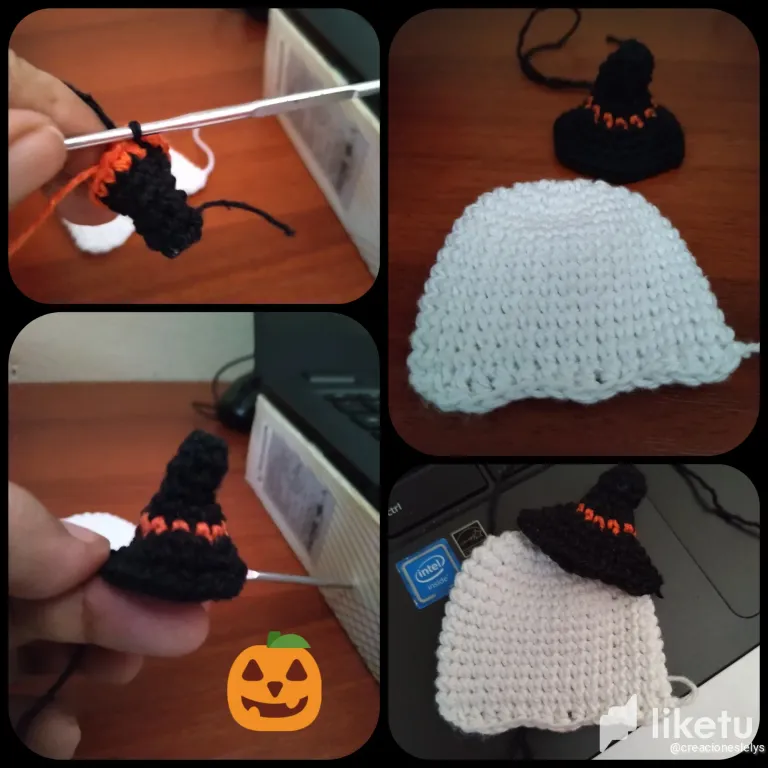
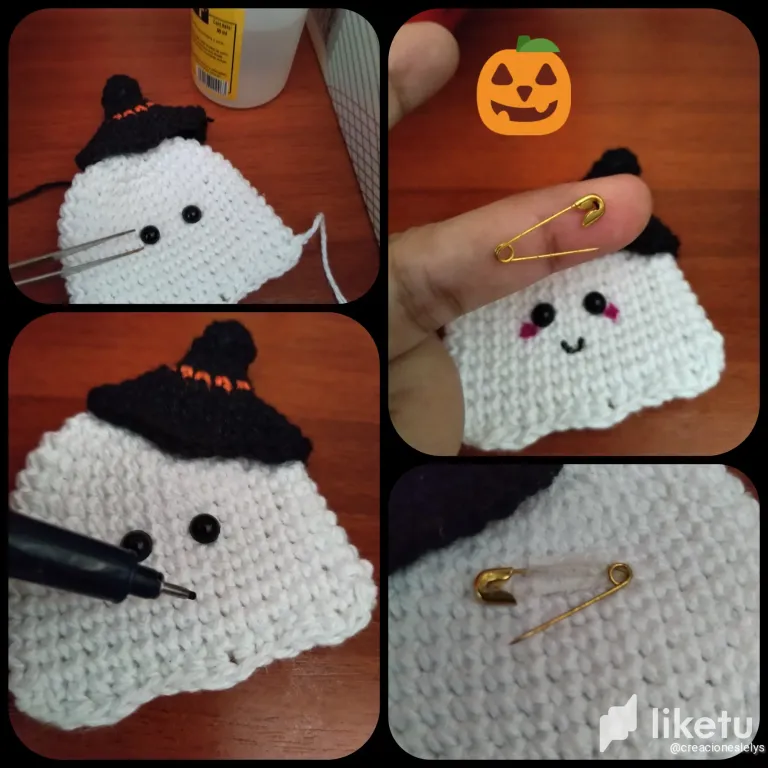
The border is knitted making fans by knitting the following sequence: 1pb-1pma-1pa-1pma-1pb. With the marker I drew the mouth and cheeks, glued her eyes with cold silicone.
To knit the hat, we start with the black yarn a magic ring of 6pb. We knit two more rows of 6 stitches. In the fourth row I knit 3pb-3aum. Then 3pb-(1pb-1aum) until we had 12pb. At the end I changed color to orange yarn and knit 12pb. Then I picked up the black yarn again and knit 1pb-1aum. In the next round I knit 18pb. In the next row 2pb-1aum. In the next round I knit 3pb-1aum of mpa for the whole round.
In this way we finished the hat.
ALL EXCESS STRANDS ARE HIDDEN AND CUT OFF.
I hope you liked this FANTASMITA pin design. I invite you to participate in this new contest sponsored by #Liketu and organized by the #diyhub community. All photos are my property. I edited with Polish. I used Deepl translator. Thanks for your visit. If you liked this content don't forget to follow me and leave me written your impressions. See you soon.
Spanish.
Prendedores FANTASMAS.
Hola amigos creativos. Bienvenidos a mi blog, en este mes dedicado a compartirles creaciones relacionadas con la temática de Halloween 🎃 espero que les guste esta pequeña colección. Para el día de hoy quiero mostrarles el paso a paso para realizar un no muy terrorífico prendedor FANTASMITA.
Para elaborarlo usé: hilos pabilos colores blanco, negro y anaranjado. Aguja de crochet de 2,25mm, tijeras, ojos plásticos, marcadores y pegamento.
El proceso de elaboración consiste en un tejido a crochet que inicia con un anillo mágico de 8 puntos bajos, seguidamente tejí una segunda vuelta de 8aumentos de puntos bajos. Para la tercera vuelta tejí 1punto bajo y 1aumento en cada punto. En la siguiente vuelta tejí 2puntos bajos y 1aumento. A partir de esta vuelta tejí solo puntos bajos en cada una de las siguientes vueltas hasta llegar a la número 15.
Luego voy a dejar plano este tejido para empezar a tejer el borde. NO LLEVA RELLENO.
El borde se teje realizando abanicos tejiendo la siguiente secuencia: 1pb-1pma-1pa-1pma-1pb. Con el marcador dibujé la boca y las mejillas, pegué sus ojos con silicón frío.
Para tejer el sombrero iniciamos con el hilo color negro un anillo mágico de 6pb. Subimos dos vueltas más de 6pb. En la cuarta vuelta tejí 3pb-3aum. Luego 3pb-(1pb-1aum) hasta obtener 12pb. Al finalizar cambié de color a hilo anaranjado y tejí 12pb. Después tomé nuevamente el hilo negro y tejí 1pb-1aum. En la siguiente vuelta tejí 18pb. El la que viene 2pb-1aum. En la próxima tejí 3pb-1aum de mpa por toda la vuelta.
De esta manera finalizamos el sombrero.
TODAS LAS HEBRAS SOBRANTES SE ESCONDEN Y SE CORTAN.
Espero que les haya gustado este diseño de prendedor FANTASMITA. Los invito a participar en este nuevo concurso patrocinado por #Liketu y organizado por la comunidad #diyhub. Todas las fotos son de mi propiedad. Edité con Polish. Usé el traductor de Deepl. Gracias por tu visita. Si te gustó este contenido no olvides de seguirme y dejarme escritas tus impresiones. Hasta pronto.
For the best experience view this post on Liketu
Genial, tu idea amiga... gracias por compartir. Abrazos
Hola. Gracias. Me alegra saber que te gustó. Un abrazo.
Que bonito Lelys! Que cosa más bonita, no me asusta, me da dulzura!! Gracias!❤️
Hola. Si, tengo esa buena propiedad 😃 que mis creaciones terroríficas no asustan ni espantan. Jajaja, ni el Chuky asustó a mis seguidores.
No se si las mías si jajaja las tuyas son creaciones muy dulces, re lindas!
¡Gracias!
A vos por hacer cosas tan bonitas. Buenas noches.😀
This is so cute and amazingly done. Wow. Thank you for entering the contest. Good luck.
Thank you very much for appreciating this creation. 🙋
Que idea tan genial para los que celebran halloween dar de obsequio o de bienvenidos al entrar a la fiesta. Me encantó y aunque no asusta nada 🤭🤭😊😊 es un lindo recuerdo para los asistentes. Me encantó.
What a great idea for those who celebrate Halloween to give as a gift or as a welcome gift when entering the party. I loved it and although it's not scary at all 🤭🤭😊😊 it's a nice memory for the attendees. I loved.
Que bueno que te gustó. La verdad es que el fantasma es más amigable que espantoso. Muy buena idea la que nos das, para usar en las reuniones y fiestas de halloween 🎃 están buenísimos. Saludos.
Is so beautiful and this is a good idea of doing this, thank you for sharing
Thank You 🤗
Beautiful crochet work. You are really doing a good job. The finished work look amazing
Hi, Thank you very much for your words. I'm glad you like this work.