Hello HIVEs!
Today I would like to introduce you to my DIY projector. This post focuses on the technical aspects. Some pictures from previous posts will serve as examples of use.
Heute möchte ich euch meinen DIY-Projektor vorstellen. In diesem Beitrag rückt das Technische in den Vordergrund. Einige Bilder aus älteren Posts sollen nachfolgend als Anwendungsbeispiel dienen.

OLYMPUS E-M1MarkII , ISO200, ƒ4.5, Live Composite (2 s)
CANON EF16-35mm ƒ4L IS USM + VILTROX EF-M2II Autofokus Objektiv-Adapter 0,71x
S.O.O.C.
Why A DIY Projector?
In the following, I would like to explain my requirements for the projector and the resulting setup:
- I want to be able to project images the size of a postage stamp up to 2m onto objects from a distance of 1 - 3m. This can be realized with an interchangeable lens. An old camera housing is ideal as a housing.
- I would like to project a coarse resolution onto the objects. Similar to the dots of Roy Lichtenstein's pop art, but not dots, but individual pixels. A low-resolution display must be built into the camera body.
- Handling should be simple, similar to a slide projector. A memory card serves as image storage.
- The projector should also be mobile, which is why it is powered by a rechargeable battery.
Nachfolgend möchte ich auf meine Anforderungen an den Projektor und den daraus resultierenden Aufbau eingehen:
- Ich möchte Bilder von der Größe einer Briefmarke bis 2m aus einer Entfernung von 1 - 3m auf Objekte projizieren können. Das lässt sich mit einem Wechselobjektiv realisieren. Ein altes Kameragehäuse eignet sich hervorragend als Gehäuse.
- Ich möchte eine grobe Auflösung auf die Objekte projizieren. Ähnlich dem Punkten von Roy Lichtensteins Pop-Art, nur eben keine Punkte, sondern einzelne Pixel. Ein Display mit geringer Auflösung muss in das Kameragehäuse verbaut werden.
- Die Handhabung sollte einfach sein, ähnlich wie beim Dia-Projektor. Eine Speicherkarte dient hier als Bildspeicher.
- Der Projektor soll auch mobil einsetzbar sein, deshalb wird dieser mit einem Akku betrieben.

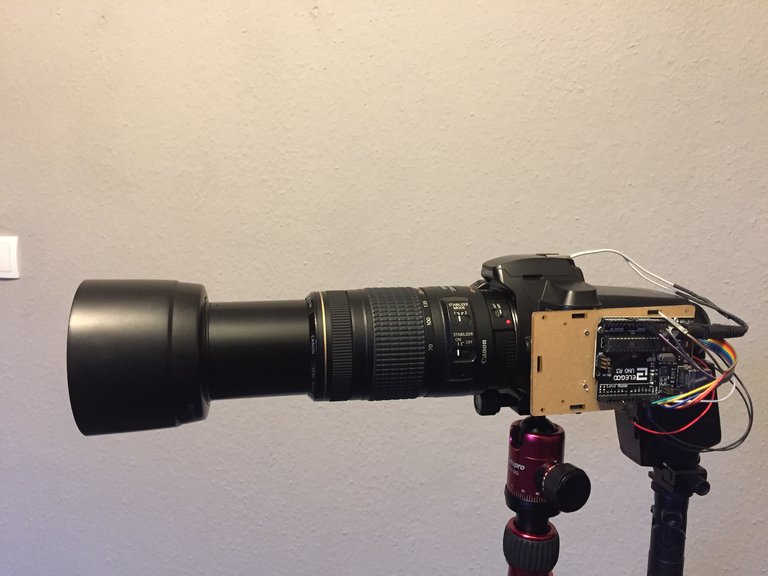
As described above, an old camera body served as the basis. On the one hand, there is a functioning battery compartment and the existing lenses can be used.
To do this, I removed the existing electronics from the housing. The electronics, consisting of a voltage converter, Arduino, memory card and 128x160px display, were then housed in the body.
I removed the rear panel of the display and mounted the TFT display in place of the curtain. If you now shine a flashlight or flash into the camera from behind, the light is projected onto the subject through the display and a lens.
The memory card contains BMP files that are shown on the display.
Wie oben beschrieben, diente ein altes Kameragehäuse als Grundlage. Einerseits ist dort ein funktionstüchtiges Akkufach vorhanden und man kann die vorhandnen Objektive nutzen. Dafür schlachtete ich die vorhandene Elektronik aus dem Gehäuse aus. Danach wurde in den Body die Elektronik, bestehend aus einem Spannungswandler, Arduino, Speicherkarte und Display 128x160px untergebracht. Die Rückwand des Displays habe ich entfernt und das TFT-Display an die Stelle des Vorhangs montiert. Wenn man jetzt mit einer Taschenlampe oder einem Blitz von hinten in die Kamera leuchtet, wird das Licht durch das Display und ein Objektiv auf das Motiv projiziert. Auf der Speicherkarte befinden sich BMP-Files, die auf dem Display angezeigt werden.


Material
- ATmega328 board
- Battery / rechargeable battery
- XL4015 DC-DC Step Down Module 5A
- 1.8'' SPI TFT display 128 x 160
- Memory card
- Camera (cannibalized)
- ATmega328-Board
- Batterie / Akku
- XL4015 DC-DC Step Down Modul 5A
- 1,8'' SPI TFT Display 128 x 160
- Speicherkarte
- Kamera (geschlachtet)


The Arduino Sketch
Now you don't have to reinvent the wheel. I found a sketch including a circuit diagram by Enrico Gueli on the web, which was perfect for my project.
Here is a link to the website
Only the third line from the bottom was changed
before: TFTscreen.image(logo, x, y);
after: TFTscreen.image(logo, 1, 1);
Nun muss man nicht das Rad neu erfinden. Im Web fand ich ein Sketch inklusive Schaltplan von Enrico Gueli, welches sich perfekt für mein Projekt eignete.
Hier ein Link zur Website
Abgeändert wurde nur die dritte Zeile von unten
vorher: TFTscreen.image(logo, x, y);
nachher: TFTscreen.image(logo, 1, 1);
The Cover
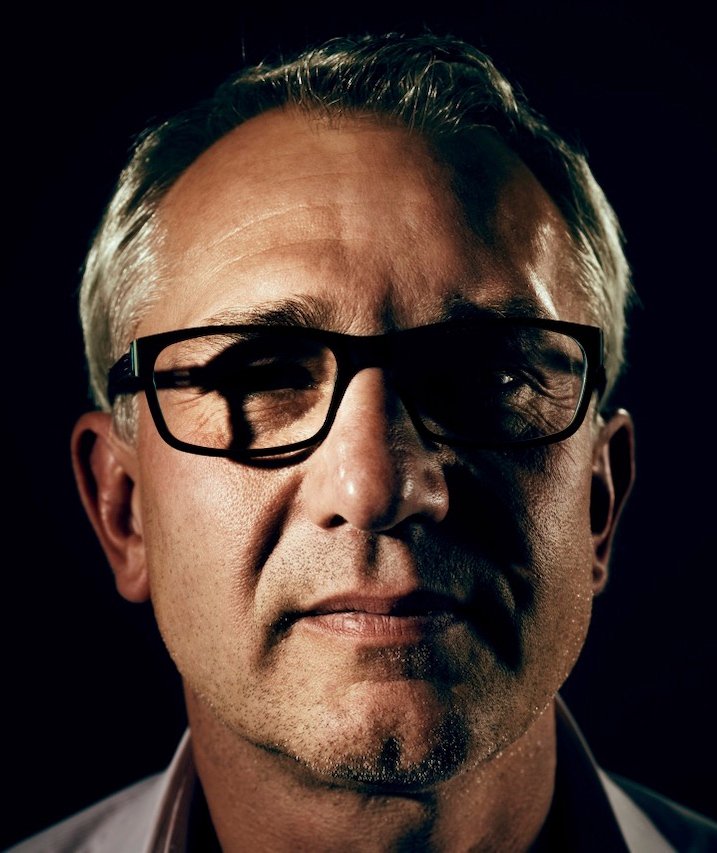
The picture above shows the set for the cover picture. I had previously saved the ones and zeros as BMP on the memory card. I create the BMP files with the GIMP program. I can use the lens to determine how large or sharp the image I have created appears on the subject. You can use this technique to make the pixels appear very large so that they almost look like a pattern. I usually use a CANON AF 70-300 mm f/4-5.6 on the projector. It can be exchanged as required. I place a flash behind the display of the projector. I exposed the head in the title image with an LEDLenser P6.
Das Bild oben zeigt das Set für das Titelbild. Ich hatte die Einsen und Nullen vorher als BMP auf der Speicherkarte gespeichert. Die BMP-Files erstelle ich mit dem Programm GIMP. Mit dem Objektiv kann ich bestimmen, wie groß oder scharf das von mir erstellte Bild auf dem Motiv erscheint. Die Pixel kann man mit Hilfe dieser Technik sehr groß erscheinen lassen, dass sie fast wie ein Muster wirken. Ich verwende meist ein CANON AF 70-300 mm f/4-5.6 am Projektor. Es kann je nach bedarf getauscht werden. Hinter das Display des Projektors platzierte ich einen Blitz. Den Kopf im Titelbild belichtet ich mit einer LEDLenser P6.

OLYMPUS E-M1MarkII , ISO64, ƒ5.6, Live Composite (3.2 s)
CANON EF24-70mm ƒ4L IS USM + VILTROX EF-M2II Autofokus Objektiv-Adapter 0,71x
Model: Claudia
I originally developed the projector for the SPRACHLOS project. The idea was to project a roughly pixelated image onto the model's hand.
Here is the link to the article
Ursprünglich habe ich den Projektor für das Projekt SPRACHLOS entwickelt. Es sollte ein Bild grob verpixelt auf die Hand des Models projiziert werden.
Hier der Link zum Artikel.
Canon EOS 6D Mark II
Canon EF16-35mm ƒ4L IS USM (zwei Verlaufsfilter)
Canon EF 24-70mm ƒ4L IS USM
ISO100; f11; 354s
S.O.O.C.
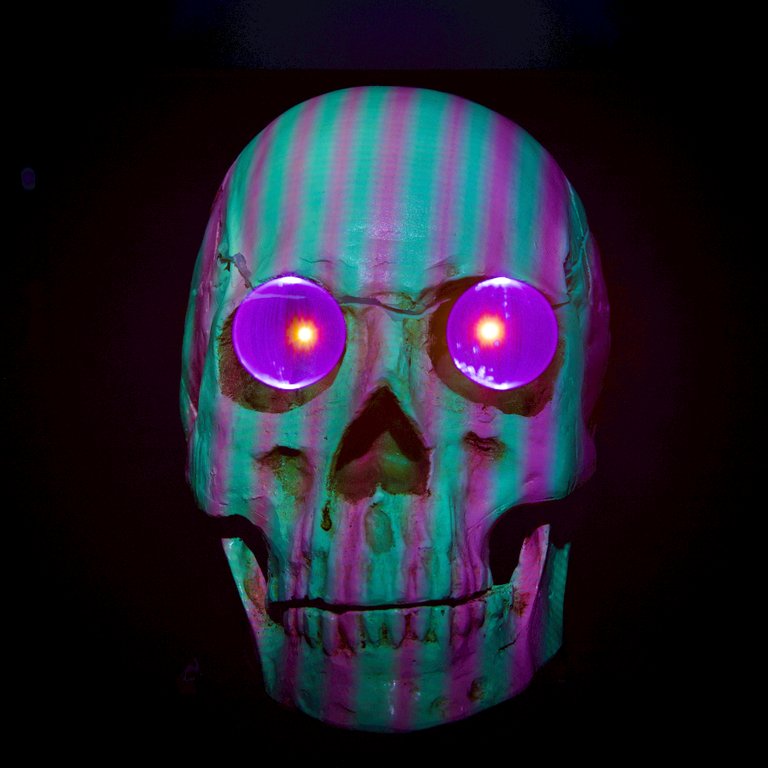
Another project I had presented here as THE SKULL LIGHT PAINTING, in which eyes were inserted into the skull by ORBs and the skull itself was provided with patterns by the projector.
Here is the link to the article
Ein weiteres Projekt hatte ich hier als THE SKULL LIGHT PAINTING vorgestellt, in dem in den Schädel Augen durch ORBs eingesetzt und der Schädel selbst durch den Projektor mit Mustern versehen wurde.
Hier der Link zum Beitrag.

Olympus E-M1 MarkII Live composite (2.5s) F 7.1, ISO 100
EF16-35mmf/4L mit VILTROX EF-M2II Adapter 0.71x
S.O.O.C.
And last but not least, I would like to refer once again to the project
THE DIGITAL MAN in which the DIY projector was also used together with the ORBOMAT.
Here is the link to the article
I hope you enjoyed the post and I'll see you here again next Sunday. Stay tuned!
Und last but not least möchte ich hier noch einmal auf das Projekt
THE DIGITAL MAN verweisen in dem ebenfalls der DIY-Projektor zusammen mit dem ORBOMAT zum Einsatz kam.
Hier der Link zum Beitrag.
Ich hoffe, euch hat der Beitrag gefallen und wir sehen uns hier am nächsten Sonntag wieder. Bleibt dran!

What Is Light Painting?
Light painting is a unique art form. As a rule, the darkness is illuminated by the artist with various light sources and traces of light are painted into the picture with various lighting tools. Various techniques are used, such as camera rotation or other movements of the camera during exposure. The creative possibilities are almost unlimited. When using ND filters, this technique can also be used in daylight. All images were taken during a single exposure. Apart from denoising, sharpening, cropping and possibly adjusting the white balance, the images are not processed on the computer.
Lichtmalerei ist eine einzigartige Kunstform. In der Regel wird die Dunkelheit mit diversen Lichtquellen vom Künstler ausgeleuchtet und Lichtspuren mit diversen Lichtwerkzeugen ins Bild gemalt. Dabei kommen verschiedene Techniken zum Einsatz, wie Kamerarotation oder andere Bewegungen der Kamera während der Belichtung. Die kreativen Möglichkeiten sind nahezu unbegrenzt. Bei Einsatz von ND-Filtern kann diese Technik auch bei Tageslicht angewand werden. Alle Bilder wurden während einer einzigen Belichtung aufgenommen. Abgesehen vom Entrauschen, Schärfen, Beschneiden und eventuellem Anpassen des Weißabgleichs werden die Bilder nicht am Computer bearbeitet.
CandelART
more about me and my art:

WE ARE LIGHT PAINTERS
To help and support the LightPainters community here on Hive I would appreciate your delegation of HivePower. Any amount is appreciated. It does not require much to get started, we are happy for any gesture. @lightpainters
How to delegate?
Delegate 50HivePower, [50HP]
Delegate 250HivePower, [250HP]
Delegate 500HivePower, [500HP]
Delegate 1000HivePower, [1000HP]
All the Hive Power will help to upvote the artist's contribution as part of the LightPainters community.
Du leuchtest mit der Taschenlampe durch das TFT Dingen das Du in ein Kameragehäuse eingebaute hast? 🤔
Und ich dachte schon, ich habe bekloppte Ideen. 😂😂😂 Sehr cooles Projekt mein Bester!
Danke! 😊 Ja bekloppt 😂 Wenn man keine andere Möglichkeit sieht, ein Projekt zu verwirklichen, baut man so etwas.
Interesting experiments!
Wow!... What an ingenious thing this device!!!!
!discovery 35
!VSC
!PIZZA
!BBH
@jlinaresp has sent VSC to @candelart
This post was rewarded with 0.1 VSC to support your work.
Join our photography communityVisual Shots
Check here to view or trade VSC Tokens
Be part of our Curation Trail
@jlinaresp ha enviado VSC a @candelart
Éste post fue recompensado con 0.1 VSC para apoyar tu trabajo.
Únete a nuestra comunidad de fotografía Visual Shots
Consulte aquí para ver o intercambiar VSC Tokens
Se parte de nuestro Trail de Curación
@candelart! Your Content Is Awesome so I just sent 1 $BBH (Bitcoin Backed Hive) to your account on behalf of @jlinaresp. (1/5)
As simple as possible, as complicated as necessary.
This post was shared and voted inside the discord by the curators team of discovery-it
Join our Community and follow our Curation Trail
Discovery-it is also a Witness, vote for us here
Delegate to us for passive income. Check our 80% fee-back Program
$PIZZA slices delivered:
@jlinaresp(2/10) tipped @candelart
Sehr coole Sache, die du dir da gebastelt hast. Und die Ergebnisse sprechen für sich.
Danke Dir! 😊 Wird wieder Zeit für einen Einsatz. Es gibt noch einige Projekte...
Ich bin gespannt....
!LOL
lolztoken.com
Even the cake was in tiers.
Credit: lofone
@candelart, I sent you an $LOLZ on behalf of holovision.play
(1/6)
Farm LOLZ tokens when you Delegate Hive or Hive Tokens.
Click to delegate: 10 - 20 - 50 - 100 HP
https://twitter.com/lee19389/status/1772582257632448682
#hive #posh