Memories from the Preparation of our first Vegetable Garden in Permaculture [EN - FR]
No, despite appearances, this is not an article about communism or kolkhozes...! Hello dear Hivers and Nature lovers, today while many of my thoughts are turned towards the future realization of a garden which, in its final form (in a few years at least) will be able to make more than one hectare, I would like to share with you this rediscovery that I made some time ago... While I was browsing through my digital and memory archives (I was looking for something else of course ^^) I came across this series of images that finally represented what I was looking for !
This episode goes back to several years ago during an autumn holiday when we were in our country house with my brother, a few years younger. I don't remember how the idea came about, but whatever its origins, the project quickly took shape :
"Let's build a garden"
Since our childhood, we have been passionate about what grows and lives and even if we had taken care of a few weed plants, we had never started a real vegetable garden in the ground. I might as well tell you that, due to circumstances that I will develop a little later, only the preparation of this first plot will be presented here. Yes, it's only half of it, but it's the part that constitutes the real basis of any good garden.
The interesting thing is that at the time we were not at all aware of the diversity of cultivation strategies, the types of materials to cover the soil and a thousand other things. That's also why I'm doing this article, both to share it with you and also to make a kind of time marker to be found in a few years.
Well, as usual, I talk a lot in the introduction, but the rest will be simpler, more efficient and direct :)
Day 1
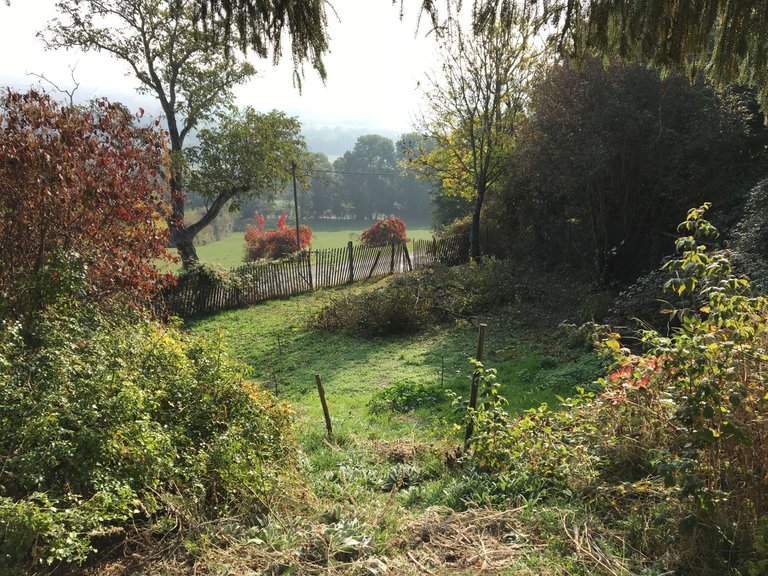
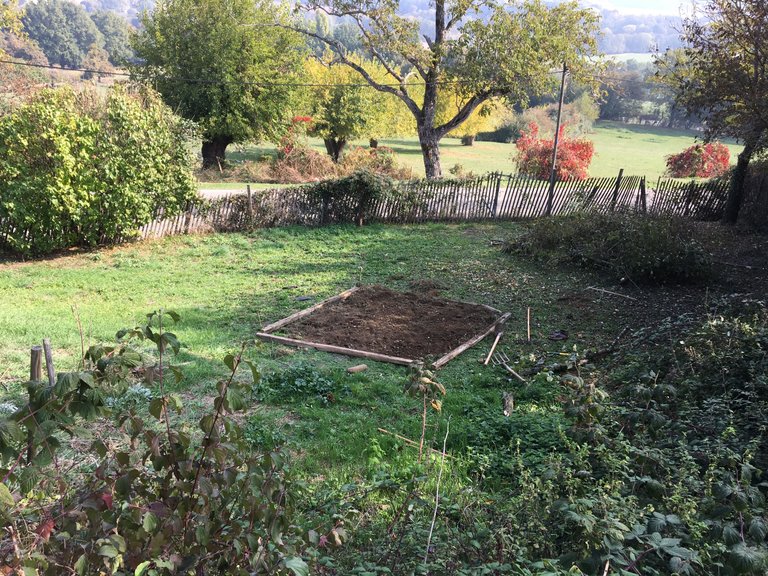
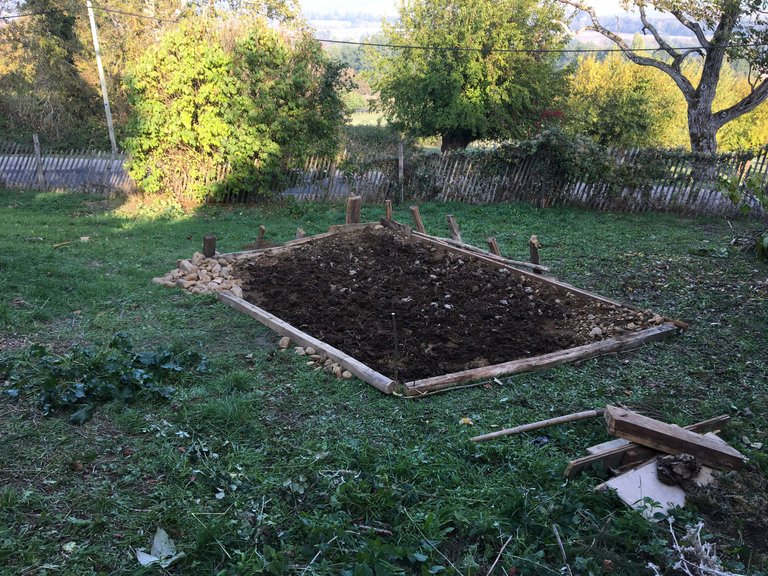
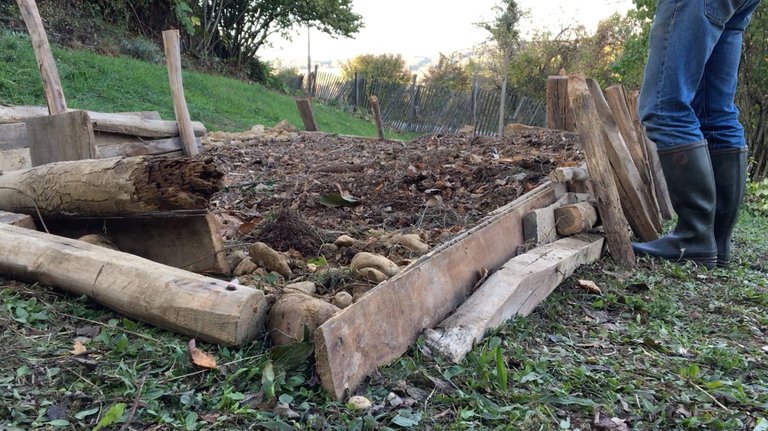
This is the location we had chosen. A gentle grassy slope on the bottom of the field.
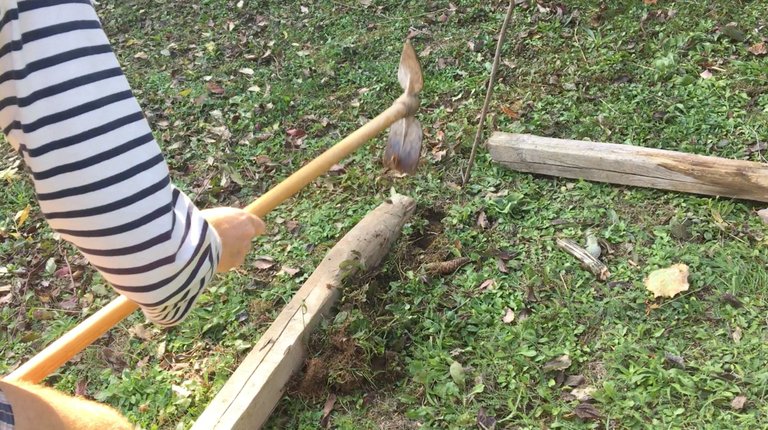
We start by marking out the area with large beams and chestnut stakes that we find in the barn...

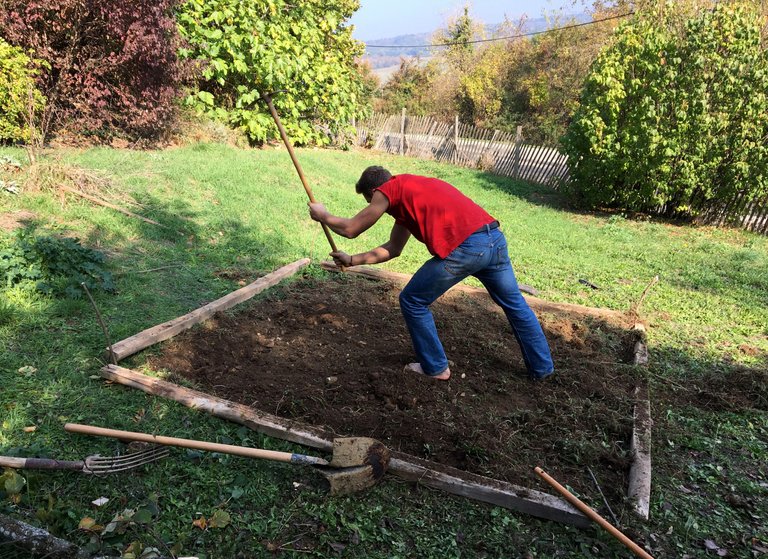
And then we start digging what might look like a mistake, although we prepare the ground more than 6 months in advance... Indeed, in permaculture, you are not supposed to turn the soil. One of the reasons given is that it disturbs the soil, burying the bacteria and micro-organisms that live in the first layers of the soil and exposing those that live deeper.
But I have to say that at the time we knew nothing about this !
Our idea was to get a flat area and by digging the slope and moving the soil downwards, we had more or less achieved our goal...
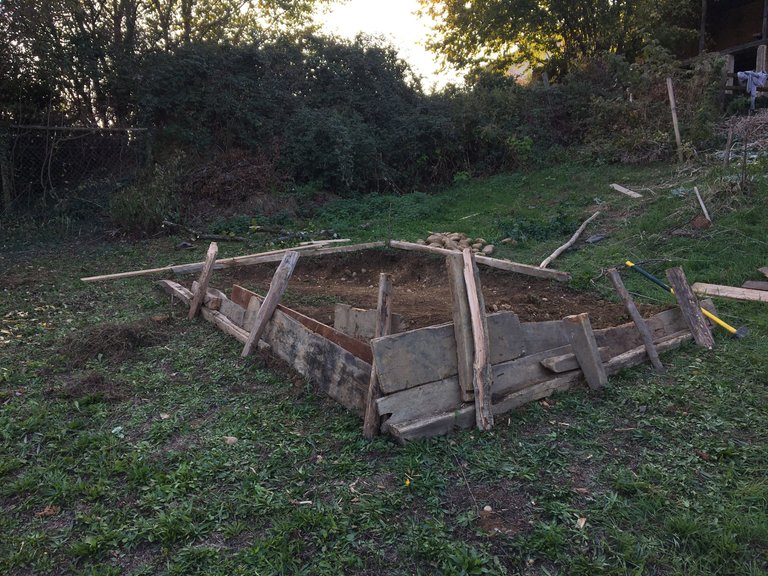
For the rest of the first day, we created a corner wall with salvaged planks and pegs to hold the soil down the slope. I don't really remember the rest of the evening, but I don't think I'm lying when I say we slept well ^^ !
Day 2
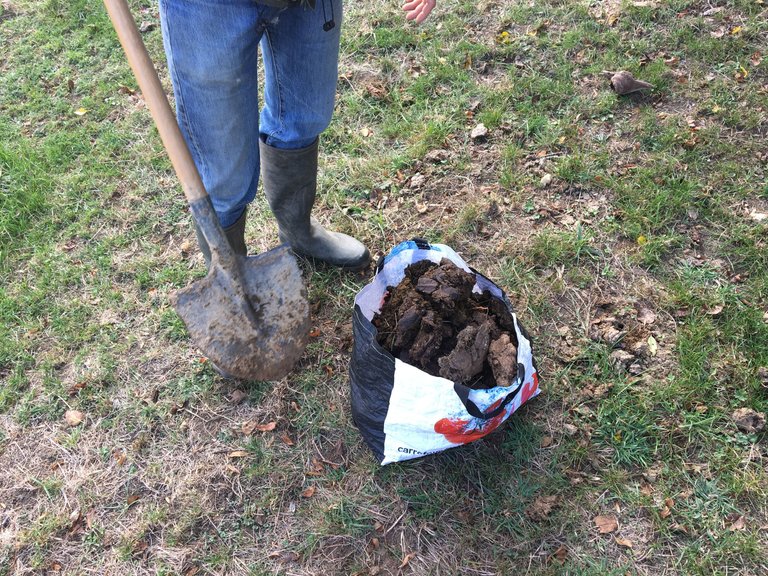
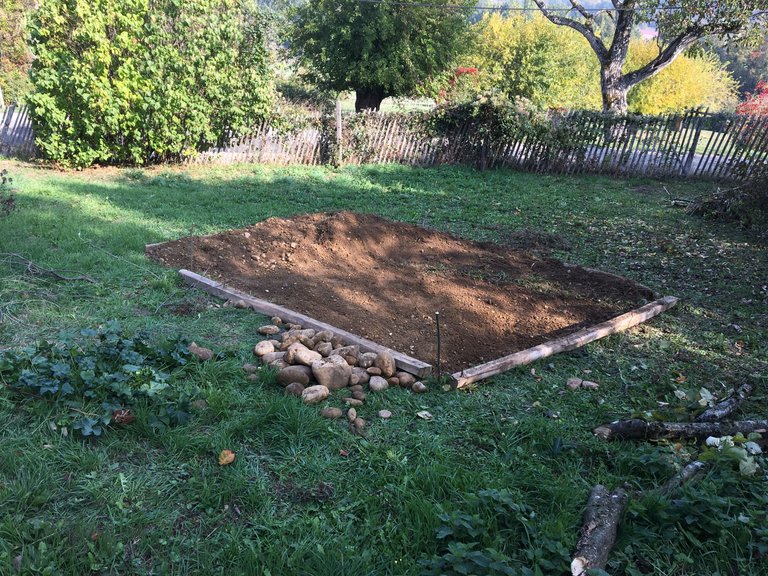
After we get up early enough, we go to the opposite field to collect a maximum of cow dung, more or less fresh or dry. The diversity of these states brings indeed different nutrients more or less powerful or advanced but which will bring nutrients whatever happens !
The rest of the day we bring in freshly cut straw and mix it with hay, also found in the barns of the house.
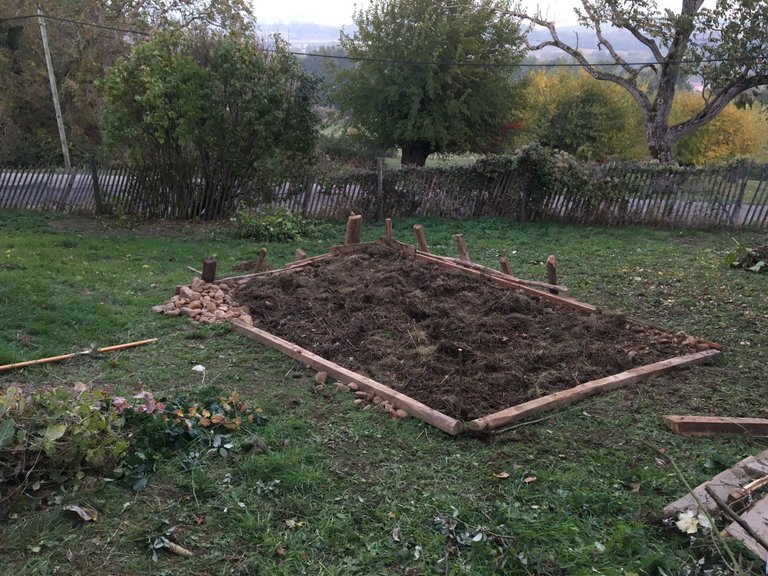
We also create a small pile of pebbles in the left corner, which I remember was meant to drain as well as capture some of the sun's heat and give it back to the plants we were thinking of planting there. Squash if I remember correctly...
The tools are put away and all together we take a final sunbath, again very tired !
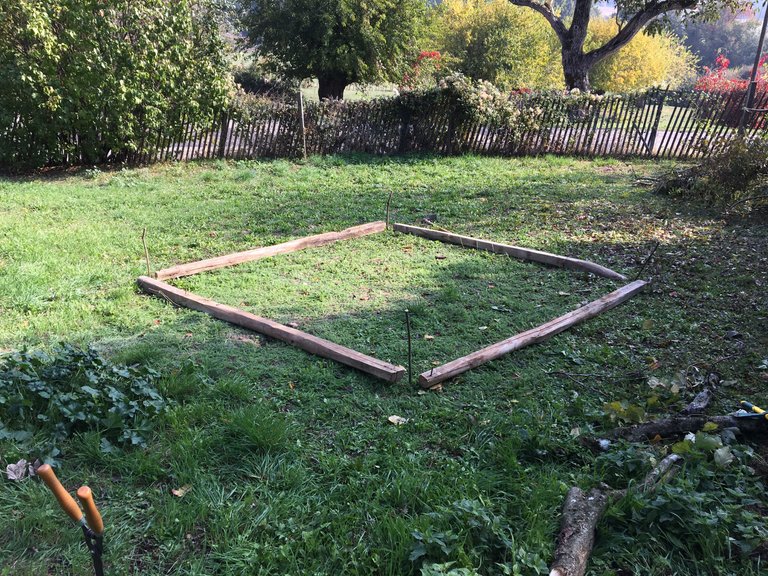
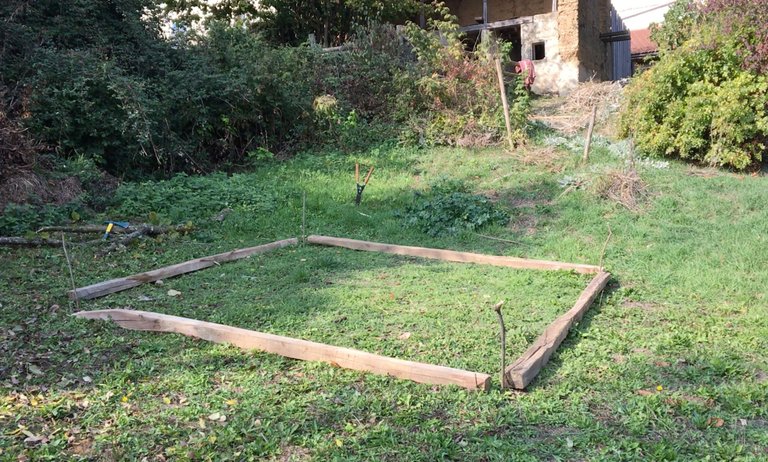
Day 3
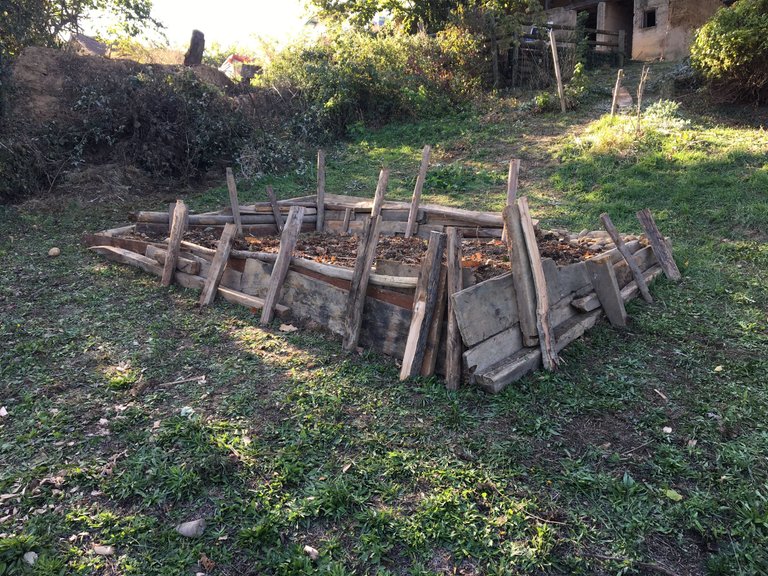
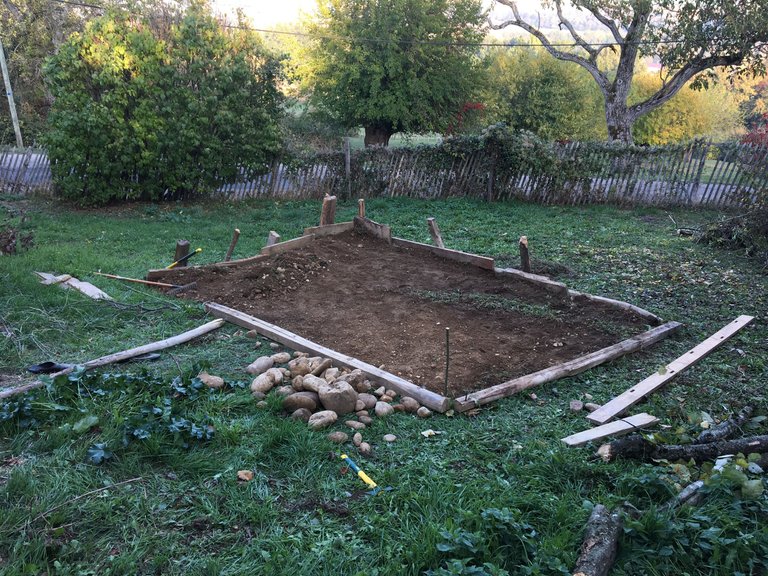
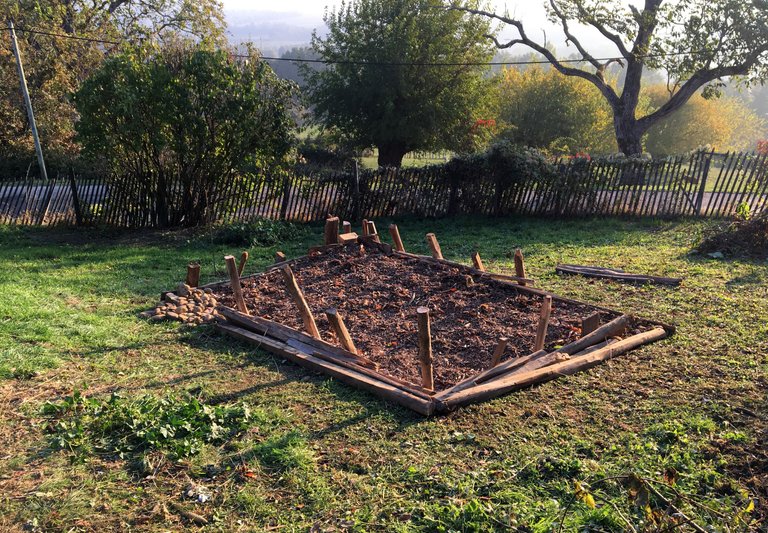
On this third and final day, we continue the structure of our vegetable garden. In terms of size, I think it was about 4 by 3 meters, or about 12 square meters.
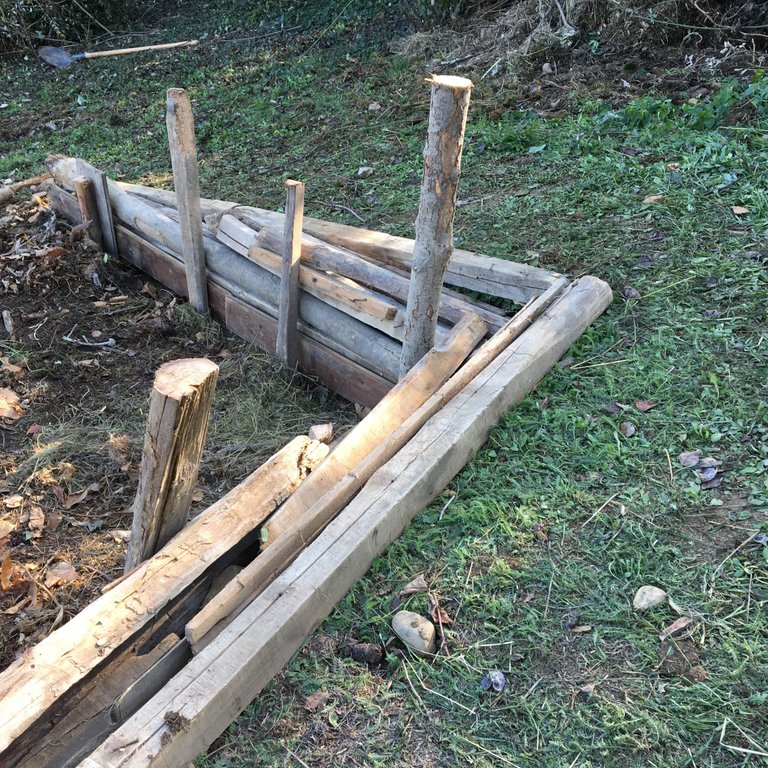
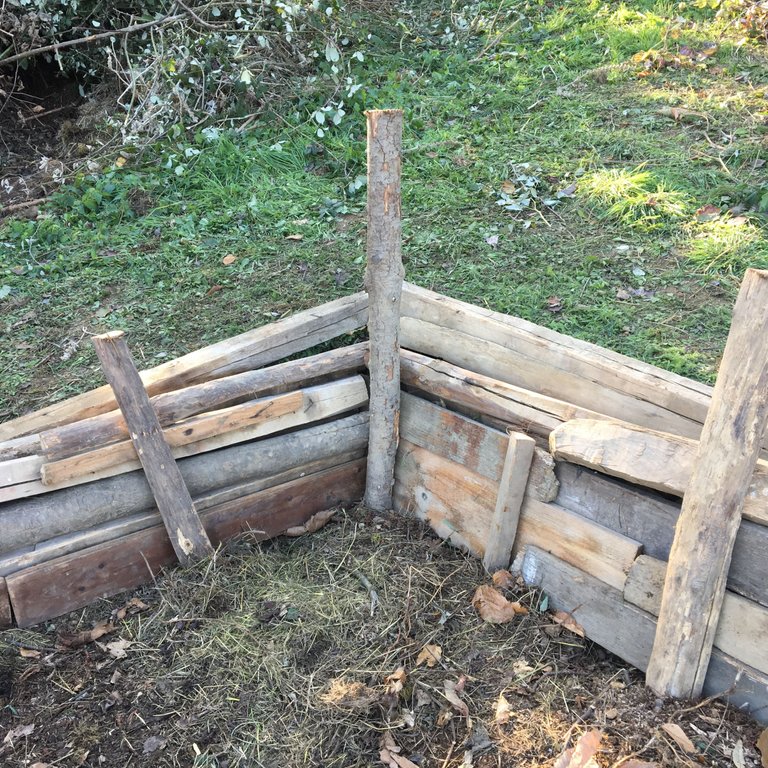
In the extension of the diagonal that follows the slope and opposite the opposite corner, we build a wooden corner inspired by the first one made the day before. The idea here is simply to retain the soil of the plant, even if this will not prevent a heavy rain from doing major damage !
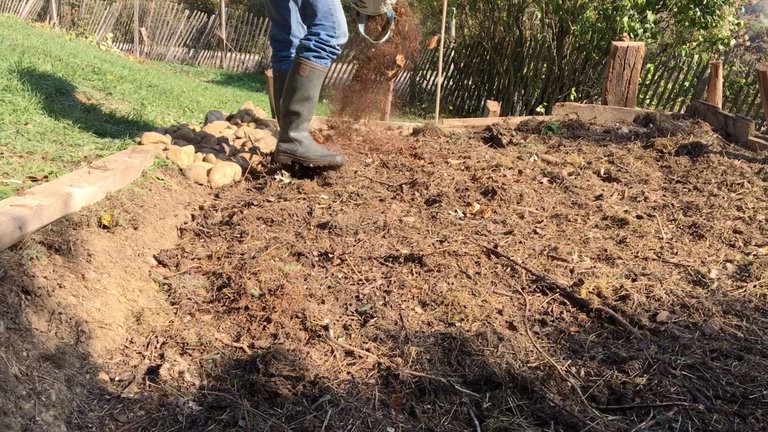
Finally, we end up with a large mixture of "dead" leaves, all in varying states of decomposition...
That's it for the story of this construction between brothers !
I hope this has been inspiring and perhaps given you the desire to start a vegetable garden. I don't pretend to be a rocket scientist and I'd love to get feedback on how you go about building your layers and the order in which they are placed !
Thank you for visiting and reading, take care and see you soon,
<3
Non, malgré les apparences, il ne s'agit pas d'un article sur le communisme ou les kolkhozes..! Bonjour chers Hivers et amoureux du vivants, aujourd'hui alors que bon nombre de mes réflexions du moment sont tournés vers la futur réalisation d'un jardin qui, dans sa forme finale (dans quelques années au moins) pourra faire plus d'un hectare, je souhaiterai partager avec vous cette redécouverte que j'ai faite il y a quelques temps... Alors que j'étais allé naviguer dans mes archives numériques et mémorielles (je cherchais tout autre chose bien évidemment ^^) je suis retombé sur cette série d'image qui représentaient finalement peut-être ce que je cherchais !
Cet épisode remonte à plusieurs années lors de vacances d'automne lorsque nous étions dans notre maison de campagne avec mon frère plus jeune de quelques années. Je ne me rappelle comment est venue l'idée, mais quoiqu'en furent les origines, le projet prit rapidement forme :
"Construisons un jardin"
Depuis notre enfance, nous sommes passionnés par ce qui pousse et vit et même si nous nous étions occupé de quelques plans de weed, nous n'avions jamais commencé de A à Z un véritable potager en pleine terre. Autant vous le dire et par rapport à des circonstances que je développerai un peu plus loin, seule la préparation de cette première parcelle sera présentée ici. Oui, c'est un peu juste la moitié, mais c'est la partie qui constitue la base véritable de tout bon jardin qui se respecte.
Ce qui est intéressant, c'est qu'à l'époque, nous n'étions pas du tout conscients de la diversité des stratégies de cultures, des types de matières et matériaux pour recouvrir le sol et de mille autres choses encore. C'est aussi pour cela que je fais cet article, à la fois pour le partager avec vous et puis aussi pour faire une sorte de marqueur temporel à retrouver d'ici quelques années.
Bon, comme à mon habitude, je parle beaucoup dans l'introduction, mais la suite sera plus simple, efficace et directe :)
Jour 1
Voilà l'emplacement que nous avions choisi. Une faible pente herbeuse sur le bas du terrain.
On commence par délimiter le tout avec de grosses poutres et des piquets en châtaignier que nous trouvons dans la grange...
Et puis, nous commençons a creuser ce qui pourrait s'apparenter à une erreur, bien que nous préparions le terrain avec plus de 6 mois d'avance... En effet, en permaculture, on est pas sensé retourné la terre. Une des raisons invoquées, c'est que cela dérange le sol, enfouit les bactéries et micro-organismes qui vivent dans les premières couches de la terre et met à l'air libre ceux qui vivent plus profondément.
Mais je dois dire qu'à l'époque, nous ne savions rien de tout cela !
Notre idée était d'obtenir une zone plane et à force de creuser la pente et de déplacer la terre vers le bas, nous étions plus ou moins arrivé à notre objectif...
Tout le reste de cette première journée, nous avons créé un mur d'angle avec des planches de récupération et des piquets pour retenir la terre dans le sens de la pente. Je ne me rappelle pas forcément du reste de la soirée, mais je ne pense pas mentir en vous affirmant que nous avons bien dormi ^^ !
Jour 2
Après que nous nous soyons levés assez tôt, on part dans le champ d'en face pour récolter un maximum de bouses de vaches plus ou moins fraîches ou sèches. La diversité de ces états apporte en effet différents nutriments plus ou moins puissants ou avancés mais qui apporterons des nutriments quoiqu'il arrive !
Le reste de la journée, on ramène de la paille fraîchement coupé que l'on mélange avec du foin lui aussi trouvé dans les granges de la maison.
Nous créons aussi un petit amas de galets dans le coin gauche et qui dans mon souvenir, devait aussi bien servir à drainer qu'à capter un peu de la chaleur du soleil et à la restituer aux plantes que nous pensions planter-là. Des courges si je me rappelle bien...
Les outils sont rangés et tous ensemble nous prenons un ultime bain de soleil, de nouveau bien fatigués !
Jour 3
En cette troisième et dernière journée, nous continuons la structure de notre potager. Au point de vue des dimensions, je pense que celui-ci faisait environ 4 mètres par 3, soit une douzaine de mètres carrés.
Dans le prolongement de la diagonale qui suit la pente et en face de l'angle opposé, nous construisons un angle en bois inspiré du premier réalisé la veille. L'idée ici est tout simplement de retenir la terre de la plante, même si cela n'empêchera pas une grosse pluie de faire d'importants dégâts !
Pour terminer, nous finissons par mettre un important mélange de feuilles "mortes" tout dans des états de décomposition de la matière plus ou moins avancés...
Voilà, ce sera tout pour le récit de cette construction entre frères !
J'espère que cela vous aura inspiré et peut-être donné envie de commencer vous-même un potager. Sachez que je ne prétends pas avoir la science infuse et que je serai ravi d'avoir des retours sur la manière dont vous vous y prenez pour construire vos différentes couches et l'ordre de répartition de celles-ci !
Merci pour votre visite et le temps de votre lecture, prenez bien soin de vous et à très bientôt,
<3
Awesome!
I love seeing these enthusiastic first attempts, as they remind me of my own ones: Enthusiastic fellows who have read quite a bit but have zero experience, constantly second guessing themselves, like: "Is this actually permie?" - "Not sure, but it makes sense, so let's just do it."
Digging the soil I don't really consider that bad, as long as you don't do it regularly, or leave it exposed. But even when building a sheet-mulching bed, I like to stab the ground a good number of times with a fork, for aeration, water, and a general passageway for creatures.
I particularly enjoyed your little retaining wall that resulted from wanting to have a level plot on a slope. Very well done, but I bet you learned really fast that it would be easier to work with the slope instead. :-)
But I was so glad to see you hauling manure, straw, and leaves to your little field! So much better than poisoning it, or dumping a bunch of instant fertilizer (to be instantly washed away by the next rain).
Thanks for sharing! I can certainly say: "It's permie, it's all very permie!"
agreed :)
Thanks you for your long and detailed appreciation :D
At half of the making processI really enjoyed asking myself those kind of questions that appear from the action of doing it ! We indeed read a lot with my brother, but at that time, we lacked of real experience as this one was our first tangible ^^ !
Know I think we’ll do that a bit differently but on a close basis.. Still without any transformed chemicals, as I’m radically against those type of products !
Thanks again, can’t wait to start the new ones :) Have a good day 💫✌️
Que tout s'y passe bien.
!LOL
lolztoken.com
A toothbrush works much better.
Credit: reddit
@anttn, I sent you an $LOLZ on behalf of @itharagaian
(4/10)
Are You Ready for some $FUN? Learn about LOLZ's new FUN tribe!
Merci, en fait ce jardin a été réalisé il y a quelques années et comme c’est mon père qui n’a pas vraiment la main verte qui s’en est occupé, rien n’en est malheureusement vraiment ressorti 😂
Bonne journée à toi !
dommage
Oui en effet, on se « vengera » sur le prochain 🙃
Thank you for the supportive and well-appreciated energy 😊 !
Yay! 🤗
Your content has been boosted with Ecency Points, by @anttn.
Use Ecency daily to boost your growth on platform!
Support Ecency
Vote for new Proposal
Delegate HP and earn more
Love that bed, and can't wait to see your crops grow on it. Good evening!
Thank you ✌️ To be honest, I never saw anything one that patch, my father was supposed to take care of our plants and it didn't happen... Now this house is gone, but the experience is still here :)
Have a good weekend !
What a good layout for a vegetable garden it is my friend. Honestly, it is my first time to see something like this for here in my area we usually cultivate the soil and then plant directly on the soil cultivated but this one is indeed interesting. I assume that this garden has a healthy soil because of the components that you have mixed with the soul. I wish you success on this gardening my dear friend. I wish to see the plants and harvest at the most perfect time. Have a nice day and keep safe.
Thanks you for your kind words and supportive energy :D
I would be curious to see how you do... But for sure your soil must be rich and fertile !
Unfortunately, I never saw anything on this patch : my father was supposed to take care of our plants and it didn't happen... Now this house is gone, but the experience is still here :)
Have a good weekend ahead ✌️
Ohh! This is a lot of fun work that has many benefits for you. And in the future I want to make a wet garden.
For sure ! Oh, will be curious to see that ! I'm not familiar with this time of garden...
Have a good day 😉
a job that brings many benefits as well as a lot of fun, your layout is very beautiful. Thanks for your sharing
Thanks ! I'm glad you enjoyed this article 😊
That was nice! Good Job!
😉 Thanks ! ✌️
Absolutely! It's amazing how our knowledge and understanding of different cultivation strategies and materials evolve over time.
Indeed, even I'm more in the idea to renew the old and be inspired by this low-tech technics :)
Thanks for visiting @hotspotitaly 😇 I hope you're doing well and in advance, I wish you a good weekend ✌️
Il est vraiment beau ! Bonne chance pour ton projet ! J'ai plus ou moins le même mais avec une date finale très éloignée pour l'instant :') !PIZZA !LOL
lolztoken.com
The Allmond Brothers.
Credit: reddit
@anttn, I sent you an $LOLZ on behalf of @ykretz
(2/6)
Merci beaucoup :)
Je souhaite quand même pour toi que cela ne sera pas trop lointain 🤞😉
Bon dimanche à toi !
!PIZZA !LOL
lolztoken.com
All you could hear around there was “guac, guac, guac, guac.”
Credit: reddit
@anttn, I sent you an $LOLZ on behalf of @ykretz
(1/6)
Use the !LOL or !LOLZ command to share a joke and an $LOLZ
$PIZZA slices delivered:
@ykretz(1/5) tipped @anttn (x2)