Learning to Design a Permacultural Forest Garden and Playing with differents Layers
Some of you who know me here know that we finally found a house. Well, the purchase is in progress, but it will be good for the beginning of the summer :) Those of you who know me also know my love for Nature, what grows, grows and gives its fruits. But I think that in the end, few of you know my true passion for designing plans and especially via Illustrator software !
It's something I've kept from my years in art school, an environment and a way of thinking - let's say a way of life- where everything has to be aesthetically pleasing, not just beautiful because that's quite subjective, but rather that one feels that there is a reflection linked to the aesthetics behind it all.
And what could be better than to combine the useful with the pleasant and to train oneself to design a garden while seeking to make beautiful, visually interesting and instructive things ? I assure you, this article will be much less focused on the use of the software as such (you will already find enough tutorials on the Web), but much more on the questions related to the design of a permaculture garden forest.
But what is a garden forest ?
It is both very simple and quite complex when you get into the details... As its name suggests, the garden forest (or edible forest) is to be considered as a kind of super-organism composed of a host of other organisms that interact with each other, as happens naturally in a forest.
The idea is to imitate the forest environment in order to benefit from the incredible conditions of richness and biodiversity found there. Indeed, nobody waters the forest and yet it grows and develops year after year. Its soil is richer with each season and the connections between the soil, the tree roots, the bacteria, the fungi and all the micro-organisms are to be seen as a real fabric whose meshes are more and more tightly woven.
This is a permaculture concept that is quite old and has been traced back to ancient times, mainly in the warm and tropical regions of the world.
One of the richest places in terms of nutrients and biodiversity in forests are the clearings and edges. Indeed, in these places there is a subtle balance between light and shade, dry and wet, open and closed, aerated and stagnant, which allows dozens of different types of plants to grow in the same place, depending on whether you place vegetables that need shade at the back, fruit trees that need sun at the front, or plants from drier and warmer environments.
I don't yet have the means to go into detail about each species and even to be very precise, but I think you get the idea.
No, what I would really like to do and am looking forward to is to start all this in real life and share the different steps with you But that will come in due course and for the moment I am trying to use my time wisely to learn before putting it into practice.
The plan !
In the first part, I would like to present you the different steps I was able to put in place, all in as much detail as possible, and in the second part, I would like to tell you about the book resources or testimonials I was able to use.
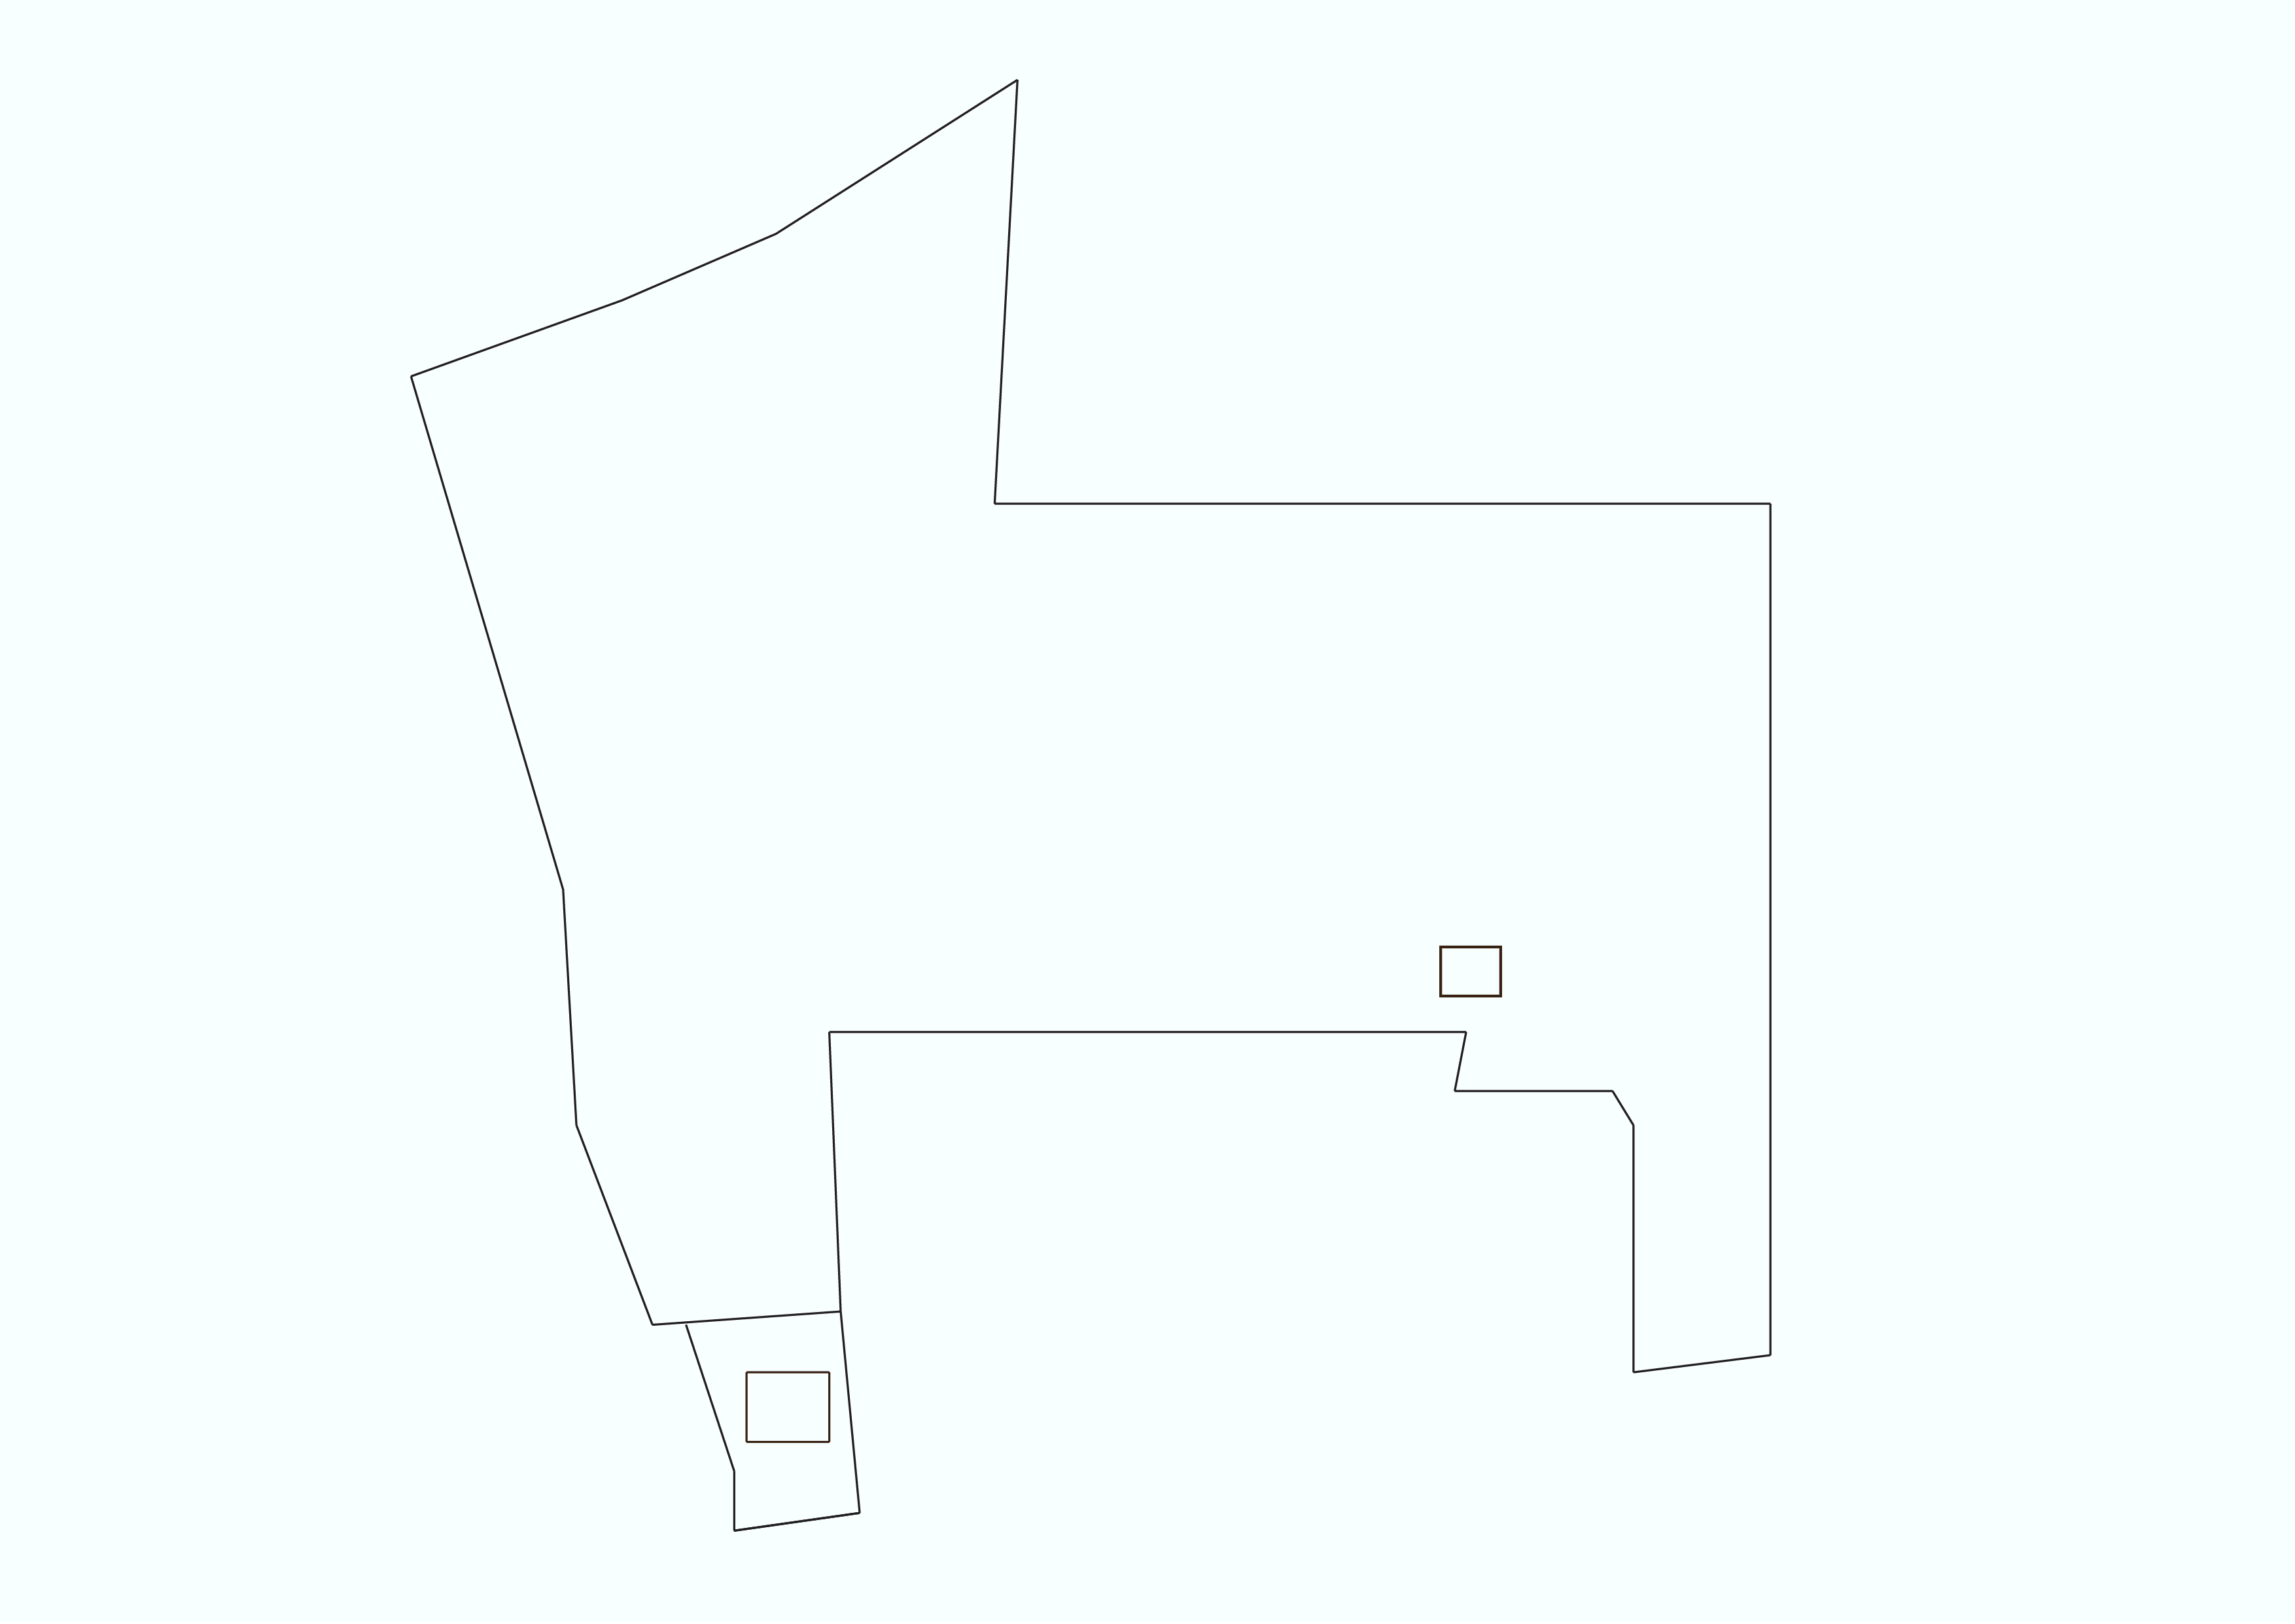
To make the image above, I took a screenshot of our field and opened it in Illustrator. I went back over the outline of the land and added the buildings.
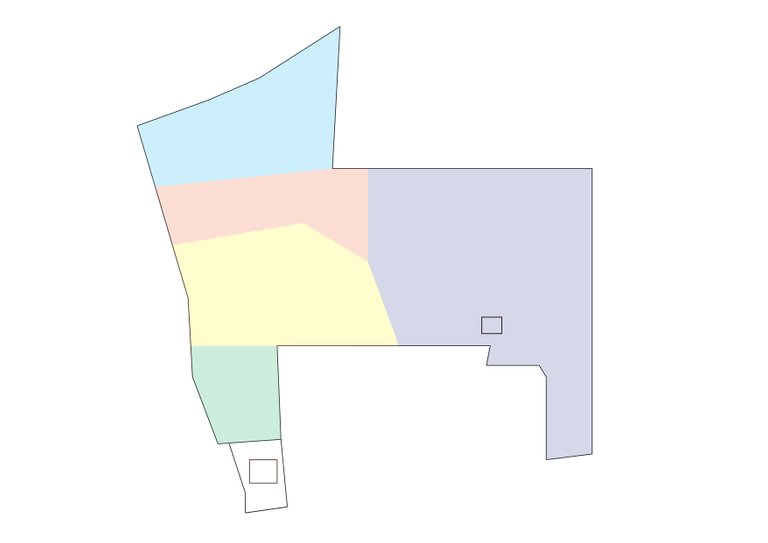
One of the principles of garden design is to create zones according to how much you will go to a place, how often and how much effort you can or want to put into it. Indeed, on almost two hectares like our future land, you can't be everywhere at once and it would be a kind of madness to think that it is possible to manage everything with the same energy.
The zones are therefore placed in relation to the house (the rectangle at the bottom) and the main vegetable gardens will therefore not be very far from it. Indeed, if you need to go back and forth a lot to water, look for tools or whatever, it is better to be close to your house! The successive areas will be more dedicated to trees and shrubs, flowers and even very large trees at the top.
To quickly describe the land, it is almost all sloping with flat areas, facing due south and with a well at the bottom, a very important factor to take into account and which we will see later...
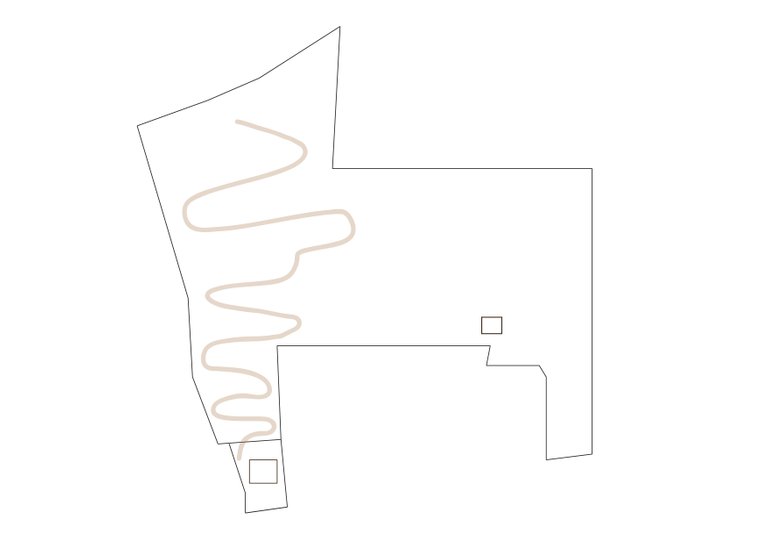
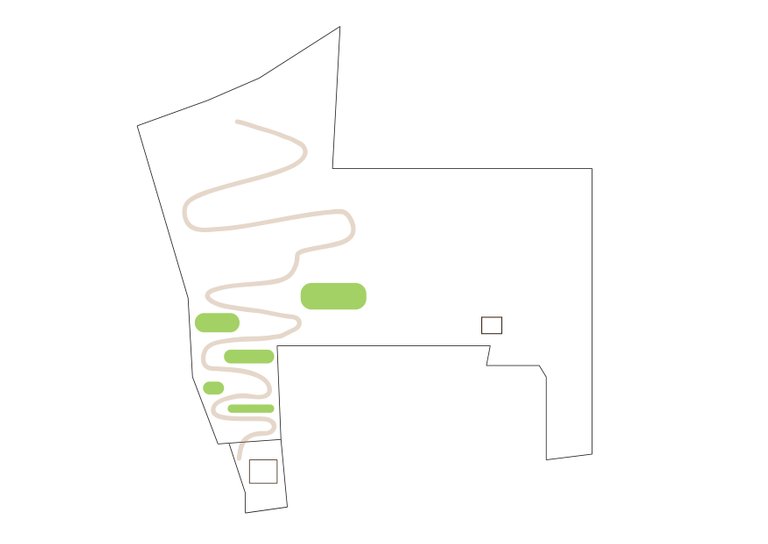

I then added a zigzagging path to make it easy to get back up to the top of the field, some vegetable gardens and finally, some ponds that I can't wait to create for real! Indeed, the land is very wet and as it is bordered by the forest on its northern part, I think we will not lack water !
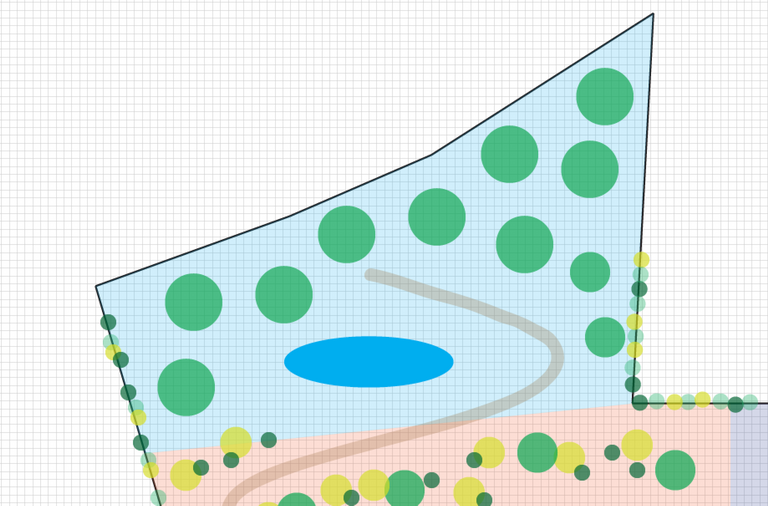
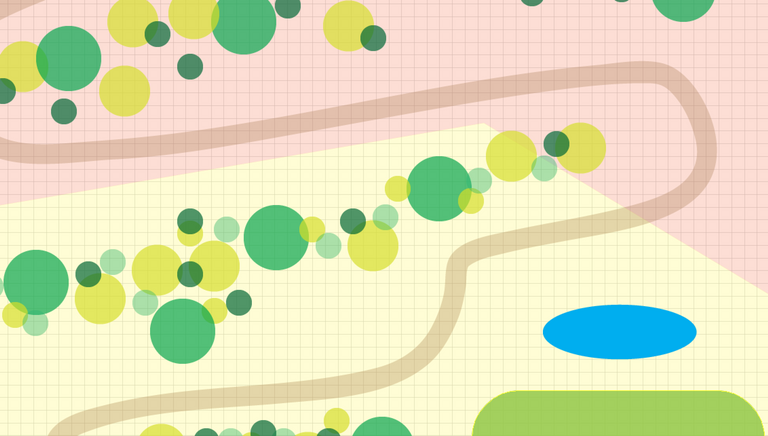
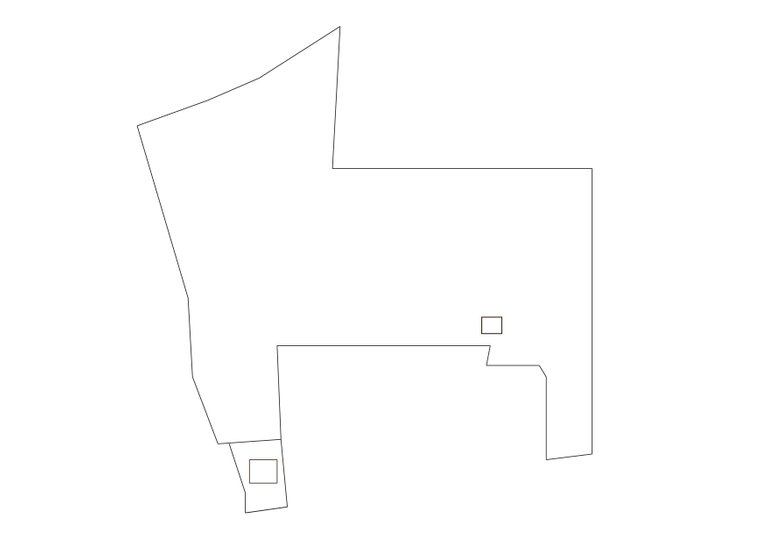
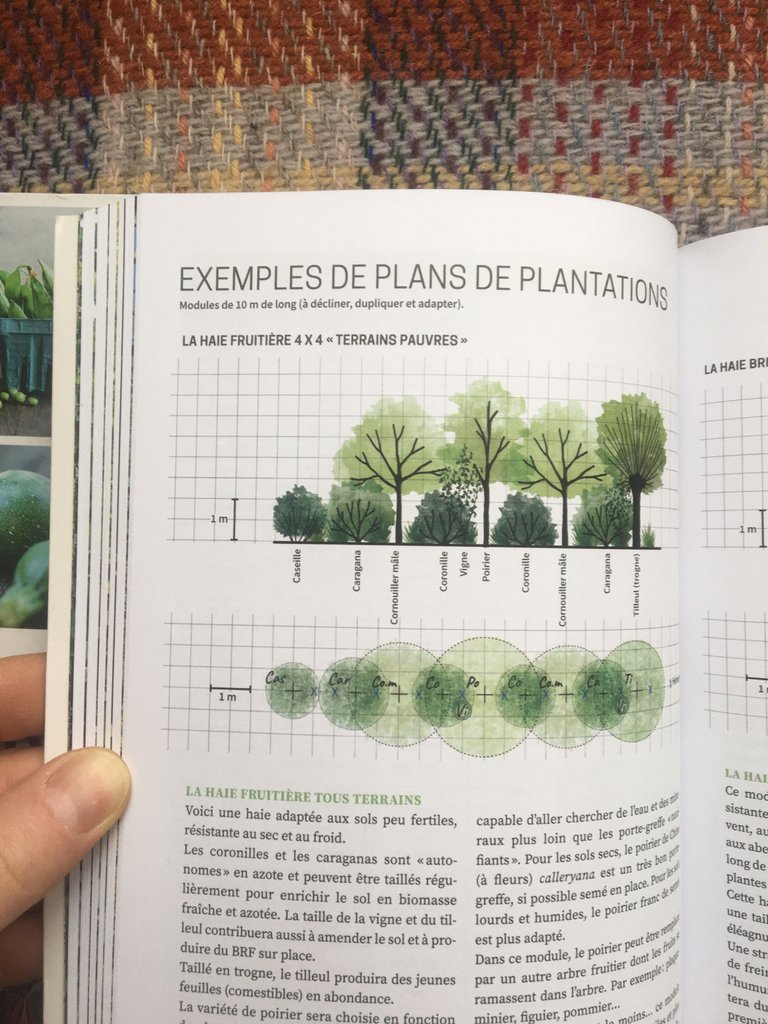
Here are some details of the other steps of the plan. Still in Illustrator, I added a grid where each tile, at my scale, represents one square meter. This is one of the most important parts of the plan, as it allows you to see the size of the different plant species and the diameter of large trees, for example, which can be as large as 7 to 10 meters for some. Of course, at the time of planting, the trees and other plants are quite small, but you have to foresee this from the start!
So I created several circles with diameters of 1 meter up to almost 6 in my memory. The idea is to realize how many species we could accommodate on this ground... Obviously, quite a lot ^^ !

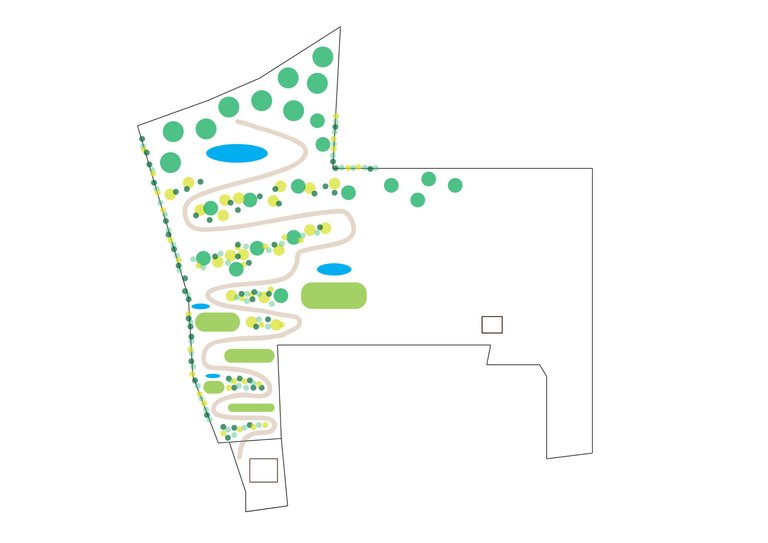
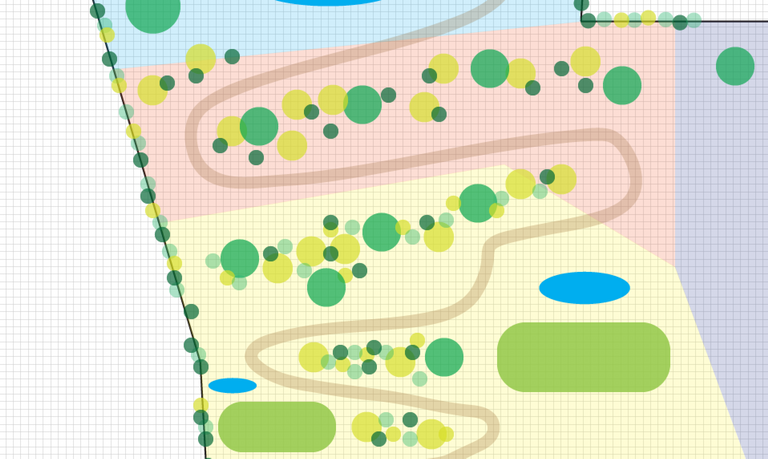
This is the result after adding the trees, removing the colored areas and also putting some hedges on some sides.
Of course, this is all very hypothetical and conceptual at the moment, but there is a good chance that important parts of this plan will see the light of day. The idea is not to stick to the plan, but rather to think ahead !
The resources I have used
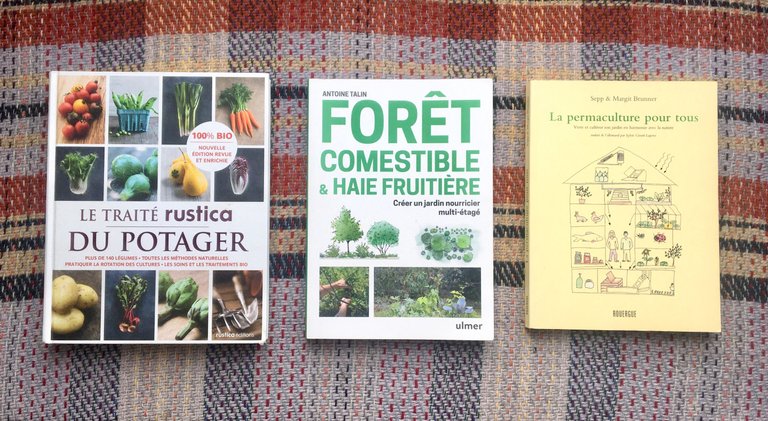
To conclude this article presenting my progress, I would like to present some of the books that accompany me in this research and learning...
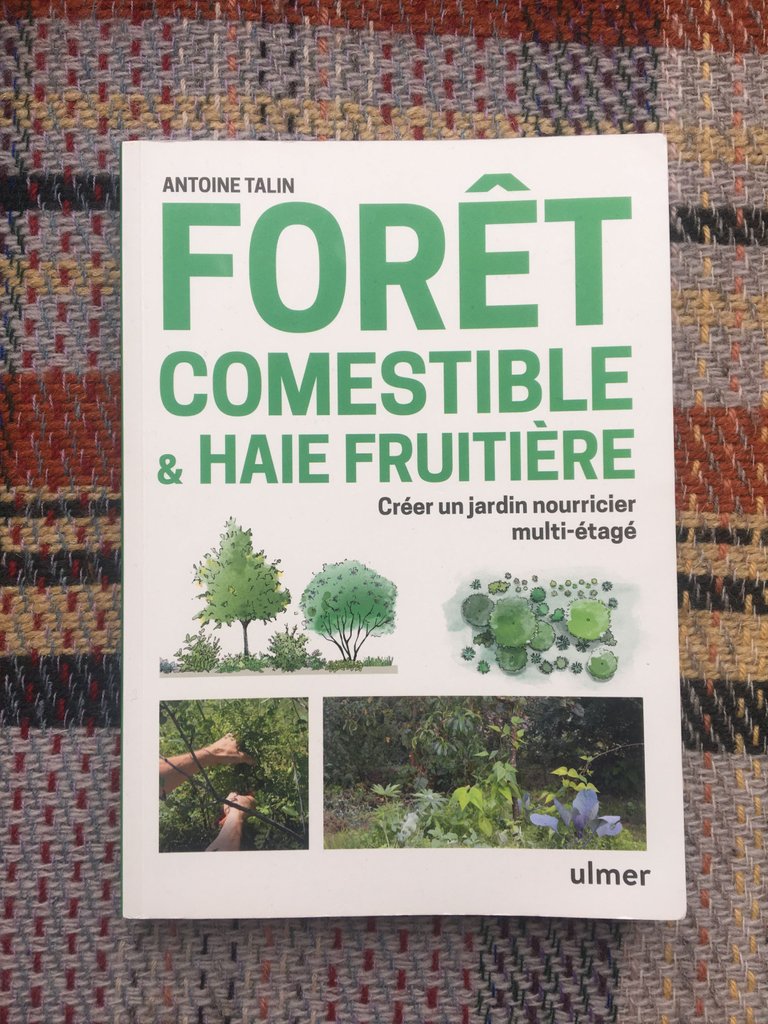
The first one, and the one I'm reading the most at the moment, is this one, which, as its name suggests, is primarily about garden forests... The book is really very accessible and at the same time very technical, it is a real mine of knowledge yet to be discovered !
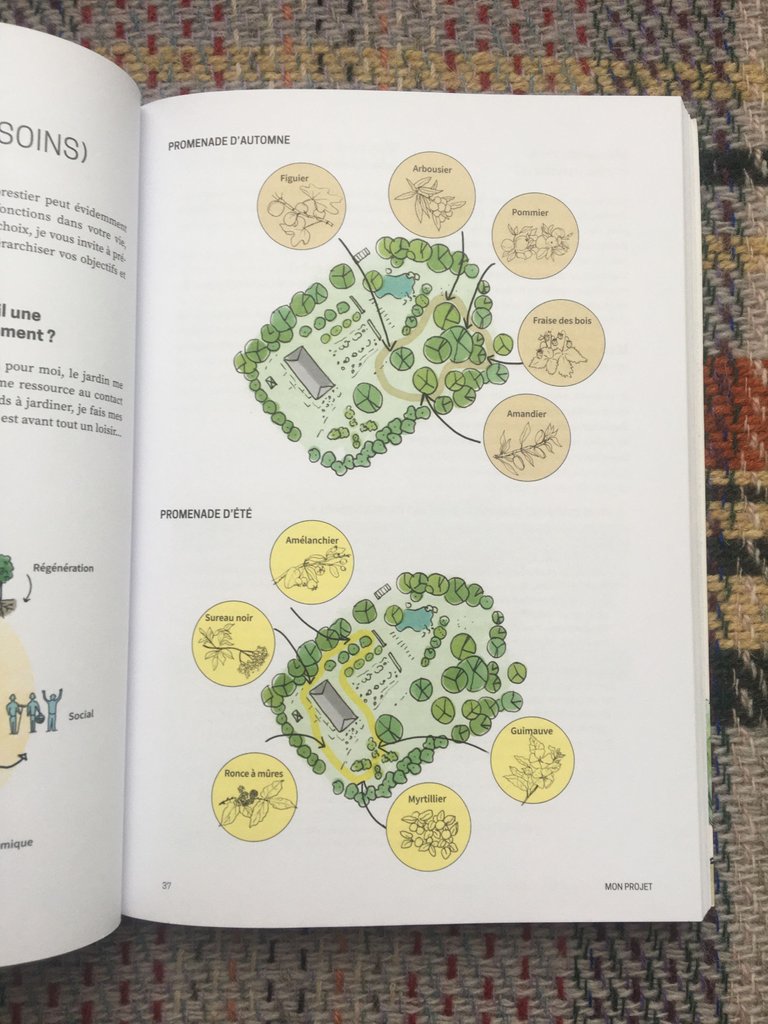
We find in particular the various hedges and paths to be created according to the zones of cultures, plantations and then according to the seasons of course...
The second one is mainly dedicated to the different species and varieties of vegetables. With almost 160 types of vegetables and very readable and detailed cards, I should have plenty to do !
Finally, although there are others that I consult in parallel, the third is a more general book on permaculture and deals in a broader way with the different aspects of designing a permaculture garden and the philosophy linked to this whole movement of thought and life. There are many practical cases and good tips that I can't wait to put into practice !
Voilà, that's all for today !
I hope this article has interested you and I will be delighted to have your feedback in the comments, even if it is still quite difficult to understand without seeing many images of the field in real life :)
Thanks for reading, take good care of yourself and your loved ones,
<3
Quelques uns parmi vous qui me connaisse ici savent que nous avons enfin trouvé une maison ! Bon, l'achat est en cours, mais ce sera bon pour le début de l'été :) Ceux-là connaissent aussi mon amour pour la Nature, ce qui pousse, croît et donne ses fruits. Mais je pense qu'au final, peu d'entre vous connaissent ma véritable passion pour la conception de plans et particulièrement via le logiciel Illustrator !
C'est quelque chose que je garde de mes années en école d'art, un milieu et un mode de pensée - disons carrément de vie ! - où tout doit être esthétique, non pas simplement beau car cela est bien subjectif, mais plutôt que l'on sente qu'il y a une réflexion lié à l'esthétique derrière tout cela.
Et quoi de mieux que de joindre donc l'utile à l'agréable et à s'entraîner à concevoir un jardin tout en recherchant à faire de belles choses, visuellement intéressantes et instructives ? Je vous rassure, cet article sera beaucoup moins tourné vers l'utilisation du logiciel en tant que tel (vous trouverez déjà bien assez de tutoriels sur le Web), mais bien davantage sur les questionnement liés à la conception d'une forêt-jardin en permaculture.
Mais qu'est-ce qu'une forêt-jardin ?
C'est à la fois très simple et assez complexe lorsque l'on rentre dans le détail... Comme son nom l'indique, la forêt-jardin (ou forêt comestible, nourricière) est à considérer comme une sorte de super-organisme composé par une foule d'autres organismes qui interagissent entre eux, comme ce qui se passe de façon naturelle dans une forêt.
L'idée est donc d'imiter l'environnement forestier afin de bénéficier des conditions incroyables de richesse et de biodiversité que l'on y trouve. En effet, personne n'arrose la forêt et pourtant, elle pousse et se développe d'années en années. Son sol est plus riche à chaque saison et les connexions entre le sol, les racines des arbres, les bactéries, les champignons, et tous les micro-organismes sont à voir comme un véritable tissu dont les mailles sont de plus en plus resserrées et solidaires.
C'est un concept permaculturel qui est assez ancien et dont on retrouve des traces qui remontent à la nuit des temps, principalement dans les régions chaudes et tropicales du monde.
Un des endroits les plus riches en termes de nutriments et de biodiversité dans les forêts ce sont les clairières et les lisières. En effet, on retrouve dans ces endroits un subtil équilibre entre lumière et ombre, sec et humide, ouvert et fermé, aéré et stagnant qui permet de faire pousser des dizaines de types de plantes différentes au même endroit suivant qu'on place les légumes qui on besoin d'ombre un peu à l'arrière, les arbres fruitiers qui nécessitent du soleil à l'avant avec les plantes issues de milieux plus secs et chauds.
Je n'ai pas encore les moyens de rentrer dans le détail de chaque espèce et même d'être très précis, mais je pense que vous avez compris l'idée.
Non, ce que je voudrais vraiment et dont j'ai hâte, c'est de commencer tout cela en réel et de partager avec vous les différentes étapes ! Mais cela viendra en temps et en heure et pour le moment, j'essaye d'utiliser mon temps à bon escient pour apprendre avant de mettre en pratique.
Le plan !
Dans la première partie, je voudrais vous présenter les différentes étapes que j'ai été en mesure de mettre en place, le tout avec le plus de détail et dans un second temps, j'aimerai vous parler des ressources de livres ou de témoignages que j'ai pu utiliser.
Pour réaliser l'image ci-dessus, j'ai pris une capture d'écran de notre terrain et je l'ai ouvert sur Illustrator. J'ai repassé sur les contours du terrain et j'ai ajouté les bâtiments
Un des principes que l'on retrouve dans les différentes conceptions de jardins, c'est de créer des zones suivant que l'on se rendra plus ou moins à un endroit, à quelle fréquence et quel effort on pourra ou voudra y dédier. En effet, sur presque deux hectares comme notre futur terrain, vous ne pouvez pas être partout à la fois et ce sera une sorte de folie de penser qu'il est possible de tout gérer avec la même énergie.
Les zones sont donc placées par rapport à la maison (le rectangle en bas) et les potagers principaux seront donc pas très loin de celle-ci. En effet, si vous avez besoin de faire beaucoup d'allers-retours pour arroser, chercher des outils ou que sais-je, mieux vaut être près de votre habitation ! Les zones successives seront plus dédiés à des arbres et arbustes, à des fleurs et même à de très grands arbres tout en haut.
Pour vous décrire rapidement le terrain, celui-ci est presque tout en pente avec des zones plus planes, orienté plein sur et avec un puit en bas, une donnée très importante à prendre en compte et que nous verrons plus loin...
J'ai ajouté ensuite successivement, un chemin qui zigzague pour que cela soit aisé de remonter en haut du terrain, des zones de potagers et pour finir, quelques mares que j'ai hâte de créer pour de vrai ! En effet, le terrain est très humide et comme il est bordé par la forêt sur toute sa partie nord, je pense que nous ne manquerons pas d'eau !
Voici quelques détails des autres étapes du plans. Toujours sur Illustrator, j'ai ajouté une grille dont chaque carreau ramené à mon échelle, représente un mètre carré. C'est un des parties très importante pour se rendre compte de la taille des différentes espèces végétales et du diamètres par exemple des grands arbres qui peut aller de 7 à 10 mètres pour certains. Bien-sûr, au moment où l'on plante, les arbres et autres végétaux sont assez petits, mais il faut prévoir cela dès le départ !
J'ai donc créer plusieurs cercles de diamètres de 1 mètre allant jusqu'à presque 6 dans mon souvenir. L'idée est de se rendre compte de la quantité d'espèces que l'on pourrait accueillir sur ce terrain... Manifestement, une assez belle quantité ^^ !
Voilà le résultat après avoir ajouté les arbres, retiré les zones de couleurs et aussi mis quelques haies sur certains côtés.
Bien entendu, tout cela reste très hypothétique et conceptuel pour le moment, mais il y a de bonnes chances que des parties importantes de ce plans voient le jours. L'idée n'est pas de coller au plan, mais plutôt de se projeter !
Les ressources que j'ai utilisées
Pour terminer cet article de présentation de mes avancées, je voudrais vous présenter quelques uns des ouvrages qui m'accompagnent dans cette recherche et cet apprentissage...
Le premier et celui que je lis le plus en ce moment, c'est celui-ci et qui comme son nom l'indique, traite avant tout des forêts-jardins... Le livre est vraiment très accessible et en même temps très technique, c'est une véritable mine de savoirs encore à découvrir !
On retrouve notamment les différentes haies et parcours à créer suivant les zones de cultures, de plantations et puis suivant les saisons bien-sûr...
Le second est essentiellement consacré au différentes espèces et variétés de légumes. Avec presque 160 types de légumes et des fiches très lisibles et détaillées, je devrais avoir de quoi faire !
Pour terminer, et même s'il y en a d'autres que je consulte en parallèle, le troisième est un livre plus généraliste sur la permaculture et qui traite de façon plus large des différents aspects de la conception d'un jardin en permaculture et de la philosophie liée à tout ce mouvement de pensée et de vie. On trouve beaucoup de cas pratique et de bonnes astuces qu'il me tarde de mettre en pratique !
Voilà, c'est tout pour aujourd'hui !
J'espère que cet article vous aura intéressé et je serai ravi d'avoir vos retours et impressions dans les commentaires, même si cela reste encore assez difficile à cerner sans voir beaucoup d'images du terrain en réel :)
Merci pour votre lecture, prenez bien soin de vous et de vos proches,
<3
https://twitter.com/969234325966344192/status/1642917133569933313
https://twitter.com/82862126/status/1642927111726940174
The rewards earned on this comment will go directly to the people( @anttn, @thetimetravelerz ) sharing the post on Twitter as long as they are registered with @poshtoken. Sign up at https://hiveposh.com.
Thanks for the supportive energy ✌️😘
Yay! 🤗
Your content has been boosted with Ecency Points, by @anttn.
Use Ecency daily to boost your growth on platform!
Support Ecency
Vote for new Proposal
Delegate HP and earn more
✒️ Pour le partage de ces idées de plan pour des permacultures, nous vous offrons 💝50 points-fr 💝, un reblogue, un mini-upvote
🎁 Recevez en plus un bonus de 3 points-fr pour votre sélection et ce pourboire : !LUV !GIF nature
💰 Plus de Tokens de 2eme couches vous attendent dans les posts de sélections et de récompenses
Récompense Multi-engagements des Francophones
Via Tenor
@anttn, @bonus-fr(1/10) sent you LUV. | tools | discord | community | HiveWiki |
  NFT | <>< daily
https://leofinance.io/threads/@thetimetravelerz/re-leothreads-21djbykuc
The rewards earned on this comment will go directly to the people ( thetimetravelerz ) sharing the post on LeoThreads,LikeTu,dBuzz.
My favorite element in Permaculture by far is the work with edges and this is true within the initial design and later after the system has been laid out. edges are anywhere to be found, not only in forests but throughout the landscape. a terrace creates an edge, a waterline has edges, a road has edges and so on. every type of edge can be used in different ways depending on the features it offers. humidity can invite certain plants, shade, others that need it. an edge can be used as a windbreaker, a fire barrier, can provide ideal conditions near it for young plants that need them to establish. around a pond, the edge provide specific conditions for both plants and wildlife where they can thrive and benefit from it. in this specific case, the edge of an artificial water source can be enhanced and extended. while a round pond would have say a circumference of 10m., it could be greatly extended if we design a flower shape pond.
once the effect of edges is assimilated, it can never again be unseen or forgotten. it becomes a second nature and a great tool to work with through any bit of design in the present and into the future.
I share your excitement for this project !
and I would like to share with you this article that I really like and that is very relevant to our heritage here in Europe. I trust you will find this useful:
https://www.shelterwoodforestfarm.com/blog/the-lost-forest-gardens-of-europe
all the best.
This is indeed one of the main elements to play with..! It’s funny, I’m currently reading a book about the place of boundaries in Japan, inside the buildings or more over the garden.. You can check it, the author is Ito Teiji :)
Mmh, I would love a flower pond like the one you’re talking about! Thanks also for that link you sent me, still need to go and see, but I trust you on the passionate aspect of it 😉
Take good care dear !
This is something new for me as I am gardening base on what I have learned when I am young. It seems you really know more about it and glad you can apply it your garden.
There'll always something to learn that we didn't know in the morning 😄 !
Thank you for visiting dear @jenthoughts 😘 ✌️
I look forward to hearing more about how things progress! I also have property that I've been dreaming about developing into a food forest for years now. Two properties actually. However, my job and family have kept me from doing any actual work on it. However the kids are almost grown and I'm gearing myself to leaving my full time job to be a full time agroforester.. or permaculturalist.. or whatever I'll be called!
I'm not saying much about it yet to the community because I want better photo's before I do but thought I'd share a sneak peak here ;)
Got some space cleared so I can actually park a vehicle. Before now there wasn't even a roadway to the property! This area was covered with thin pines so scrawny you could push them over with your hand. No valuable trees. I'm hoping to start with clover as ground cover and go from there. Hopefully putting in a few camping spots so nature enthusiasts can have a place to stay and look around.
I have 20 acres of oldish (150+ year) forest and wetlands that I want to protect as much as I can. This is a picture of some of it.
The remaining 35 acres I hope to turn into food forest for animals and people alike.
Good luck on your project. Hopefully I can learn something from you as I'm doing my own 😁
This is seems so perfect dear @terganftp ! I hope you'll managed to launch yourself more and as I you want too soon ! I will also look forward to follow that advance of you 😇 😉 ! This is great you have that much forest on your land, on our side, we are surrounded by forest, but there isn't so much trees on the parcels...
Thanks for showing up, I happy we discovered each other 😊 May you have a good weekend with your family !
PS: Can I ask you where you are located ?
It is not ready for visitors yet but here are a few images :
Surrounded by mountains on all sides. With thick forest all around. 2km from the local store. 3km from a very large freshwater lake with great fishing.
On a little bigger map so you can actually find it on a map. If you don't know where that is, British Columbia is on Canada's West Coast.
I'm less than 500m from this park
https://bcparks.ca/kitsumkalum-lake-north-protected-area/
Brief description
(from Parks Canada website)
(from photos canada.com)
(from kitsumkalum.com)
My dream? Have a HIVE outpost here where any Hive member can come, enjoy, and relax. Not some expensive resort or nature retreat but rather a place to visit as friends. Maybe not realistic dream but my dream nonetheless.
Hope you enjoy and maybe come visit sometime
This just seems like heaven ! I understand why you may be impatient to get to work more and invest yourself in that environnement !
This would be awesome ! And I would love to come to visit you and your lands, that could be the first time I come in Canada :)
Thank you for the detailed infos... If there is an apocalyptic event, you can count on me haha 😉 even if I would prefer to join in more peaceful conditions ^^
I have a gravel road in place to access 20 x 1 acre pieces of land. Flat and dry (previously logged 20yrs ago). A much better road to the 2 acre piece you saw and a walking path through the remaining 30+ acres of big trees and wetland. If I could find nature minded people like yourself who want to come join me I'd be a happy man in my retirement. You would be most welcome to join or visit anytime. I will admit that while I'm Canadian.... Je ne peut pas parlais en francais bien, un peu seulement
We are currently in the process of buying our first house in France and I think it's already going to take us quite a while, but who knows what life will throw at us ^^ ? I imagine that with people invested locally, it must already be possible to do great things!
Oh, I guess your fluent French will always be better than my English haha !
Good day to you :)
Nice reportings on progress to come from you then @anttn, thanks for sharing, wish you the best+ for your land work, and fun too.
Merci 😊 J'espère que tu vas bien 🤞 !
excuses moi j'avais du mal a comprendre ce que j'ai moi meme ecrit je voulais dire que nous attendrons de savoir comment tes travaux progressent par tes super reportages et quant au reste il est plus comprehensible, desole nous te souhaitons le meilleur dans tes plans et projets and... have fun!
Pas de soucis, on a hâte en effet de commencer ! Ce sera sûrement pour le tout début de l'été 😇
Bonne soirée et à bientôt !
Not bad, having a sloping triangle facing south! Though that's more like just one hectare then if you keep that eastern area as your zone five. Looking forward to see the implementation.
Yeah, it's even better than what we ever dream of ! In fact it's almost two so I think we'll start slowly.. at the beginning though ^^ !
I'm really impatient to start for real needless to say :)
Take care ✌️