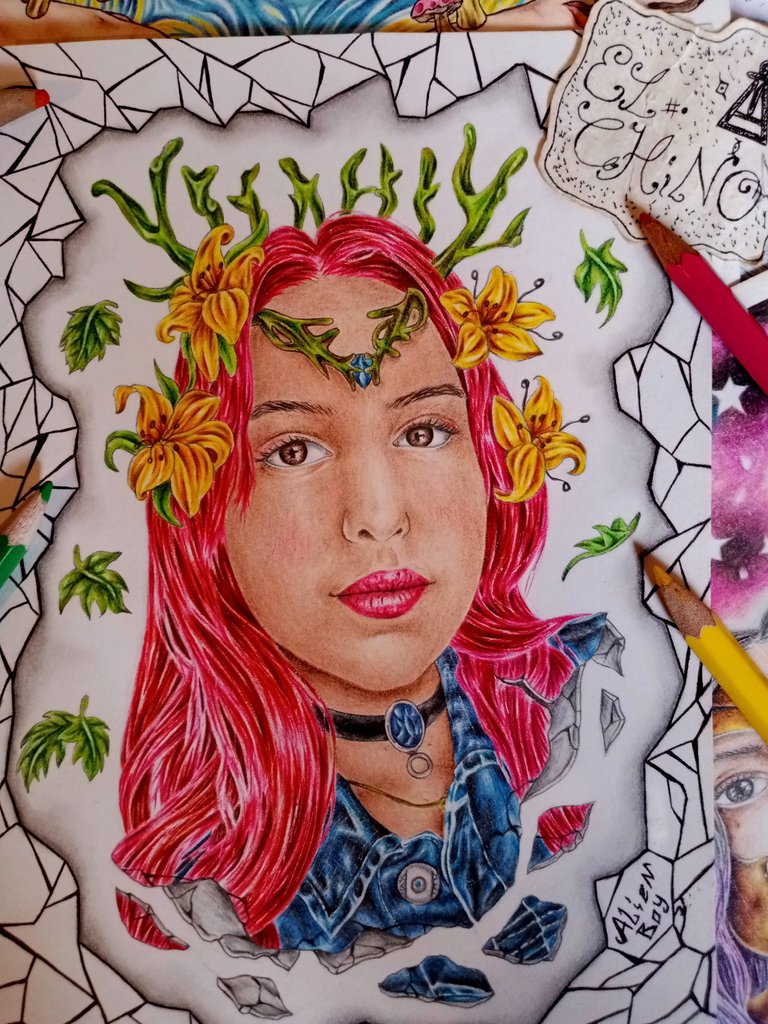
¡Arte: La Dama Del Bosque - Art: The Lady Of The Forest! [ESP | ENG]
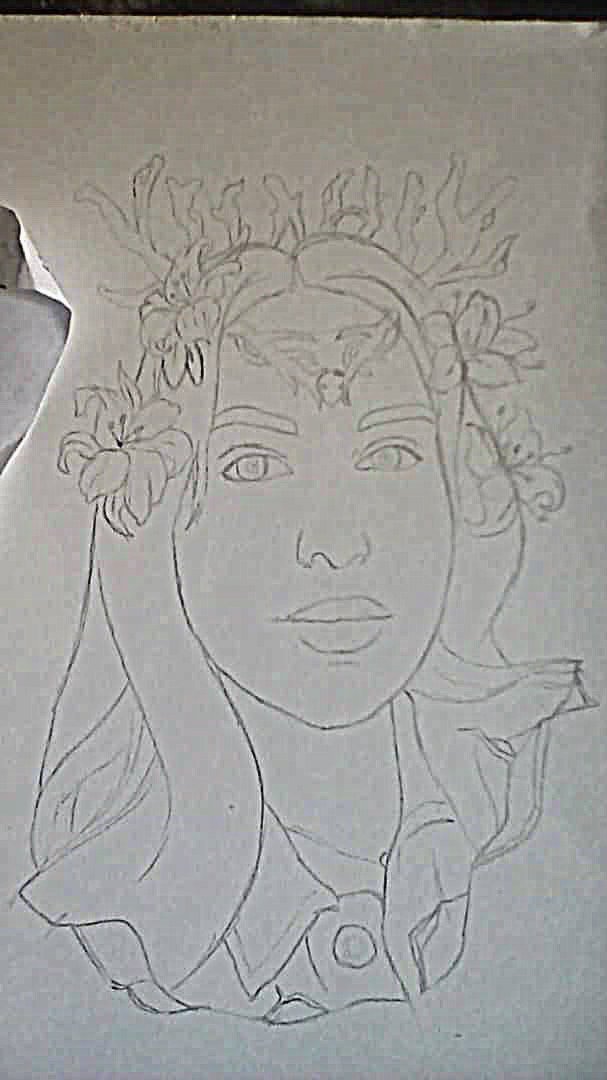
Hola a todos, Espero se sientan muy bien, Esta es mi tercera publicación. Les contaré de manera algo detallaba el procedimiento que seguir para este diseño. Para este dibujo use como referencia la foto de una hermosa señorita llamada: Majo, Mi idea era retratarla ella pero como una princesa del bosque, Con una corona hecha de plantas y flores a su alrededor
Materiales:
*Lápiz de grafito HB
*Cartulina de dibujo
*Colores: Faber-Castell (48)
*Prismacolor Escolares (24)
.
Hello everyone, I hope you are feeling well, this is my third publication. I will tell you in detail the procedure to follow for this design. For this drawing I used as a reference the photo of a beautiful lady called: Majo, My idea was to portray her but as a princess of the forest, with a crown made of plants and flowers around her.
Materials:
*Graphite pencil HB
*Drawing paper
*Colors: Faber-Castell (48)
*School Prismacolor (24).

Paso- 1:
Para el boceto utilice un lápiz HB, Lo primero que hago en cada boceto son figuras básicas siempre suelo iniciar por los ojos en caso de ser un rostro, Una vez que termine el rostro continúe con la corona que esta hecha con ramas de árbol para luego seguir con las flores que se encuentran alrededor de su cabello. Realice un boceto simple ya que la mayoría de los detalles se los daré en el coloreado.
Step- 1:
For the sketch I use a HB pencil. The first thing I do in each sketch are basic figures, I always start with the eyes in case of a face, once I finish the face continue with the crown that is made with tree branches and then continue with the flowers that are around her hair. Make a simple sketch since I will give you most of the details in the coloring.
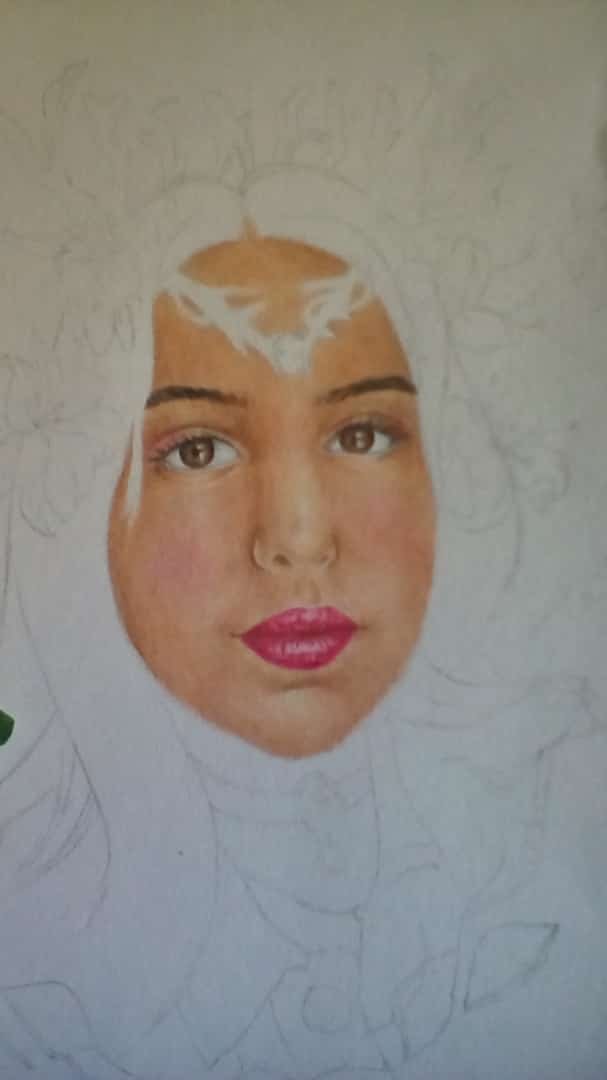
Paso-2:
Una vez terminado el boceto principal lo borre un poco para que cuando lo empiece a colorear se note realista, Lo primero que inicie coloreando fue la parte de los ojos, Aquí utilice los siguientes colores: Marrón, Gris, Café oscuro y color negro. Inicie con el tono de color más claro en este caso el marrón, Luego de eso lo combine con el café oscuro alrededor del iris y teniendo mucho cuidado de no colorear en las zonas de brillo en el ojo, Luego aplique el color negro en la pupila, Con el mismo colore negro pero con la punta muy afilada hice las pestañas y cejas, Para luego usar levemente el gris en la zona blanca del ojo.
Lo siguiente que continúe fue la piel, Aquí utilice los colores: Marrón, Rosa claro, Color carne.
Inicie identificando las zonas más con sombra en la piel allí aplique el marrón levemente con capas para luego utilizar el rosa claro combinando muy bien los colores, Por ultimo utilice el color carne literalmente en toda la piel.
Luego continúe con los labios aquí utilice los colores: Café oscuro, Rojo y rosado.
Lo primero que hice fue pasar el rosado por todo el labio tanto el inferior como el superior, Para luego usar el café oscuro para las zonas más oscuras de los labios principalmente el centro, Ese mismo café oscuro lo combine con el color rojo que es el color que más debe de resaltar, Finalmente para crear un difuminado utilice nuevamente el rosado en las zonas más claras.
Step-2:
Once finished the main sketch I erased it a little bit so that when I start coloring it it will look realistic, The first thing I started coloring was the part of the eyes, Here I used the following colors: Brown, Gray, Dark brown and black color. I started with the lightest color tone in this case the brown, After that I combined it with the dark brown around the iris and being very careful not to color in the areas of brightness in the eye, Then I applied the black color in the pupil, With the same black color but with the very sharp tip I did the eyelashes and eyebrows, Then I slightly used the gray in the white area of the eye.
The next thing I continued was the skin, here I used the colors: Brown, Light pink, Flesh color.
Start by identifying the most shaded areas on the skin, there apply the brown lightly with layers and then use the light pink combining the colors very well, finally use the flesh color literally all over the skin.
Then continue with the lips here I used the colors: dark brown, red and pink.
The first thing I did was to pass the pink all over the lip both the lower and upper, then use the dark brown for the darkest areas of the lips mainly the center, That same dark brown combine it with the red color that is the color that should highlight the most, Finally to create a blurred use again the pink in the lighter areas.
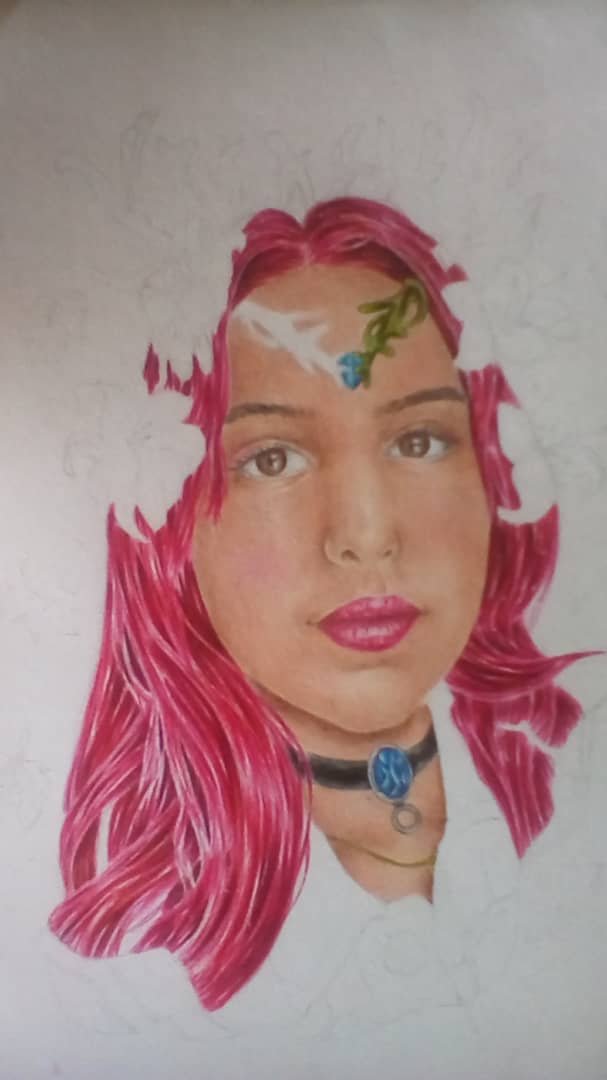
Paso-3:
Luego continúe con el cabello aquí use los colores: Café oscuro, Marrón, Rojo y rosado.
Aquí literalmente realice cada cabello individualmente por mechón, Iniciando con el color más claro en este caso el rosado. Luego el rojo que es el color que más debe de resaltar, En las zonas más oscuras utilice el café oscuro y el marrón. Cabe recalcar que hubo zonas donde no aplique ninguno de estos colores, Principalmente donde este ubicada una flor o parte de la corona.
Lo siguiente que coloree fue la corona de ramas y las hojas con los colores: Verde selva, Verde césped, café oscuro y azul cielo.
Primero combines los dos colores verde selva y verde césped en toda la corona, Para luego utilizar el café oscuro levemente en todas las zonas oscuras creando un difuminado con el verde principal, Para la pequeña gema que esta en delante de la corona ósea en la frente de la chica utilice el azul cielo para luego mezclarlo con el café oscuro, y por ultimo en cada una de las hojas que se encuentran alrededor realice el mismo procedimiento que en la corona.
Step-3:
Then continue with the hair here using the colors: Dark Brown, Brown, Red and Pink.
Here literally do each hair individually per strand, starting with the lightest color in this case pink. Then the red which is the color that should stand out the most. In the darker areas use dark brown and brown. It should be noted that there were areas where I did not apply any of these colors, mainly where a flower or part of the crown is located.
The next thing I colored was the wreath of branches and leaves with the colors: Jungle green, grass green, dark brown and sky blue.
First combine the two colors jungle green and grass green in the entire crown, and then use the dark brown slightly in all the dark areas creating a blur with the main green, for the small gem that is in front of the crown, in the forehead of the girl I used the sky blue and then mix it with the dark brown, and finally in each of the leaves that are around I did the same procedure as in the crown..
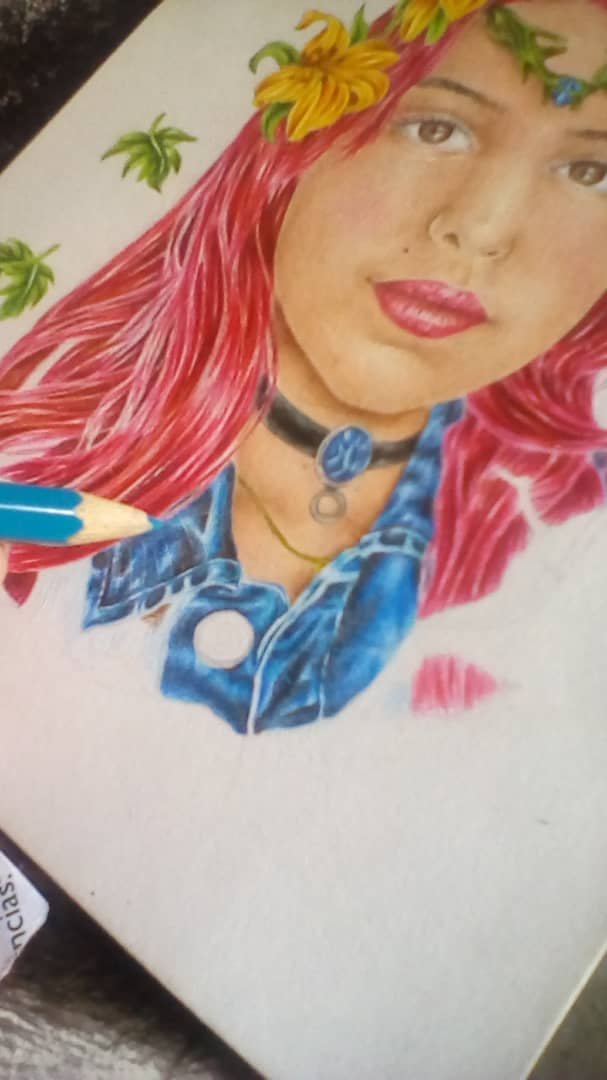
Paso-4:
Para la ropa utilice los siguientes colores: Azul marino, Azul cielo, negro y gris.
El primer color que aplique fue el color azul cielo por toda la zona de la ropa para luego usar el color negro en la zonas mas oscuras, Ese mismo color lo combine con el azul marino y así crear un degradado con arrugas de tela, Por último use una hojilla para pasarla de manera no muy uniforme para crear la textura de tela. Como se puede ver en la imagen final el dibujo esta algo agrietado debajo de la chica, Esa zona la coloree solo con gris
Para el fondo solo utilicé un bolígrafo y gris. Use el bolígrafo para crear las líneas del fondo aleatorias y luego aplique el color gris sin mucha fuerza alrededor del todo el dibujo principal.
Step-4:
For the clothes I used the following colors: navy blue, sky blue, black and gray.
The first color that I applied was the sky blue color all over the clothing area and then I used the black color in the darkest areas, I combined that same color with the navy blue to create a gradient with fabric wrinkles, Finally I used a blade to pass it in a not very uniform way to create the texture of fabric. As you can see in the final image the drawing is somewhat cracked under the girl, I colored that area only with gray.
For the background I only used a pen and gray. Use the pen to create the random lines of the background and then apply the gray color without much force around the whole main drawing.
0
0
0.000
Congratulations @alien-boy! You have completed the following achievement on the Hive blockchain And have been rewarded with New badge(s)
Your next target is to reach 500 upvotes.
You can view your badges on your board and compare yourself to others in the Ranking
If you no longer want to receive notifications, reply to this comment with the word
STOPCheck out our last posts:
Contáctenos para saber más del proyecto a nuestro servidor de Discord.
Si deseas delegar HP al proyecto: Delegue 5 HP - Delegue 10 HP - Delegue 20 HP - Delegue 30 HP - Delegue 50 HP - Delegue 100 HP.
¡Muchísimas gracias! 🌙
Me gustan mucho tus dibujos, y más porque son hechos a mano y no digitalmente, creo que le agrega valor, aunque ahora todo lo hacen digitalmente.
Pero de esta manera muestras tu talento. Excelente.
¡Muchísimas gracias señorita!
En eso tiene toda la razón, Es arte manual es bastante mejor 👽
palante no se aflija yo también comense dando tropiezos pero lo mejor es el arte que tu realiza con tus manos éxitos.
👏👏👏