Look oscuro con reflejos rosa y delineado de alas🖤💗 // Dark look with pink highlights and winged eyeliner🖤💗
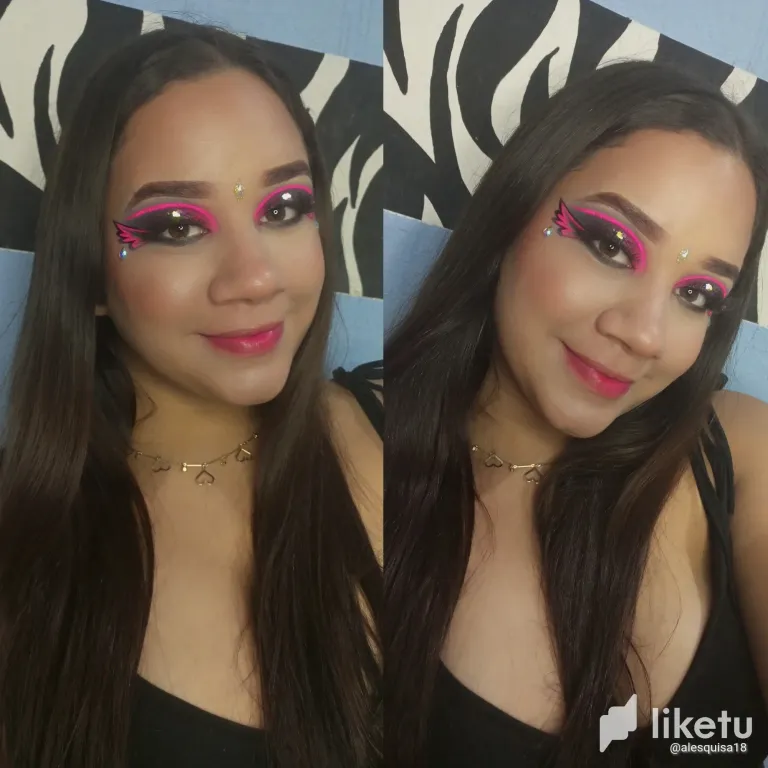
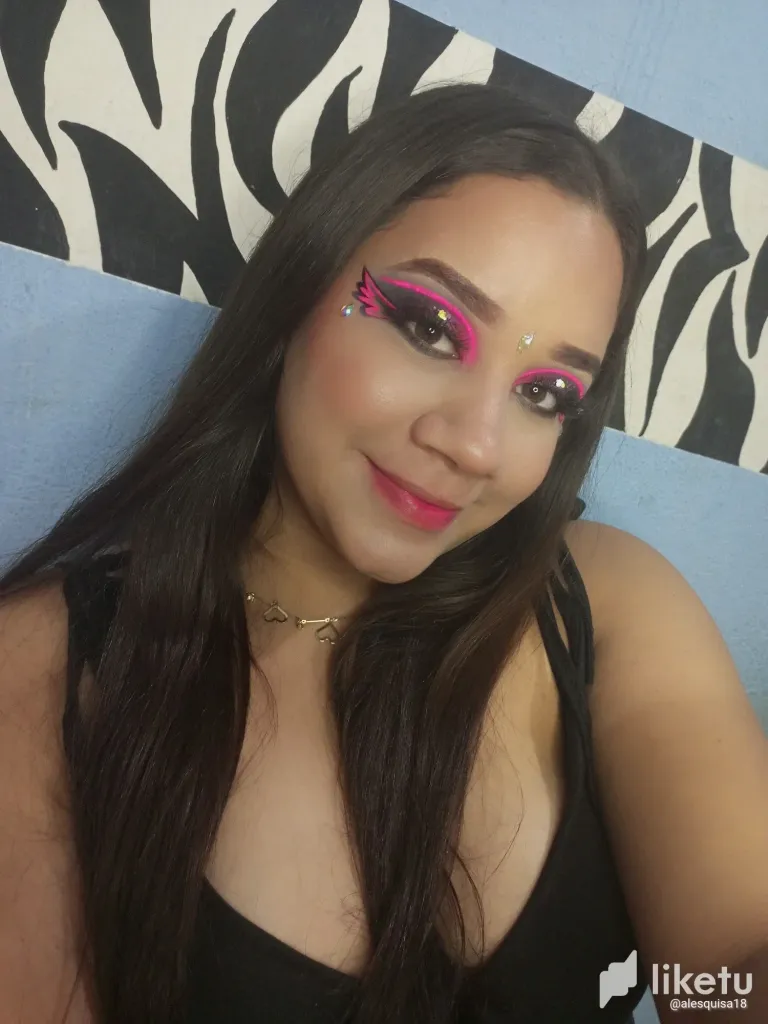

Holaaa, queridos amigos Hivers y gente talentosa de Makeup Power🥰. Ya me estaba perdiendo un poco y quizá lo haga más seguido ya que ando con los últimos preparativos para obtener mi primer título universitario👀. Pero a eso no vinimos, en la noche de hoy les traigo un tutorial de maquillaje bastante fácil usando un tono oscuro como lo es el color negro. Debo admitir que siento que ese color no me luce tan bien y es por eso que no lo agrego a los tutoriales que suelo hacer, pero el día de hoy fue la excepción. Espero disfruten el rápido paso a paso de este lindo look🤗. Comencemos!✨
Hello dear Hivers friends and talented Makeup Power🥰 people. I was already missing a bit and maybe I will do it more often since I'm going around with the last preparations to get my first college degree👀. But that's not what we're here for, tonight I'm bringing you a pretty easy makeup tutorial using a dark shade such as black. I must admit that I feel that color doesn't look that good on me and that's why I don't add it to the tutorials I usually do, but today was the exception. I hope you enjoy the quick step by step of this cute look🤗. Let's get started!✨
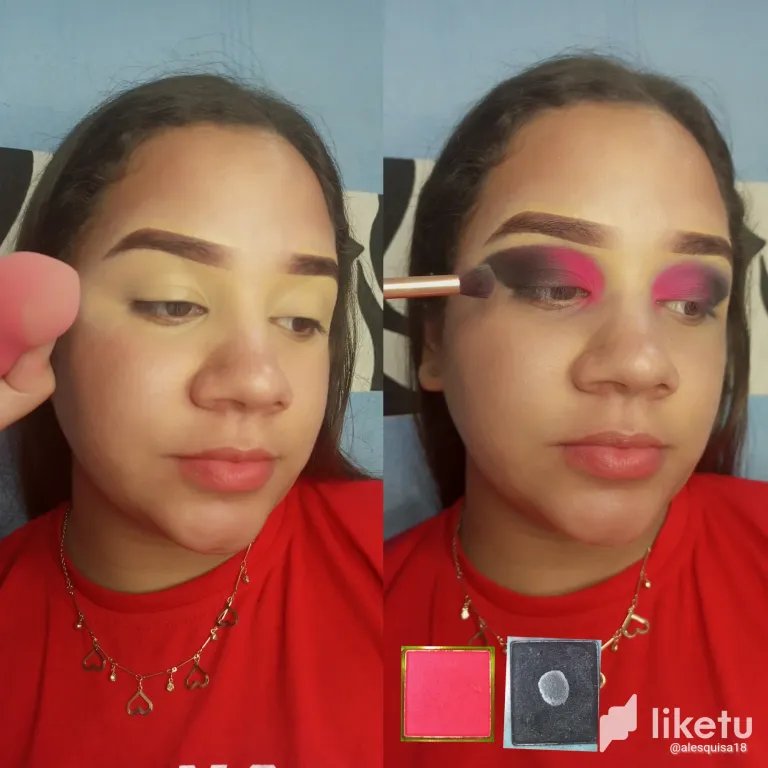
✨Paso 1 // Step 1✨
El primer paso más importante, aplicar corrector en todo el párpado y difuminar muy bien con ayuda de una beauty blender. Esto nos facilitará la pigmentación de las sombras que vayamos a usar. Después de esto, la primera sombra que me apliqué fue una color fuscia en el incio de mi párpado, luego, la fui difuminando con la sombra color negro hasta lograr una mezcla entre las dos. Las apliqué con ayuda de una brocha mediana para difuminar. Esto sin difuminar sus bordes aún.
The most important first step is to apply concealer all over the eyelid and blend very well with the help of a beauty blender. This will facilitate the pigmentation of the shadows we are going to use. After this, the first shadow I applied was a fuscia color on the beginning of my eyelid, then I blended it with the black shadow until I got a mix between the two. I applied them with the help of a medium sized blending brush. This without blending the edges yet.
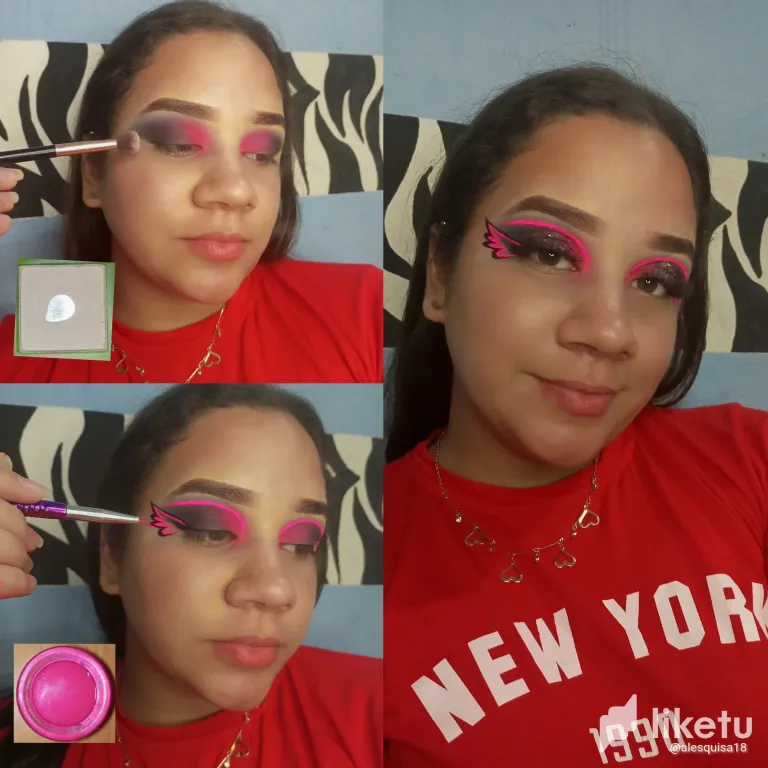
✨Paso 2 // Step 2✨
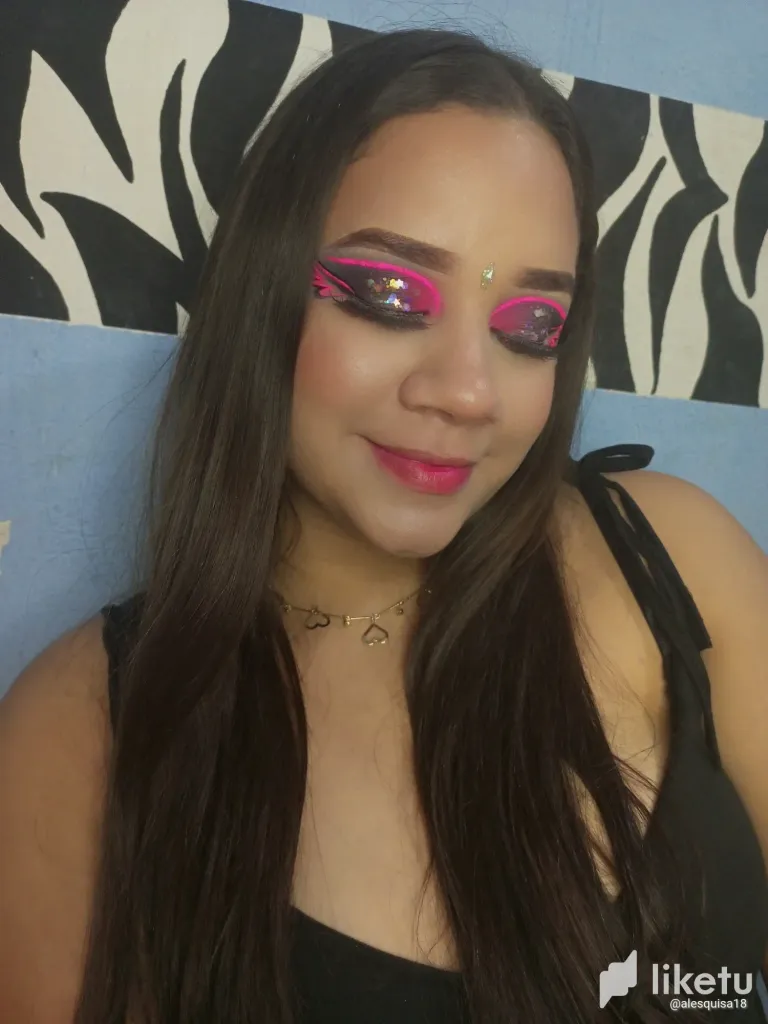
Con la misma brocha para difuminar y una sombra beige, difuminé los bordes de las dos sombras para crear un look de ojos más limpio, realmente sí hice un poco de desastre con la sombra negra, es por eso que no me llevo bien con ella😅. Luego, me realizado un pequeño delineado negro y la silueta de las alas del mismo color. Con un pincel punta fina y un delineador en crema color fuscia me realizo un trazo en todo mi párpado justo en el borde de las dos sombras, la negra y la fuscia. Con el mismo delineador en crema, marco la misma silueta de las alas como se aprecia en la imagen.
With the same blending brush and a beige shadow, I blurred the edges of the two shadows to create a cleaner eye look, I really did make a bit of a mess with the black shadow, that's why I don't get along with it😅. Next, I did a little black eyeliner and the silhouette of the wings in the same color. With a fine tip brush and a fuscia cream eyeliner I made a line all over my eyelid right on the edge of the two shadows, the black and the fuscia. With the same cream eyeliner, I mark the same silhouette of the wings as shown in the image.
✨Paso 3 // Step 3
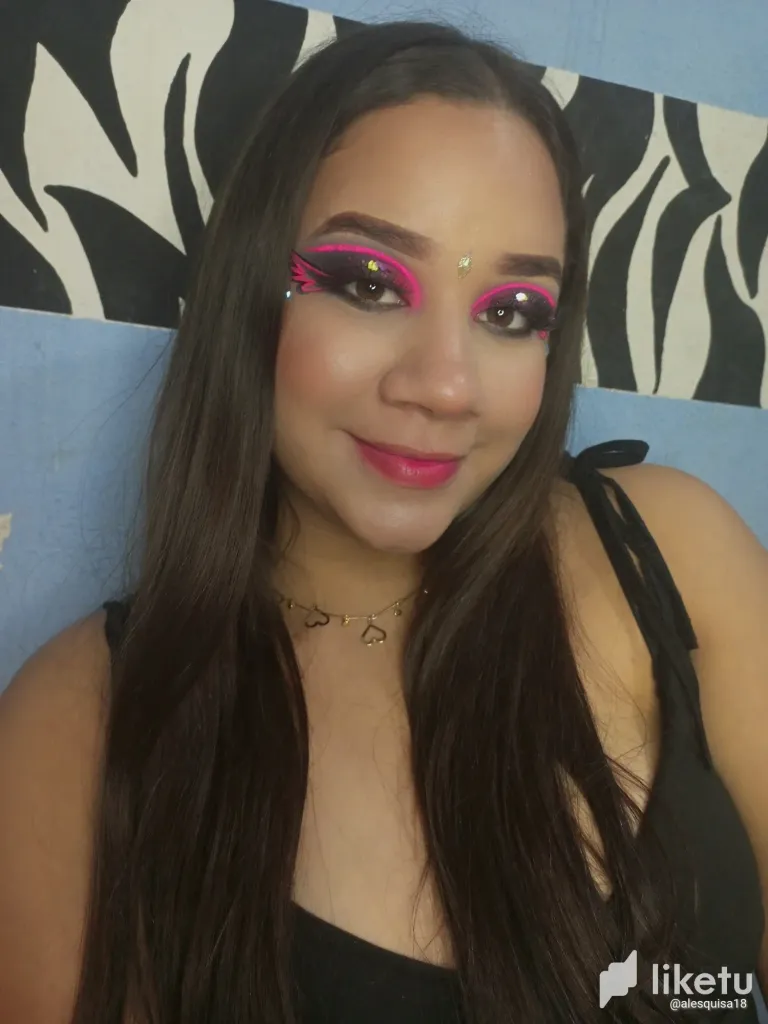
Al colocarme las pestañas postizas, que son el toque especial de cada maquillaje para convertirlo en un look más espectacular, me apliqué la sombra negra en mi párpado inferior. También me coloqué brillo en el medio de mi párpado y piedras decorativas tornasol en mis ojos y un tipo de gema entre mis cejas. En los labios sólo me apliqué tinta.
When I applied my false eyelashes, which are the special touch of every make-up to make it a more spectacular look, I applied the black shadow on my lower eyelid. I also applied glitter in the middle of my eyelid and decorative iridescent stones on my eyes and a kind of gem between my eyebrows. On my lips I only applied ink.
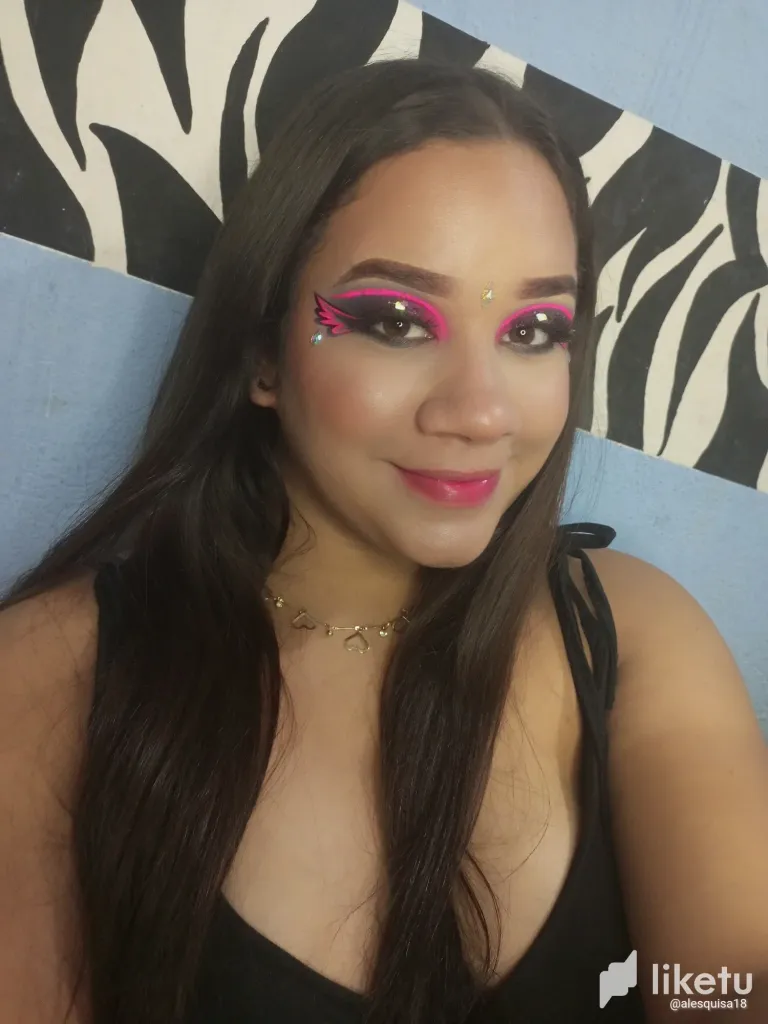
Y listo!, así de bonito queda el resultado final de este look. Espero les haya gustado, muchas gracias por ver siempre. Nos vemos en una próxima oportunidad amigos!🥰💗.
And that's it, that's how beautiful the final result of this look is. I hope you liked it, thank you so much for always watching. See you in a next time friends!🥰💗.
📍 El texto es completamente de mi autoría.
📍 The text is entirely by me.
🎙️ Traducción realizada con DeepL Traslate.
🎙️ Translation using DeepL Traslate.
📱 App's de edición: Canva y GridArt.
📱 App's edition: Canva and GridArt.
📸 Cámara: Tecno Pova 2.
📸 Camera: Tecno Pova 2.
✨ Las fotos tienen la iluminación de mi aro de luz led.
✨ The photos are the illumination of my led light ring.
📱 App's de edición: Canva y GridArt.
📱 App's edition: Canva and GridArt.
📸 Cámara: Tecno Pova 2.
📸 Camera: Tecno Pova 2.
✨ Las fotos tienen la iluminación de mi aro de luz led.
✨ The photos are the illumination of my led light ring.
📸 Cámara: Tecno Pova 2.
📸 Camera: Tecno Pova 2.
✨ Las fotos tienen la iluminación de mi aro de luz led.
✨ The photos are the illumination of my led light ring.
✨ Las fotos tienen la iluminación de mi aro de luz led.
✨ The photos are the illumination of my led light ring.
For the best experience view this post on Liketu
0
0
0.000
Que lindo quedó tu maquillaje amiga 😍, los colores están preciosos y el diseño de las alas está muy lindo, tienes mucho talento, sigue hermosa.🥰
Muchas gracias hermosa!, qué bueno que te haya gustado. Sí te animas puedes recrearlo🥰
!LOL
Posted using Hive Images
lolztoken.com
He needs me to get him out of jail.
Credit: vaipraonde
@alesquisa18, I sent you an $LOLZ on behalf of hivephoto
(9/10)